East Wind Meat Processing: Pork
by Rin, Jaime, and Taralynn
Introduction to the System
Goals:
- Total Use, Adaptability
This document describes the system I use at East Wind to process a single hog into its various components. This method has been optimized for harvesting nearly everything rom a pig and making it into the most practical array of products to keep E.W. in meat year round with minimal space and specialized equipment. All work can be done with a knife and a picnic table in winter. I beleive this information is relevant to anyone who has access to live hogs and wants pork.
This system works for any size pig from about 100 lbs up to 1000 lbs, although obviously those pigs involve different approaches and amounts of work. Each way, you end up with "one full set" of product: i.e. 1 head, one body, one stomach, one liver, one bladder, 1 blind bung casing, 1 diaphram, 1 spleen, 1 caul membrane, 1 mesentary, 1 heart, 2 lungs, 2 kidneysl and a bunch of casings (which are mostly intestines). This system is about recombining those parts to make the fullest use possible so as to honor the pig to the best of our ability.
To describe this method, I begin with two charts. One reflects processing large hogs at a rate of one per week. It includes making heavy cured, long-lasting products. The other reflects small pigs which can proceed as fast as 4 per week. (They will be slaughtered 2 at a time at different points in that week.) This chart focuses on lighter and fresher products. The rest of the manual walks through the chart, first, row by row (AKA day by day) Then column by column, which is to say, process by process. The second section contains most of the details. The first is overview.
Chart for Big Hogs
| Day / Main Objective | 1.stock | 2. Sausage | 3.casings | 4.Fat | 5.fresh roast | 6.Headcheese | 7.Light cure | 8. Heavy cure |
|---|---|---|---|---|---|---|---|---|
| Wednesday Kill | Separate Organs: Lungs, trachea, reproductive, etc. | Separate organs: the heart, kidney, diaphram, spleen, and liver | Strip, flush, and clean. Save caul. | Harvest fat from guts. | Split and chill carcass | Wash head. Split and salt. | Portion, wrap, and freeze meat from previous pig | Overhaul previous pig meat |
| Thursday Butcher | Start veggies. Head meat scrap | Select meats and fats. Trim and chop them | Change water and flush | Begin rendering soft fat once all collected | Cut roasts | cook head in stock. Remove when done. pick. | Cut meats rub in salt inject hams lay in cooler | Select meats. Apply salt weight calculate brines + time |
| Friday Trim | clean and filter add skins and feet | measure kits. Cook skin and rice. Chill. | Change water and flush | continue rendering | Trim the roasts wrap and freeze | Cook feet. Pick feet. | Apply cool brine to hams | |
| Saturday Grind | clean and filter add leftovers and leave lid up to reduce | Grind, mix, stuff | Flush and stuff with sausage | continue rendering | Grind + season meats. Sew stomach and stuff. poach in stock | Overhaul A.M. | Overhaul remove previous pig | |
| Sunday Misc | reduce | Smoke and pack | Pack in extra salt. | complete rendering between now and tuesday. Make cracklins. | odds and ends | smoke | Remove thing to dry last thing PM. | Smoke previous pig |
| Monday Packaging | reduce | pack | Pack | package | Smoke | |||
| Tuesday Packaging | pack | clean cooler | package | Smoke |
These charts outlines the steps you need to take to to completely butcher a pig. Each row is all of the things you need to do on a particular day. Each column is the process for making a specific product. They also demonstrate to a certain extent the differences in processing large and small pigs.
Chart for Small Pigs
| Day / Main Objective | 1.stock | 2. Sausage | 3.casings | 4.Fat | 5.fresh roast | 6.Headcheese | 7.Light cure |
|---|---|---|---|---|---|---|---|
| Wednesday Kill | Separate Organs: Lungs, trachea, reproductive, etc. | Strip, flush, and clean. Save caul. | Harvest fat from guts. | Split and chill carcasses | Wash and clean heads | ||
| Thursday | Start cooking organs | Begin trimming meat | Change water in casing tubs | Collect and salt | Butcher carcass. Freeze fresh meat | Cook and pick heads | Apply cure |
| Fri | Clean and cook skins | Finish trim and make sausage kits. | Change the water in casing tubs | Add to sausage. Render remains | Grind, season, stuff, and cook | Smoke pig from last week |
The following manual explains these steps. The manual is split into two parts. Part one follows the process day by day. It will explain different tasks and how they fit together. Sometimes it does not go into detail about a specific process. This is because that process will be explained in section 2. Section 2 deals with the columns of the chart, which is to say, the specific products we are making. This section goes into greater detail about the specific product.
| Day / Main Objective | 3.stock | 7. Sausage | 1.casings | 8.Fat | 4.fresh roast | 2.Headcheese | 5.Light cure | 6. Heavy cure |
|---|---|---|---|---|---|---|---|---|
| Wednesday Kill | Separate Organs: Lungs, trachea, reproductive, etc. | Separate organs: the heart, kidney, diaphragm, spleen, and liver | Strip, flush, and clean. Save caul. | Harvest fat from guts. | Split and chill carcass | Wash head. Split and salt. | Portion, wrap, and freeze meat from previous pig | Overhaul previous pig meat |
Day 1 Part 1: On the Slaughtering Pad
Preparation For Slaughter
On the day before the slaughter, gather materials. These materials include
- Paper
- Kindling
- 4 to 6 armloads of wood. Four armloads if the temperature is hot. Six armloads if it is freezing.
- Bell scrapers for scraping hide
- Sharpen all knives in the Ranch case
- Two Soup Pots: one medium-sized pot and one large sized pot
- Check that the propane tank has plenty of water
- Get 6 to 10 burlap sacks. 6 if it is a small pig, 10 if it is a big pig.
- 3 hoses that can reach the slaughter pad
- two small saucepans with handles to pour scalding water on the pig.
- 3 stainless steel hooks
- A rifle
- A tractor with a forklift
- 4 bullets
- Ranch Knives
Clean off the pad with a hose
Before lunchtime on the day before the slaughter, separate the pig. The process will be easier if the pig is starved for 24 hours. This will allow digesting food time to clear the intestines. Make sure everyone understands to give the pig plenty of water, but no food.
Make sure the hoses are long enough. Walk out the hoses so they don't freeze. Stretch the hose downhill so that all water drains out of it. If the temperature is going to remain above freezing, leave the hoses stretched out downhill ready for tomorrow. If it is going to be below freezing, coil the hoses up and put them away so they don't freeze or crack.
The Day Of The Slaughter
Early in the season, when it is warmer, wake up on the day of the slaughter as late as 5:00. Late in the season, when it is bitterly cold, wake up no later than 4:00.
First, go down to the slaughter pad and fill up the scalder with water. If it is very cold, leave the water running so the hose does not freeze. Turn on the propane and light the flame.
By the slaughter pad are two fire rings. Build fires in those two fire rings. This is for pre-heating extra water for the scalder.
Lay two fence posts over the fire rings so that you can put a pot of water over each fire. For safety, Fill the pots of water no more than 3/4 of the way full. The fires in the fire rings also serve to give workers a place to warm up.
(Jaime's hint: At this point, go get breakfast. If you do not get breakfast, around 10 you will become irritable, angry, and a jerk to the other slaughterers. )
30 minutes later, come back and check the fires and the scalder. The waters should be just under a boil. If you let the hose run, check to see that it hasn't frozen. If it is a warm day, shut off the water and walk the hoses.
Slaughtering the Pig
Pigs are stunned with a gun. The shot should happen 10-20 minutes after sunrise. Before you go down to slaughter the pig, choose the shooter and the sticker. A shooter shoots the pig. The sticker is the person who will slit one of the pig's arteries after the shot.
Bring with you
- 2 stainless steel hooks
- 2 people for a small pig, 3 people for a large pig
- On your way down, grab another armload of wood for the fires
- For a big pig, take the 30:30 rifle. For a small pig, use the 22
When taking the shot, have the sticker and assistant stand behind you. There should be no more than 3 people at the slaughter. This helps keep the pig calm.
For a big pig, aim the 30:30 behind the ear and towards the eye on the other side of the head. Make sure that no people, buildings, or other animals are behind the shot. Shoot the animal.
It is important to make the pig unconscious as quickly as possible to prevent suffering. This is done by shooting the pig in the head with a at close range. Done correctly, this damages the brain enough that the pig will not regain consciousness. If the shot goes wrong, have the sticker backup further. The shooter needs to keep calm, be careful that no people, animals, and buildings are behind the shot, and shoot the pig a second time. It is very important to take the time to get it right.
At this point, the pig is not dead, merely stunned. What will kill the pig is exanguination. There are two methods of slitting a pig's throat: transverse and thoractic. Both will bleed out the pig so that it will die.
Use the two stainless steel hooks to hang the pig from the tractor. Hook the pig behind the achilles tendon. This tendon is very strong and can take the weight of a several-hundred-pound animal. Hang the pig from the tines of the tractor's forks and transport it to the slaughtering pad.
Lay the pig down on the pad.
Dip burlap sacks in boiling water and lay a double layer over the pig. Pour 3 pots of scalding water over every part of the pig. This loosens the hair so that it is easy to scrape off.
Replace the water in the scalder with the water in the two water pots. Refill the pots 3/4 of the way.
Let the pig sit 10 minutes after being scalded. Check the hair. Gently pull at at a clump. If it's not coming off easy, pour two more waters over it.
Remove the burlap. Start scraping the hair off the pig. If it doesn't come off easy, pour more hot water.
Scrape all parts of the pig until it is naked. Pay especial attention to the head, feet, and tail.
Turn the pig over and repeat the entire scalding process.
Cut off the pig's head. Loosen the trachea so that it will be easy to pull out later. Put a stainless steel hook under the pig's chin so you can hang it from the tractor later. Set it aside for now. [Take lots of pictures] Eviscerate the pig according to the book.
Leave the organs for Foopin to sort. Take the pig's body to foopin. Now it is time to quarter the pig. Take a cleaver. If the pig is a big pig, cleave the body along one side of the spine. If the pig is a little pig, split the spine and sternum in two.
If the pig is small enough to fit in the cooler, go ahead and hang the pig halves in the cooler. If you are butchering a larger pig, count up 6 ribs from the bottom of the rib cage. Quarter the hog at the 6th rib.
Take each quarter (or half) and hang them in the meat refrigerator from stainless steel hooks.
Next few paragraphs need combining.
While one person attends casings and guts, others must attend the carcass. The head may be cut off to deal with separately. I advise to cut the throad further back than you might think to get more of the jowl.
Splitting the pig carcass into halves may proceed with a saw, hatchet, or cleaver. If one of the two latter options a mallet is an indespensible accessory. With an edged implement, remove one tenderlon and cut just off center to the side of the spine. Ribs are jointed there. With a saw, try to stay centered on the spine, thince the saw will tear valuable loin meat- something to be careful of either way.
If the pig is very large remove the shoulder primal by cutting between ribs 6 and 7. The 1st rib is small, so count carefully. The normal American Primal is between ribs 3 and 4 - cutting directly through the shoulder blade (aka the scapula). At East Wind we cut between 6 and 7 to avoid the shoulder blade bone, but leave the loin muscle mostly intact. Cutting at the end of the rib cage would sever the loin in half, and cut apart the bacon, which is fine if you don't mind.
Once the pig is halved and quartered, chill the pig in a cooler. If a cooler is not available, chill it in a shady spot. Slaughters should happen in winter during cool weather for this reason.
Sorting Guts
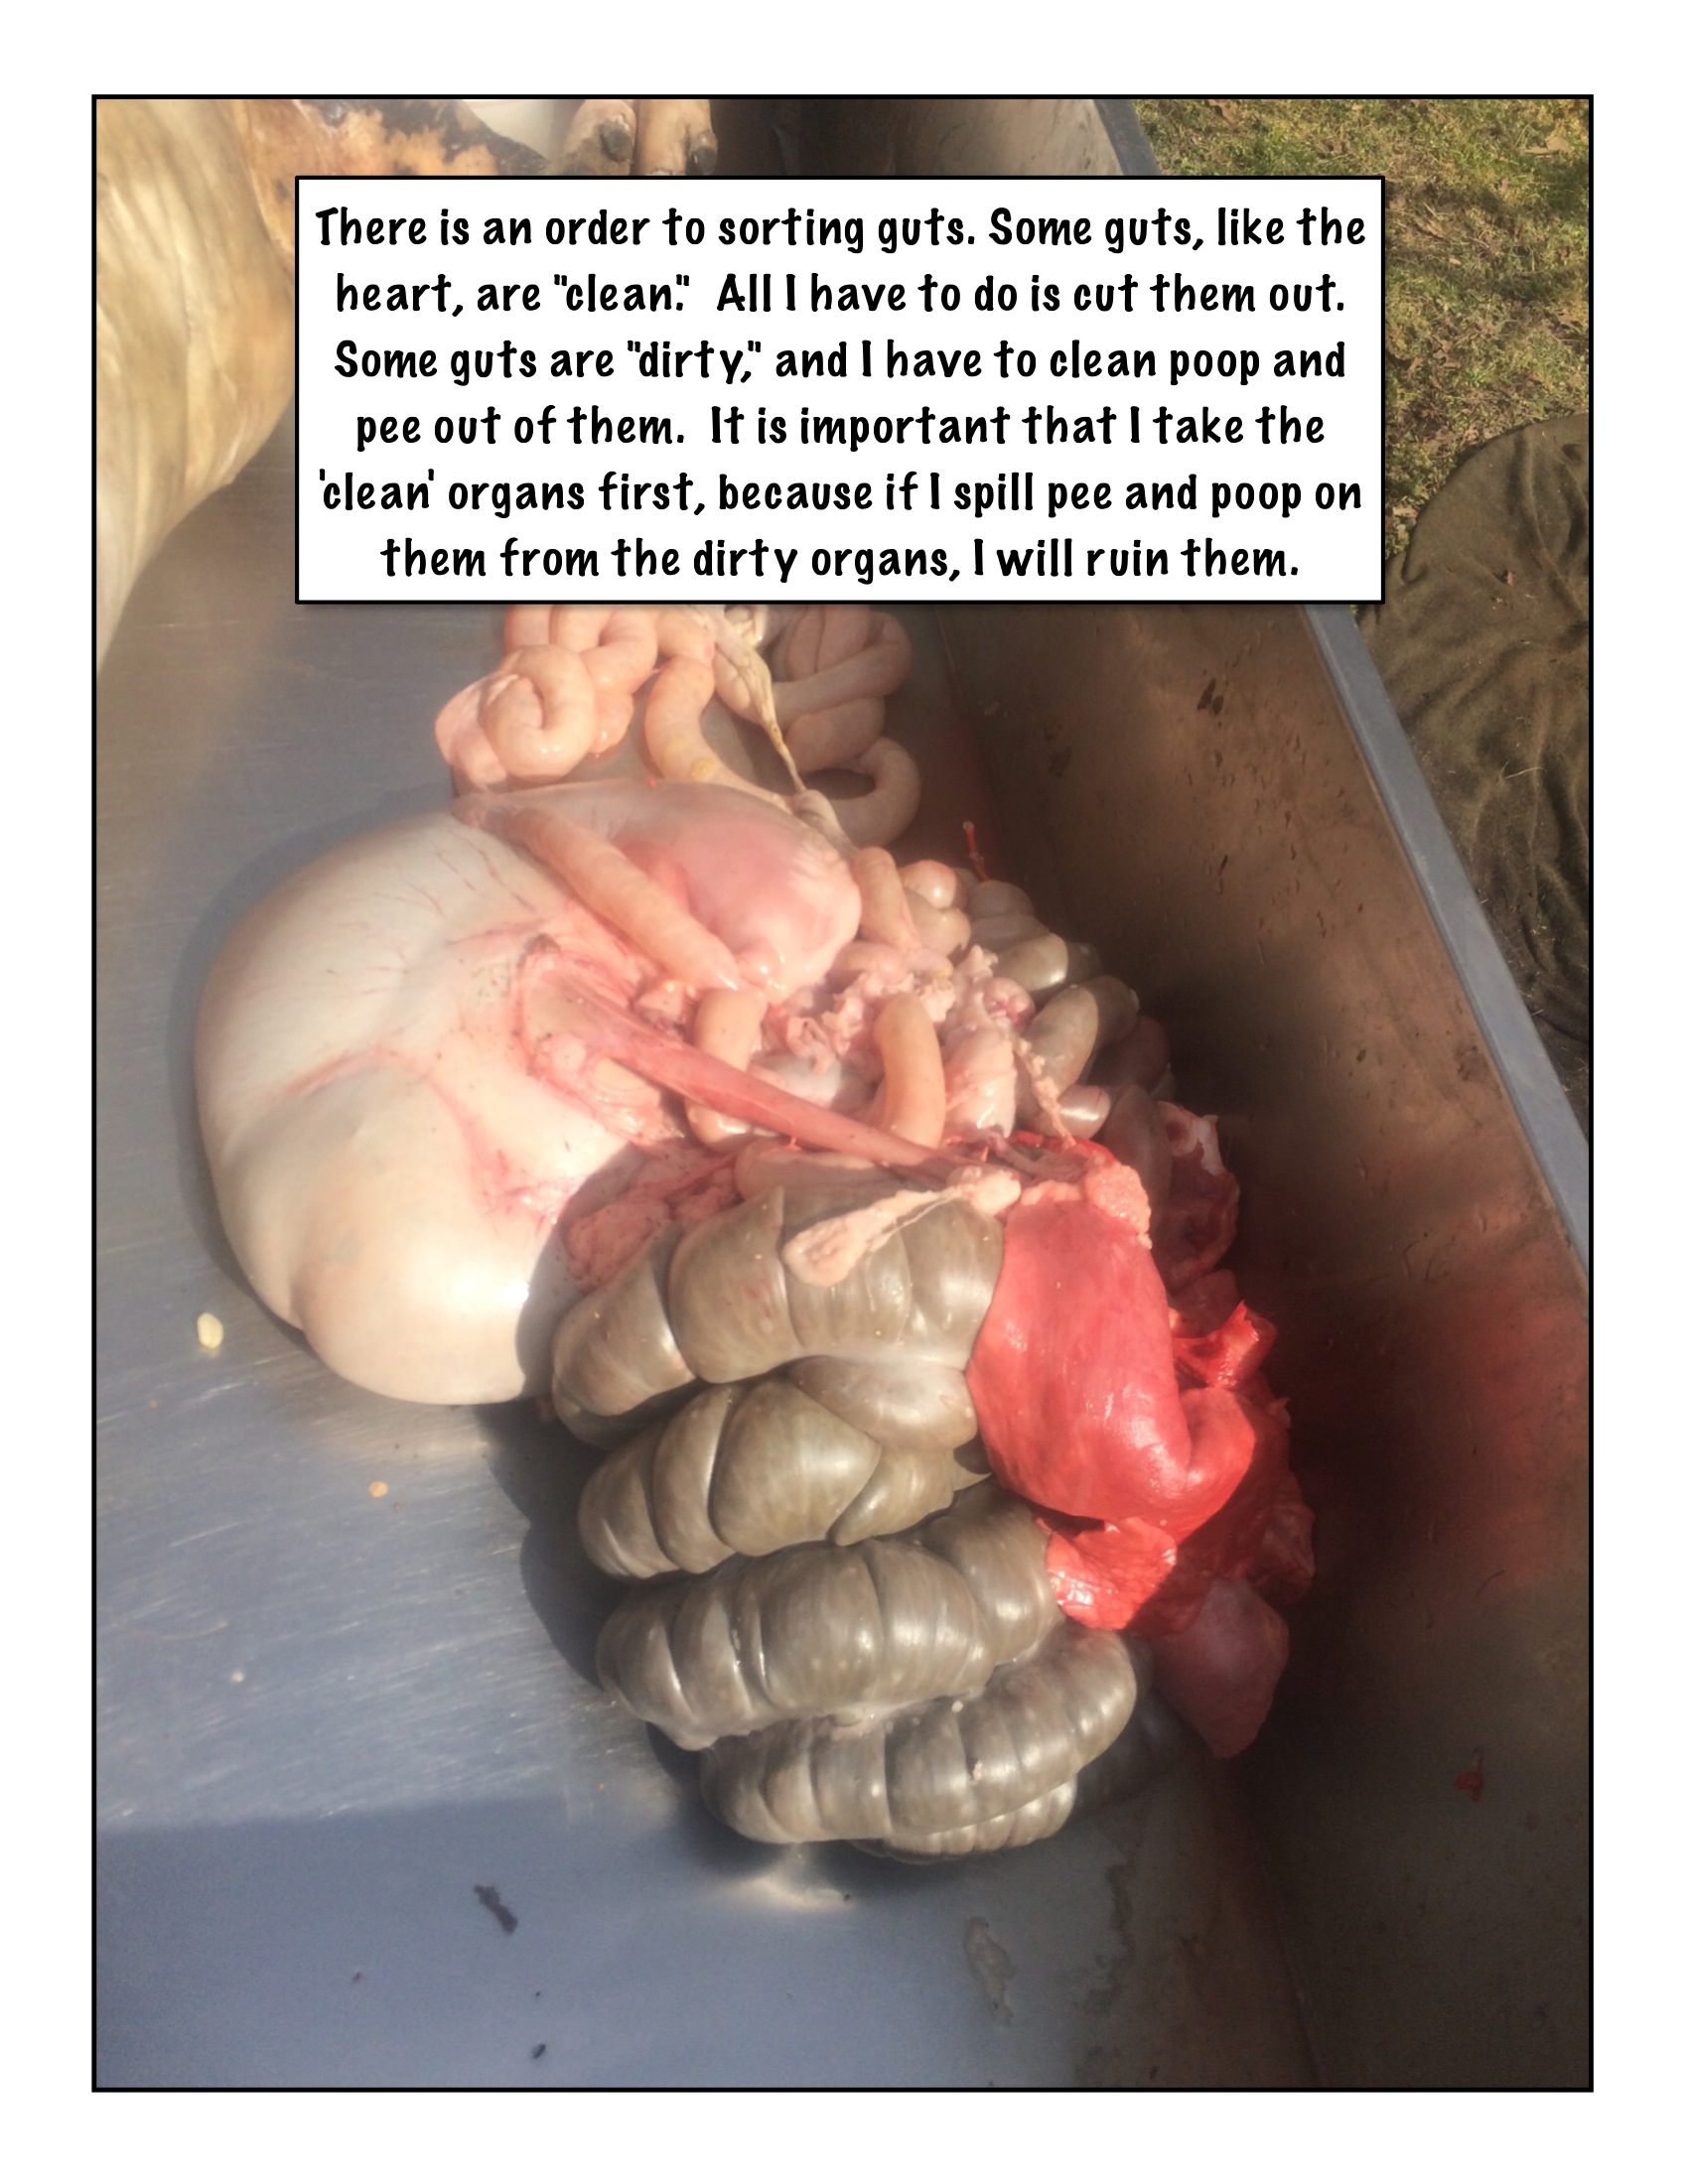
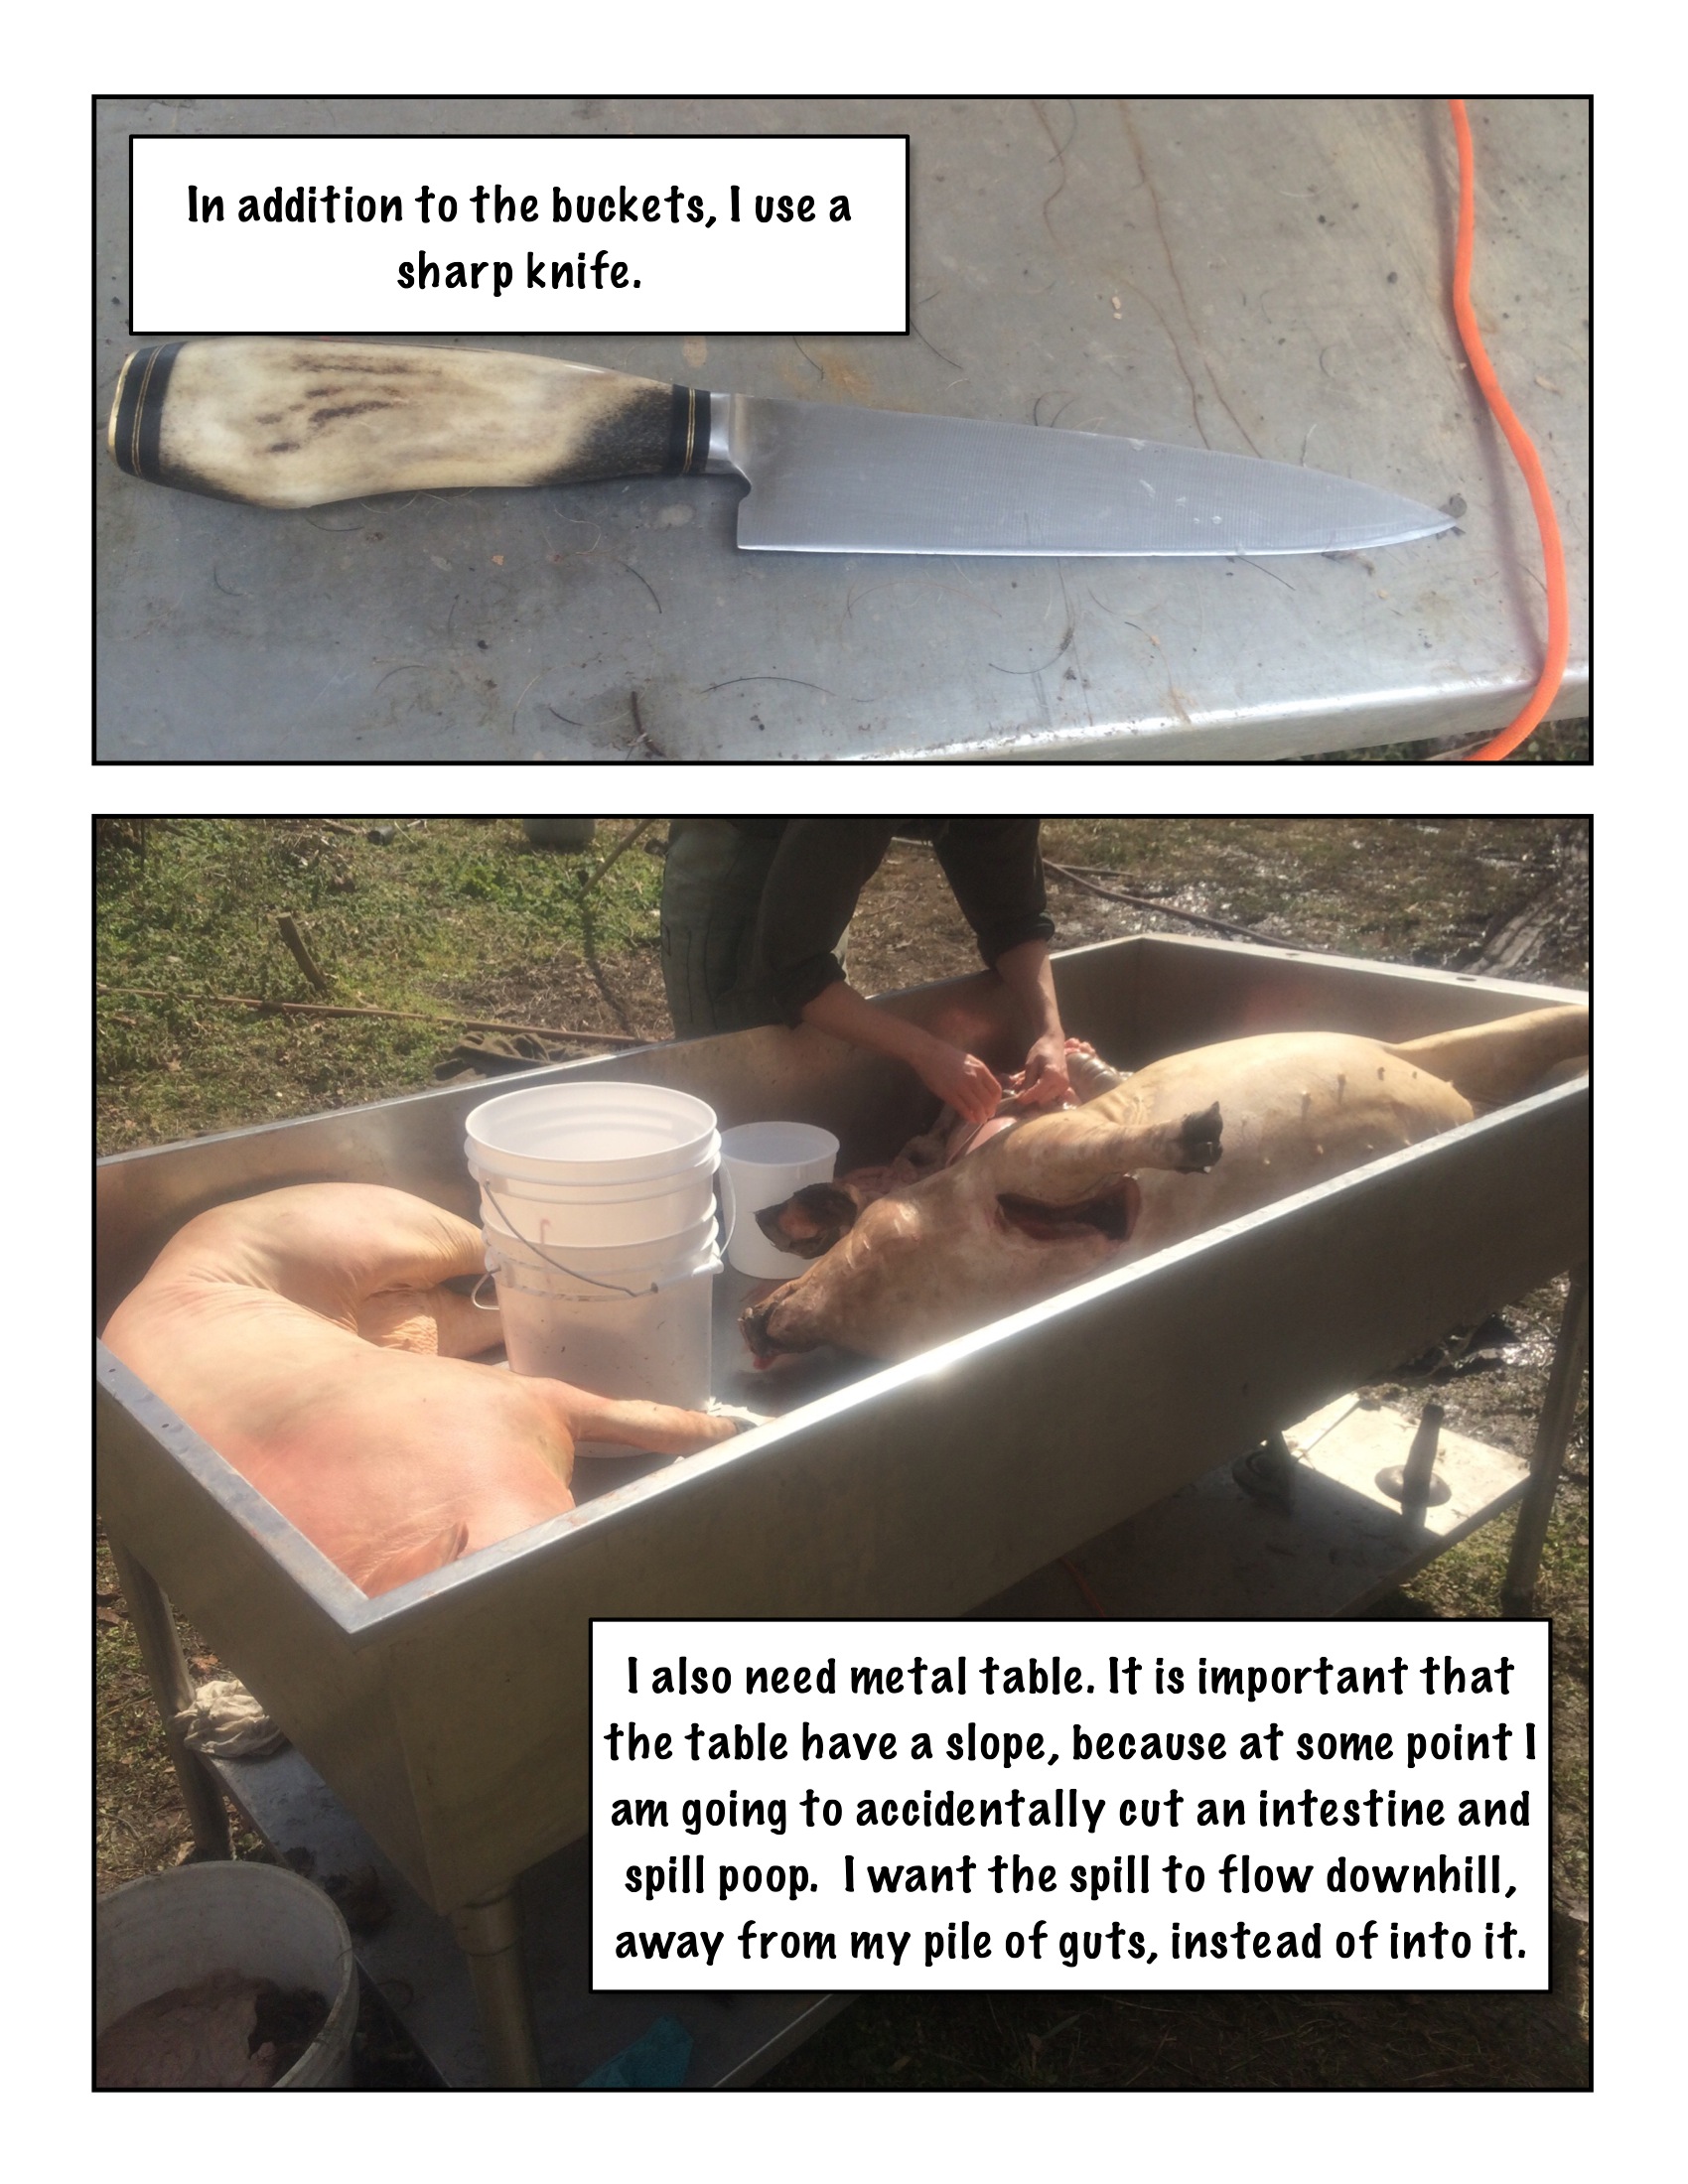


At this point, you will have a heaping pile or organs. These organs should be on a clean surface.
Now it is time to separate the organs by thier purposes.
Orient the guts with the 'mout end' (windpipe, esophagus) at the "top" and the other end (colon) at the bottom.
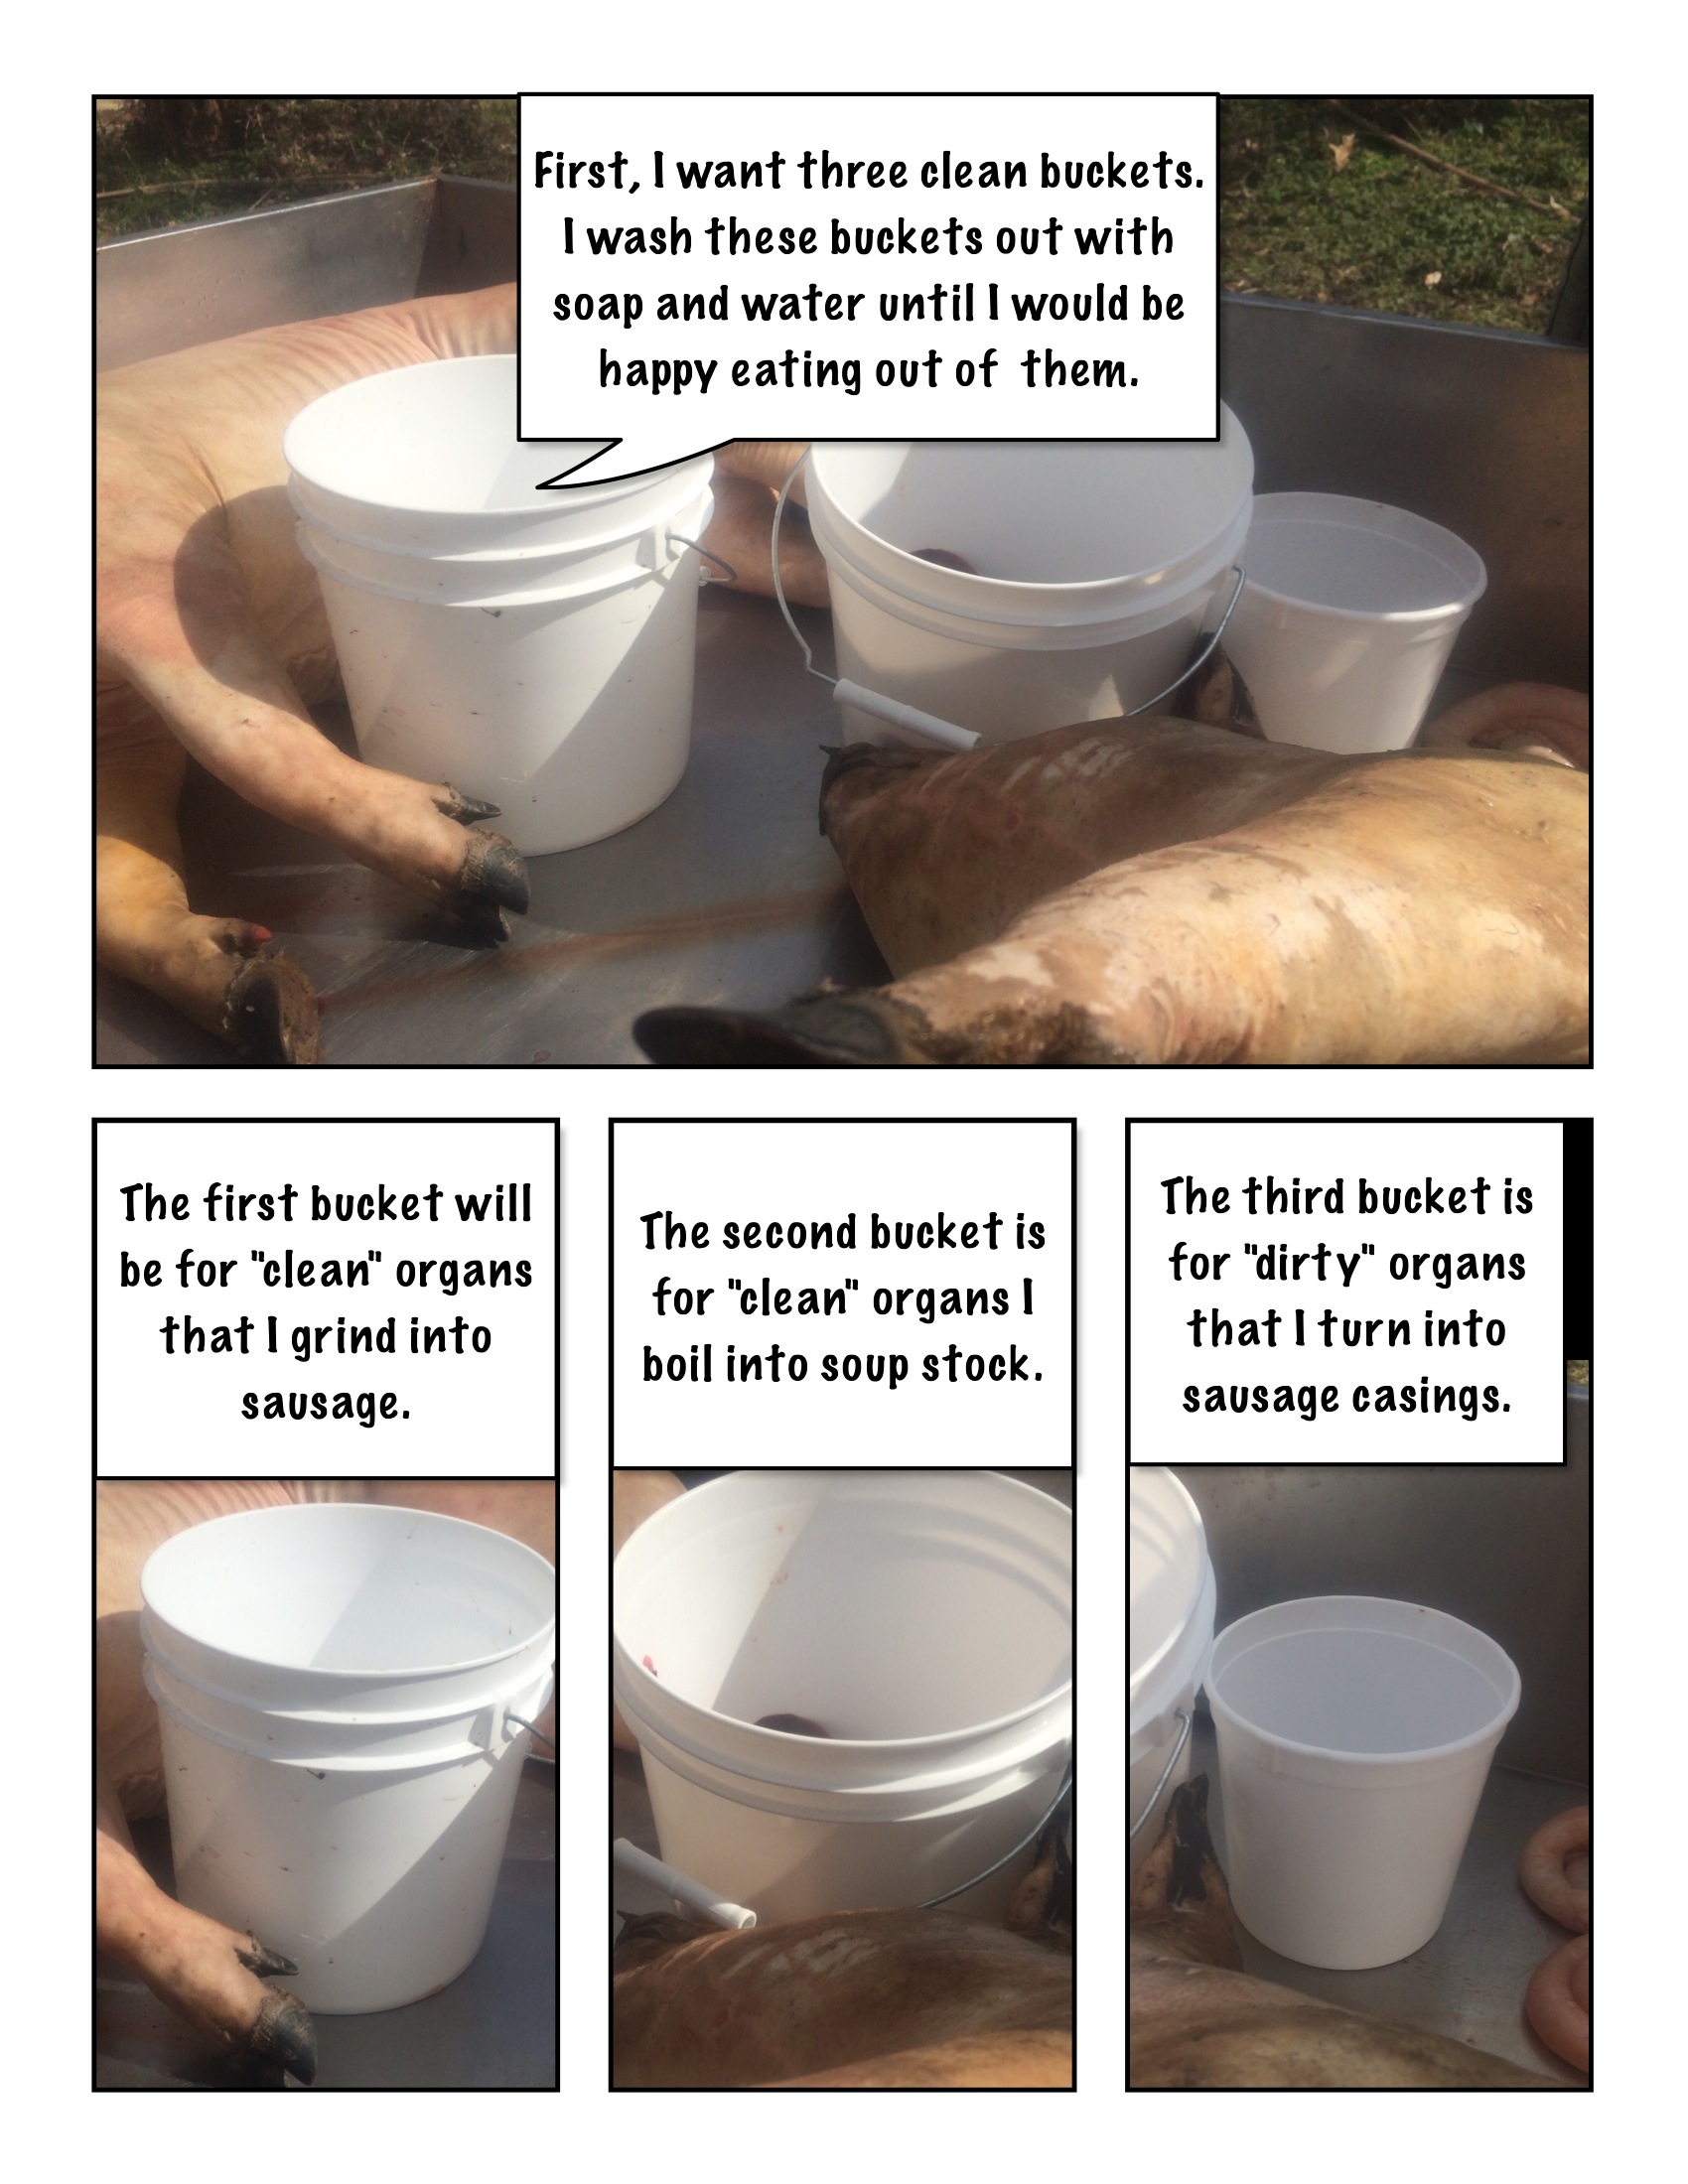
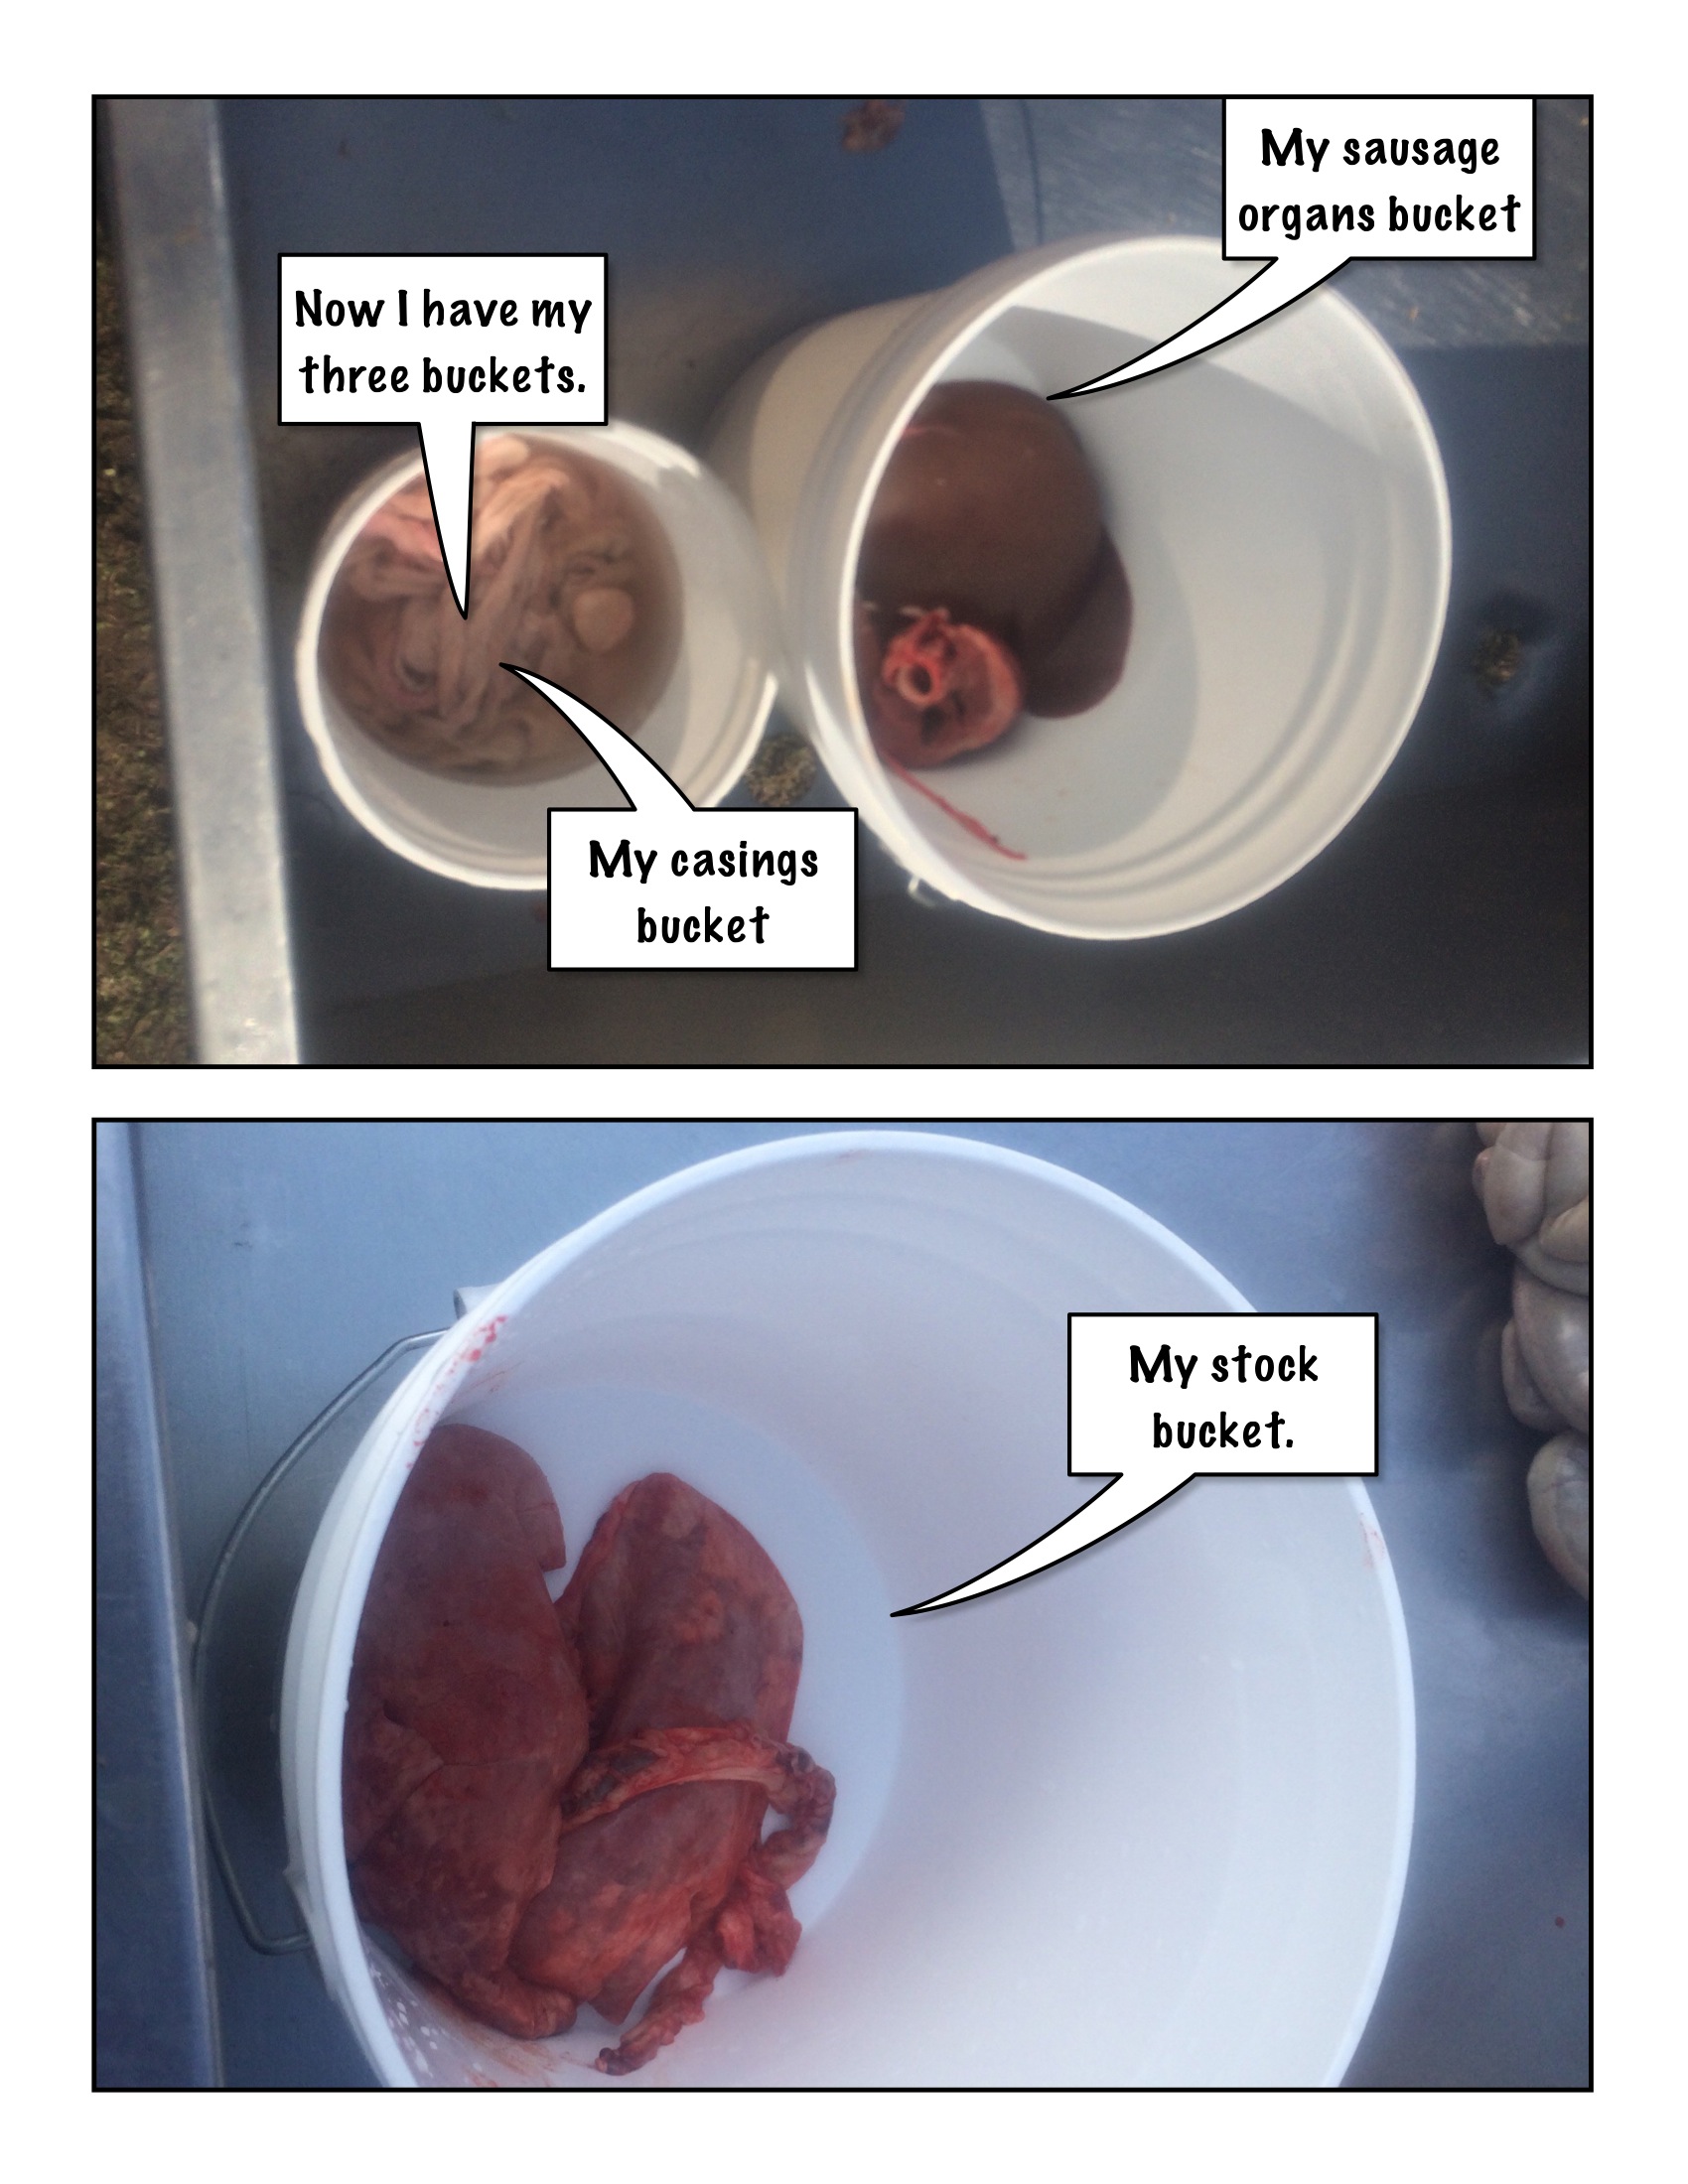
Generally try to pull out the edible organs first so they do not get contaminated with digestive contents. We will start with the "stock organs."
1.1 Organs For Stock
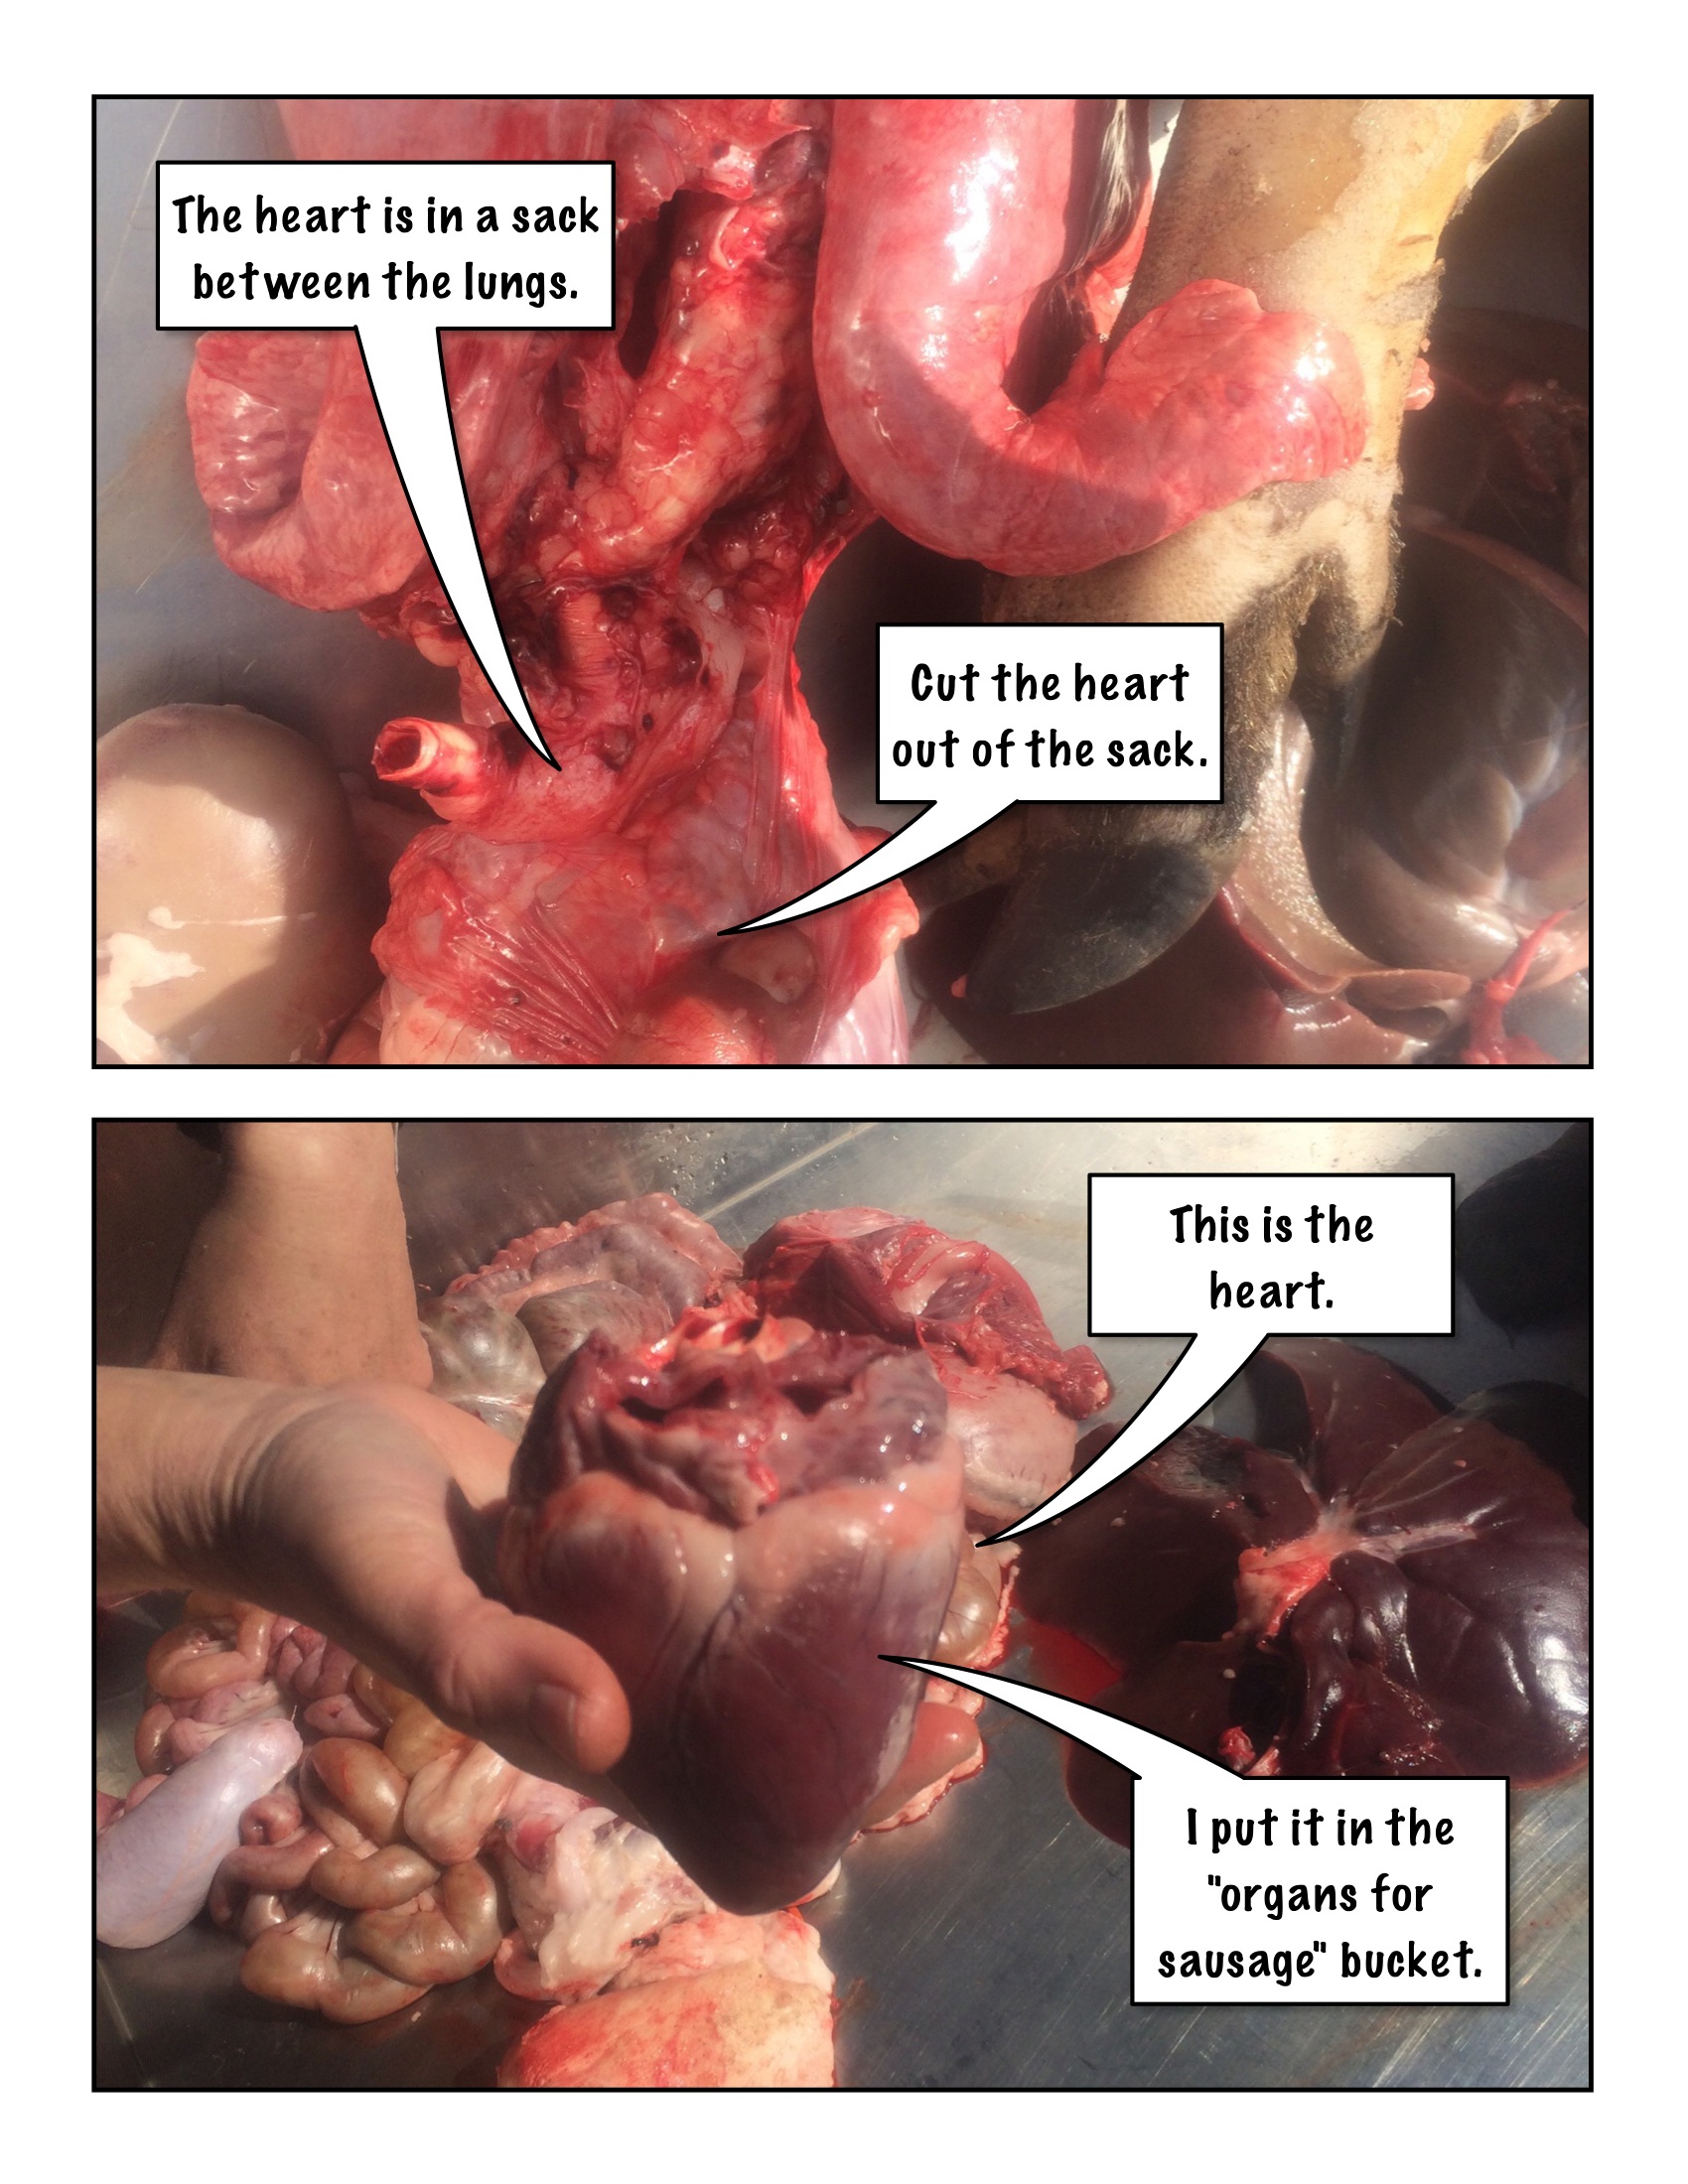
Stock organs include the traechea, the lungs, the pericardium (the sack the heart is in), the lungs, the reproductive organs, and the pancreas
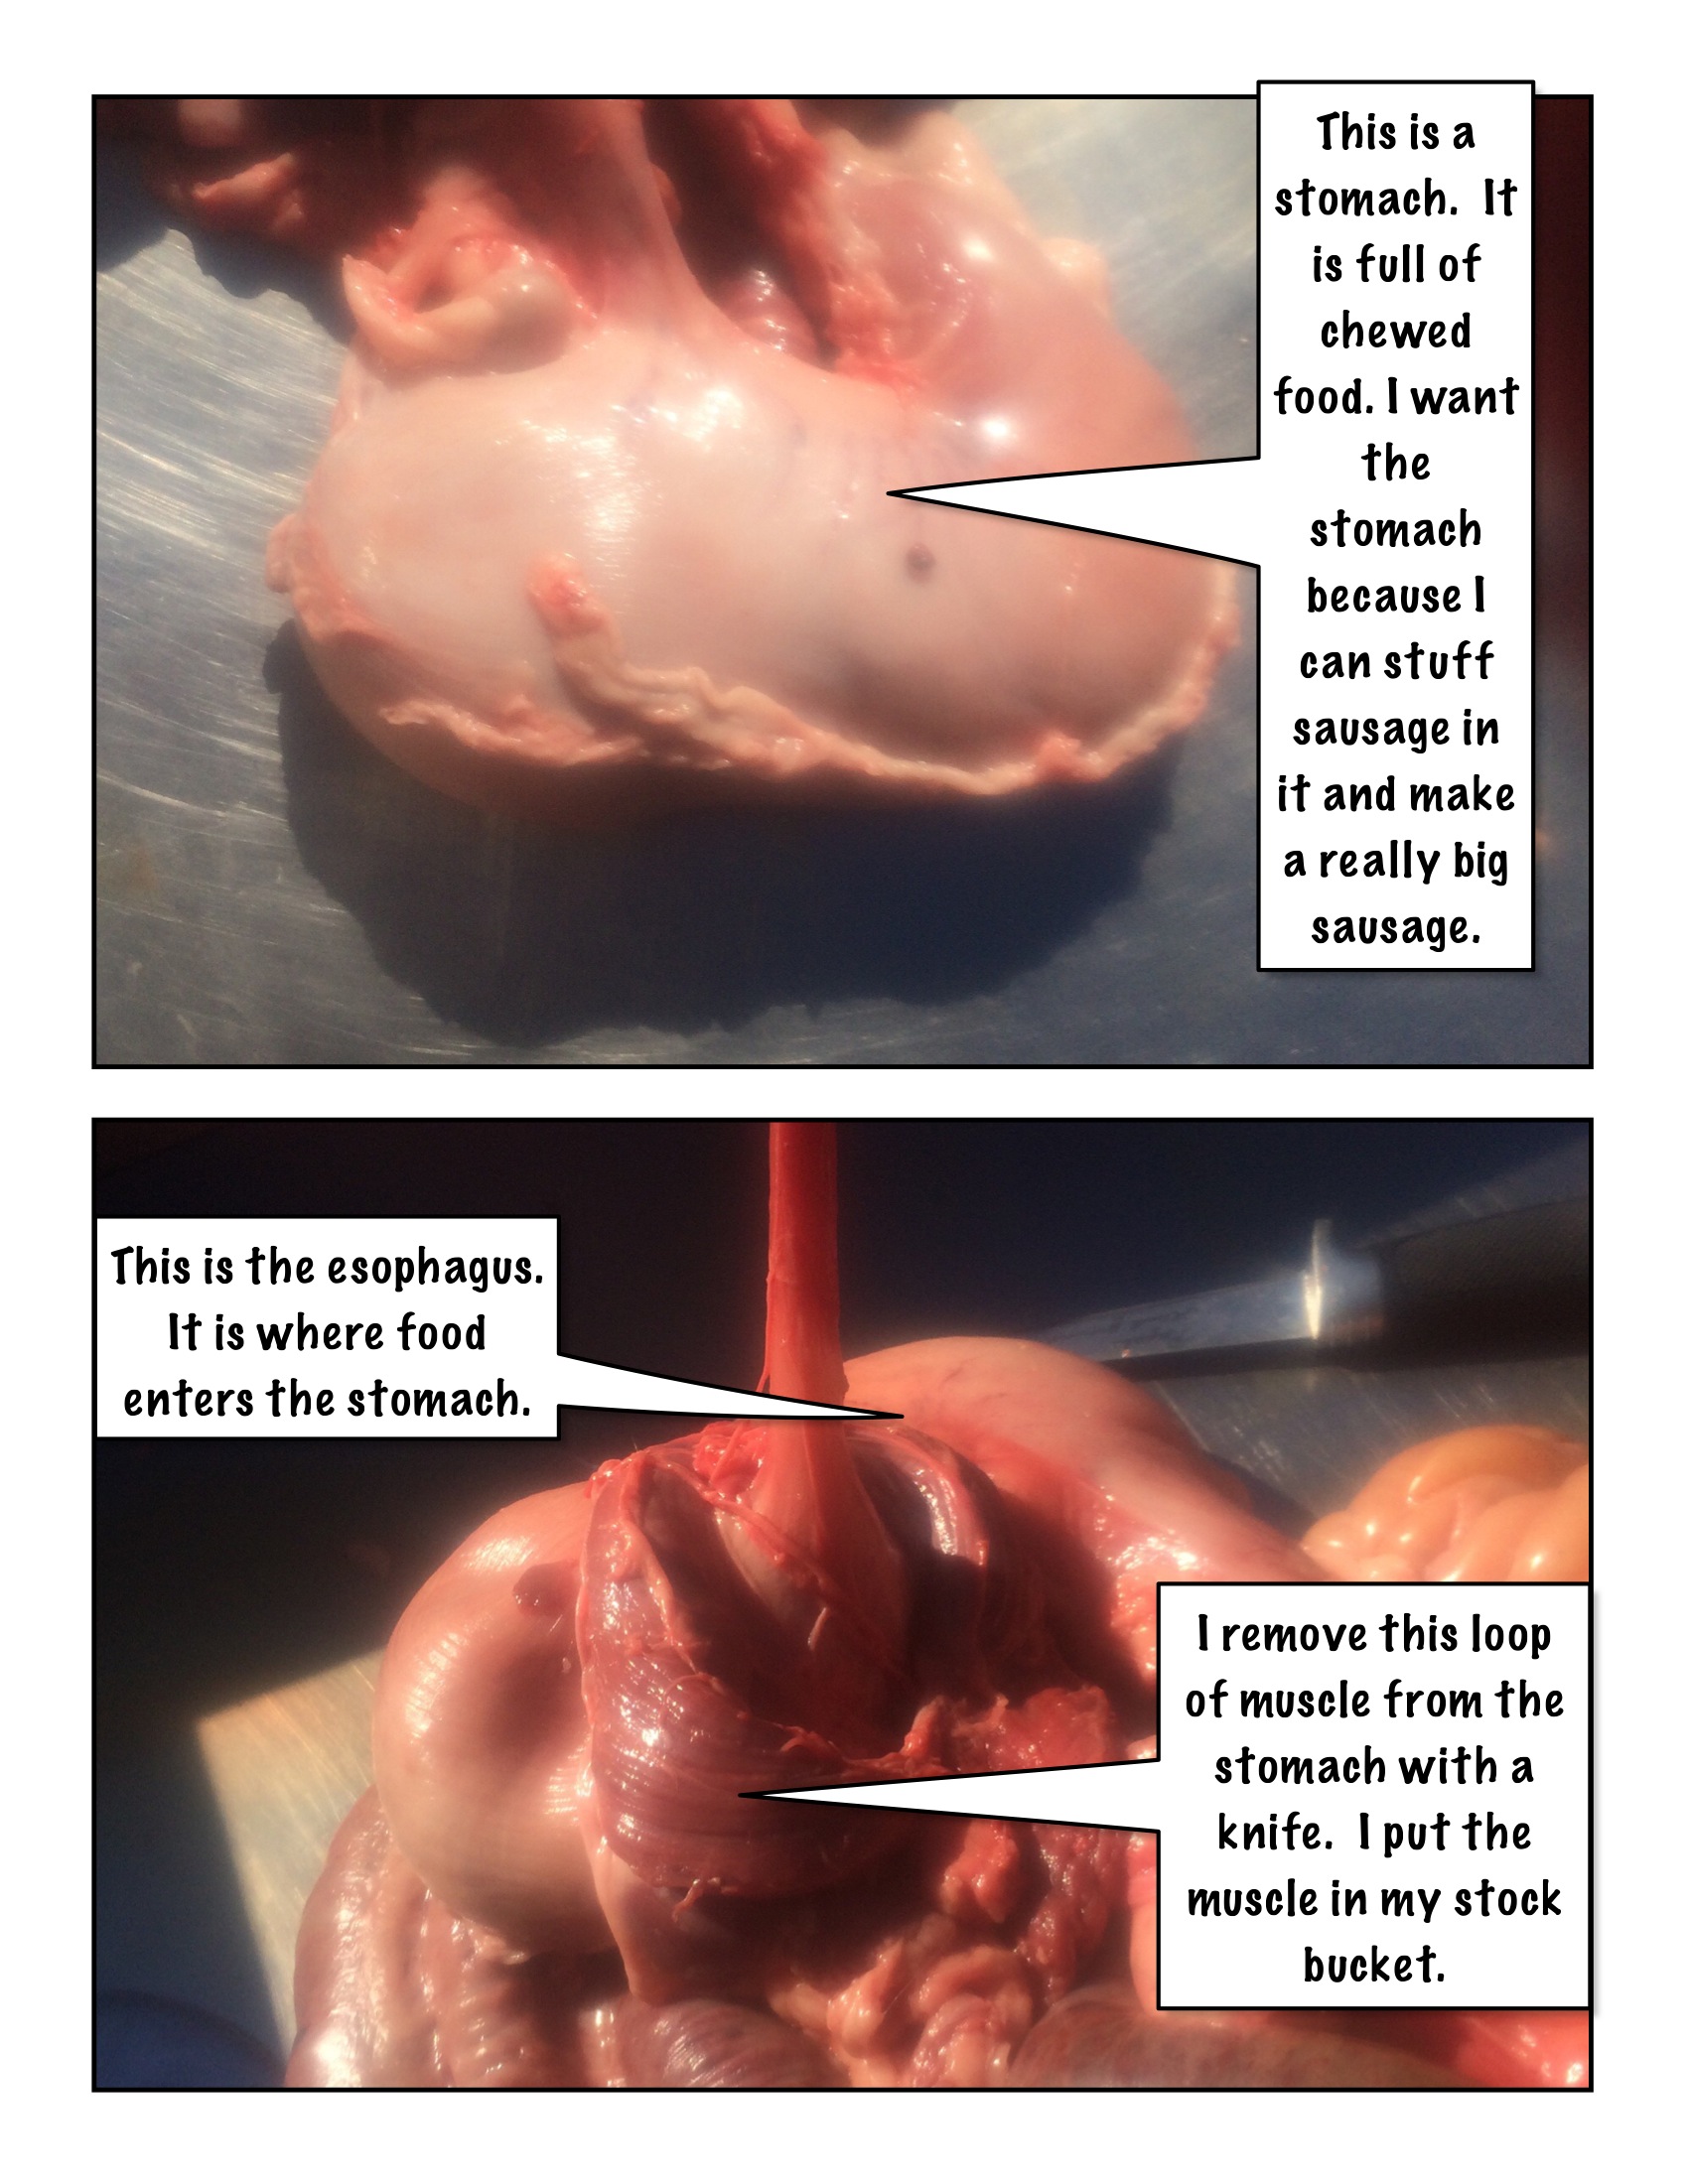
At the top of the guts, you will find the traechea or windpipe and waesend or esophagus. The windpipe leads to the lungs and the heart in it's sac. That sac is called the pericardium. Cut the heart from the sack and set it aside. It will be used for sausage. Put the pericardium, and lungs/windpipe in the stock bucket. Leave the esophagus, a meaty tube that leads to the stomach, in one piece.
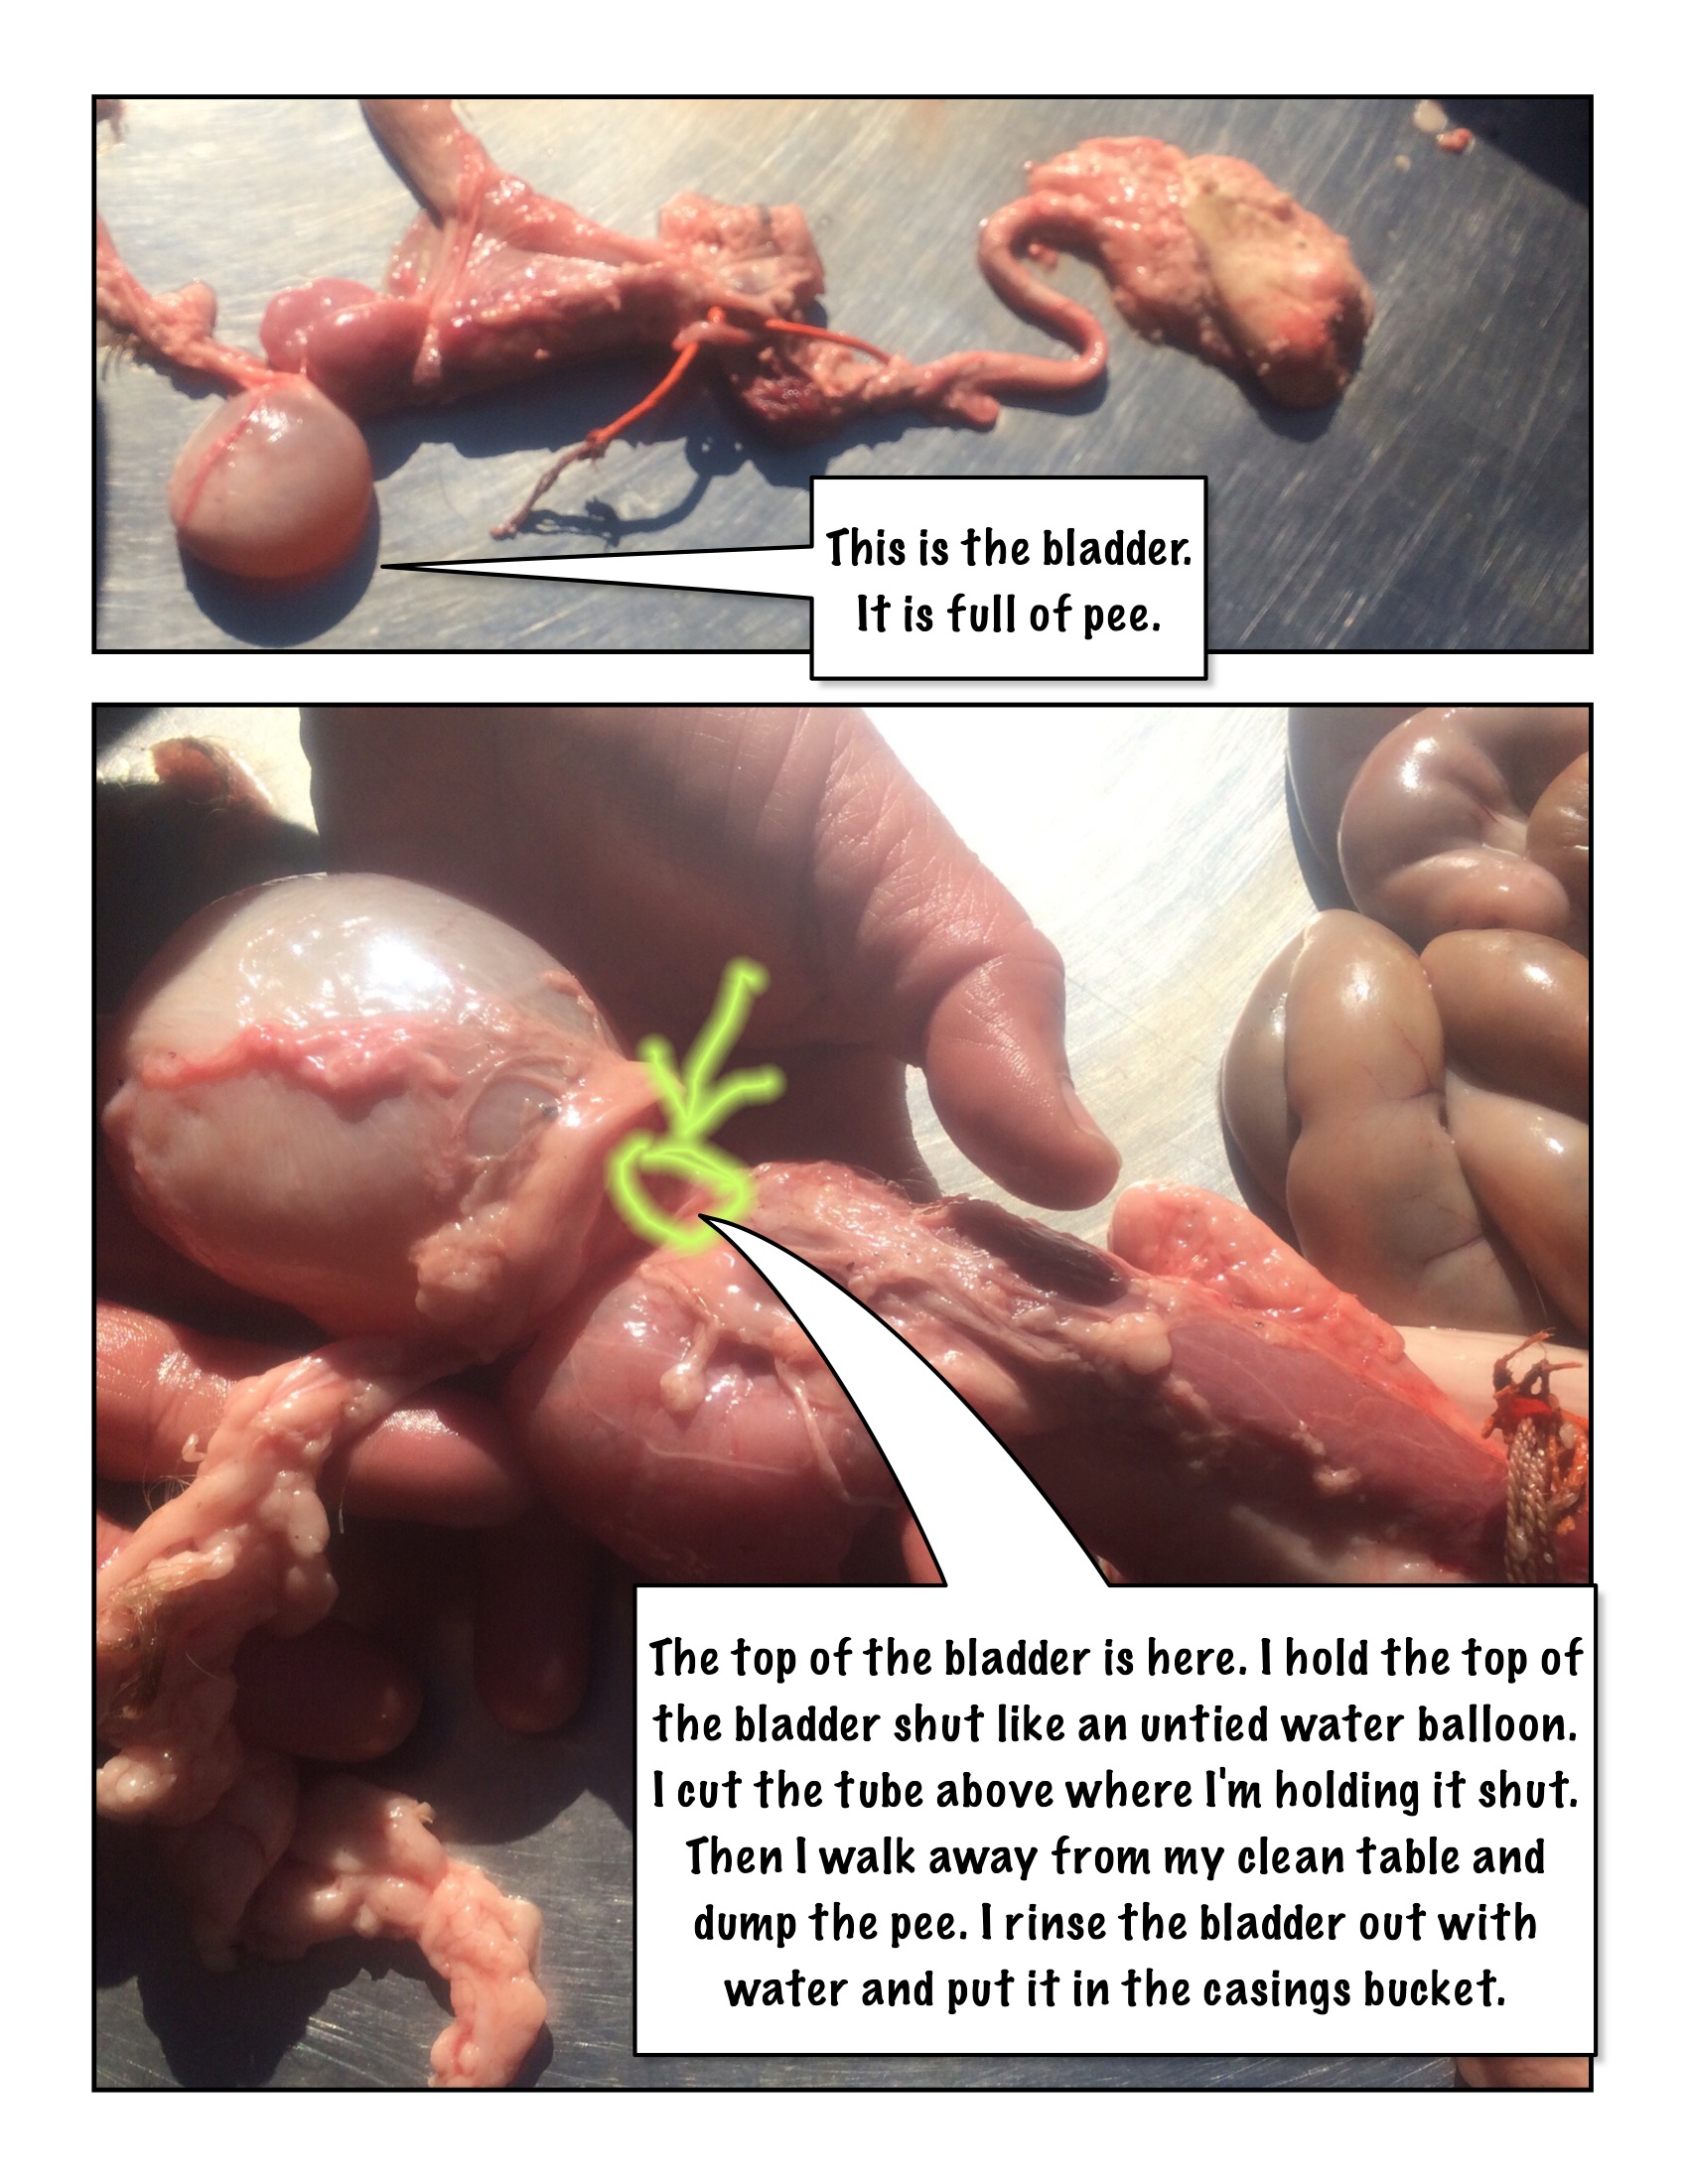
Reproductive organds are at the 'bottom' of the guts. Female reproductive organs look like intestines to to the untrained eye. Male reproductive organs include the penis. [show pictures.] When you have retrieved them, put them in the stock bucket.
The pancreas is embedded near where the intestines leave the stomach and is easiest to remove when seperating casings.
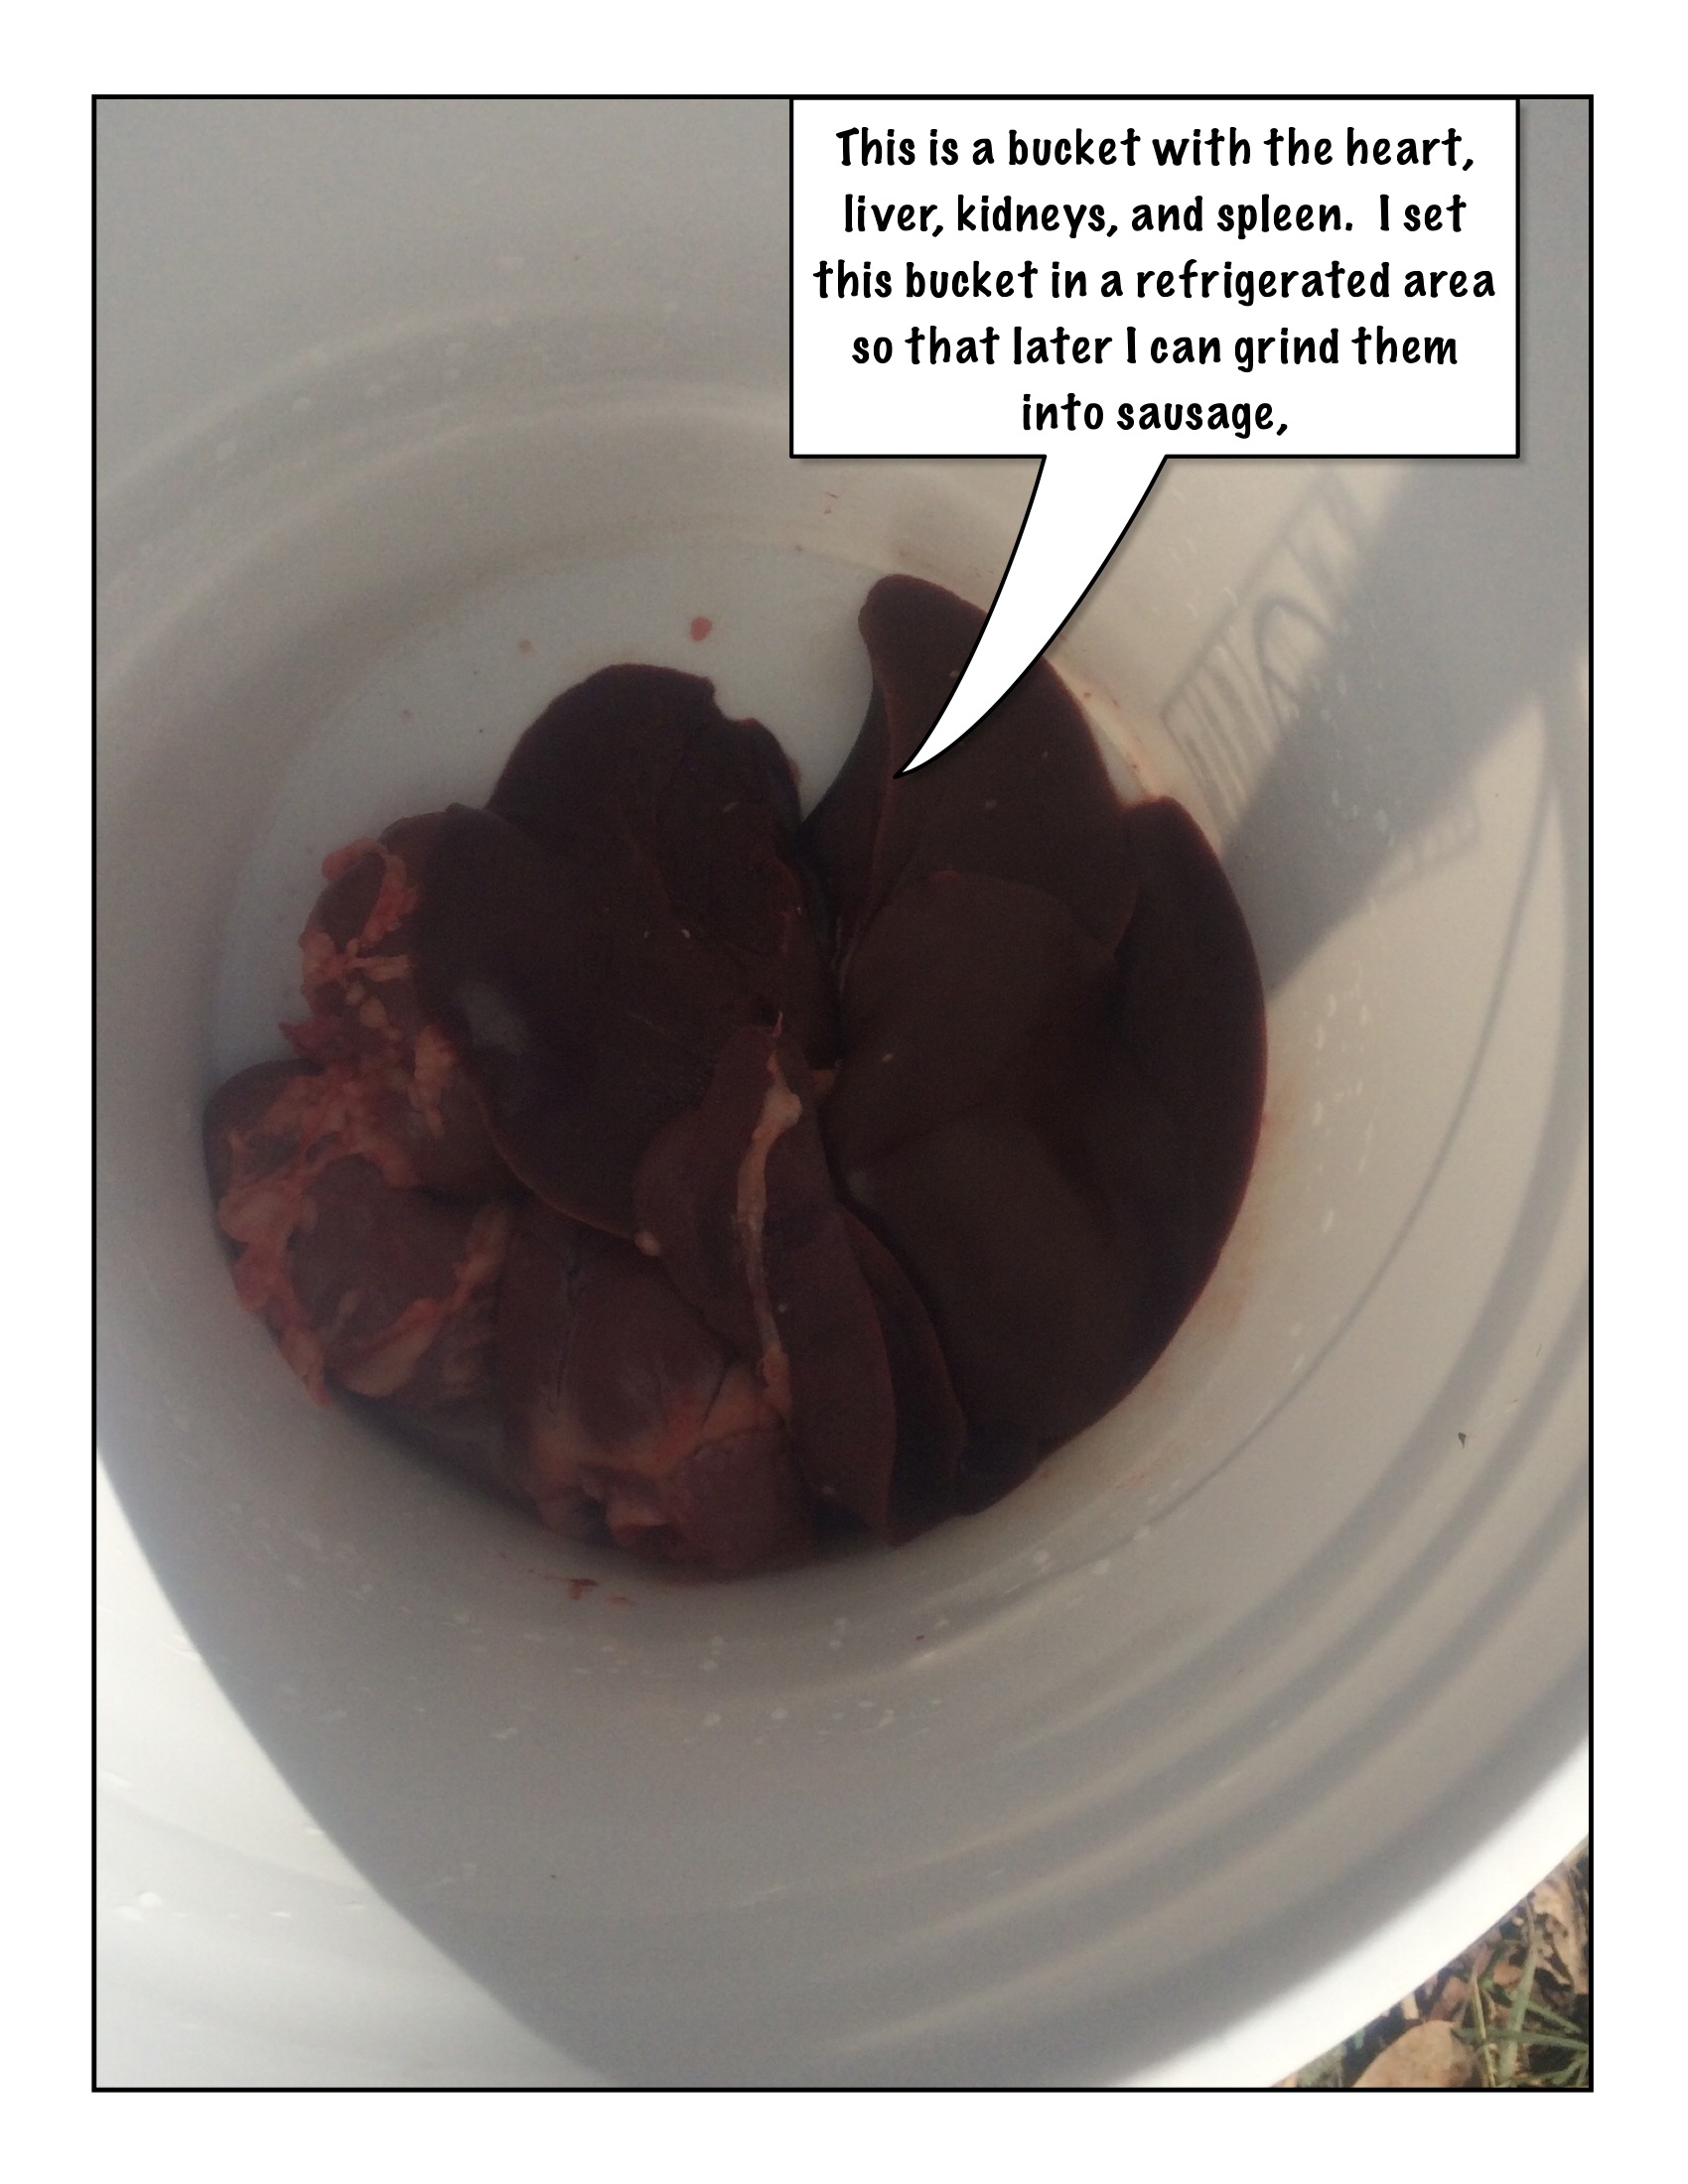
1.2 Organs for Sausage
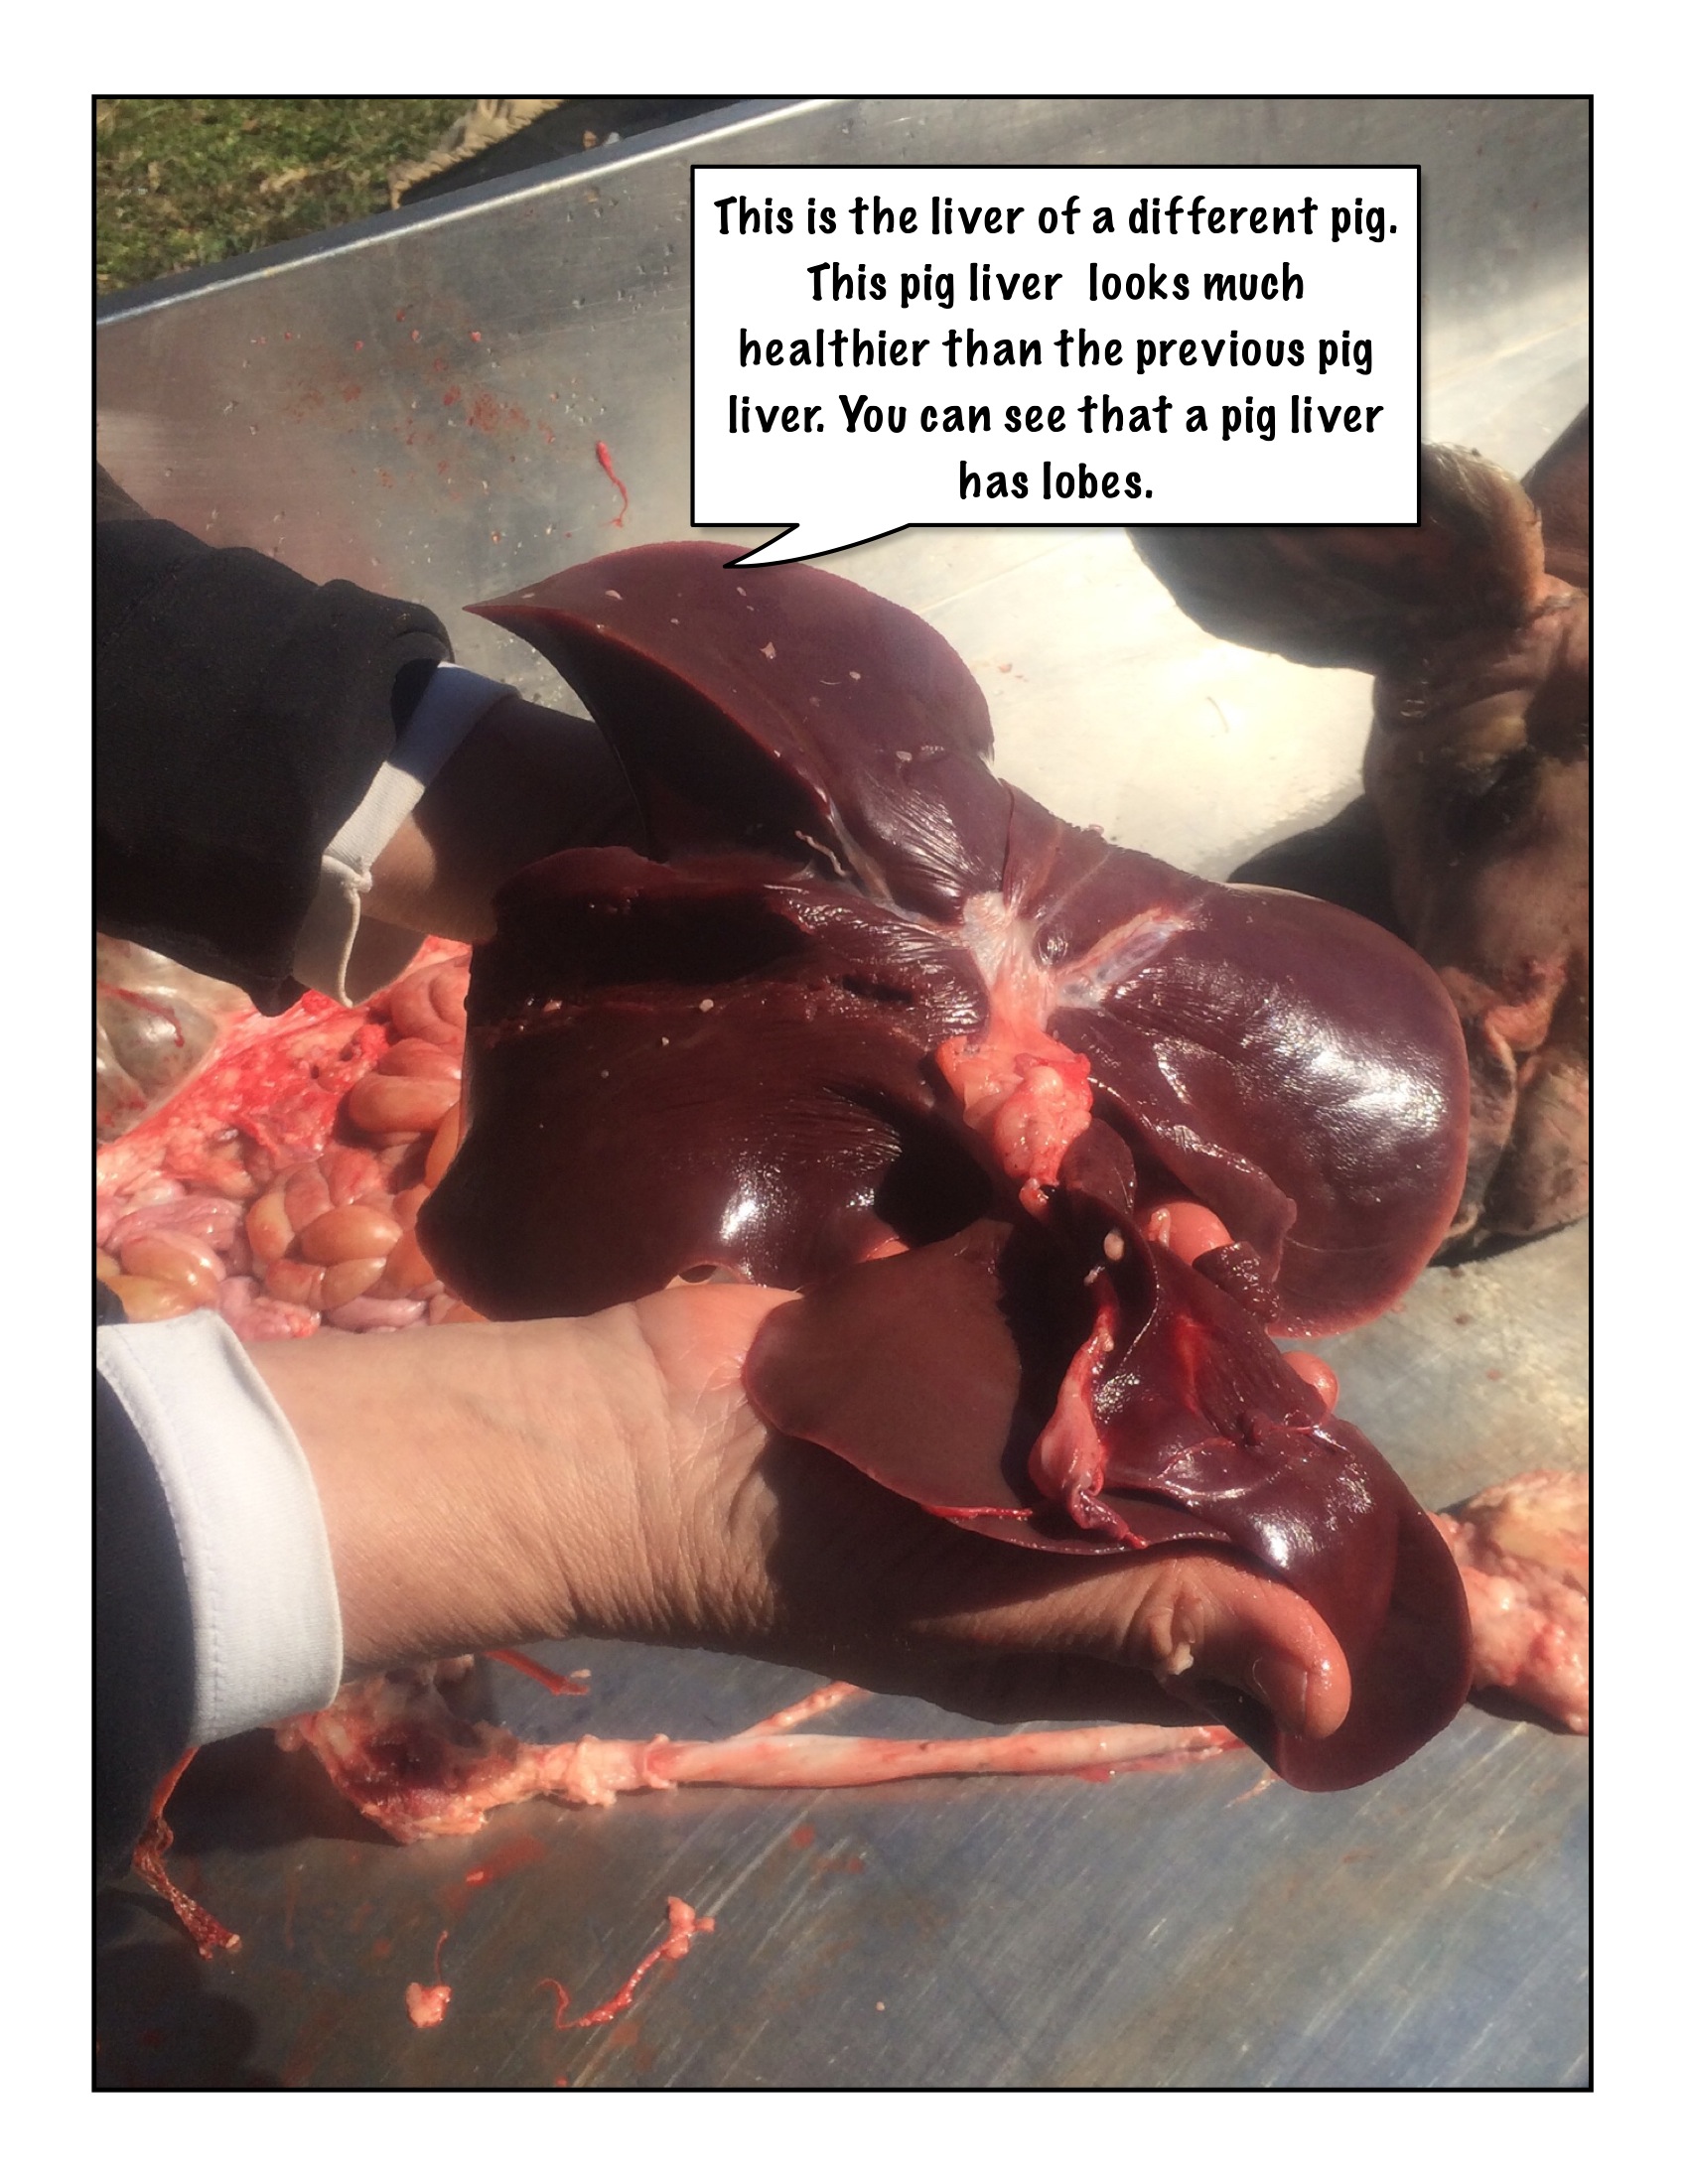
The organs used for sausage making are the heart, kidney, diaphragm, spleen, and liver.
You have already cut out the heart, so make sure you put it in a sausage bucket.
The esophagus runs through the diaphragm just as it enters the stomach. The diaphragm is connected directly to the stomach, too. Cut the diaphragm loose without puncturing the stomach.
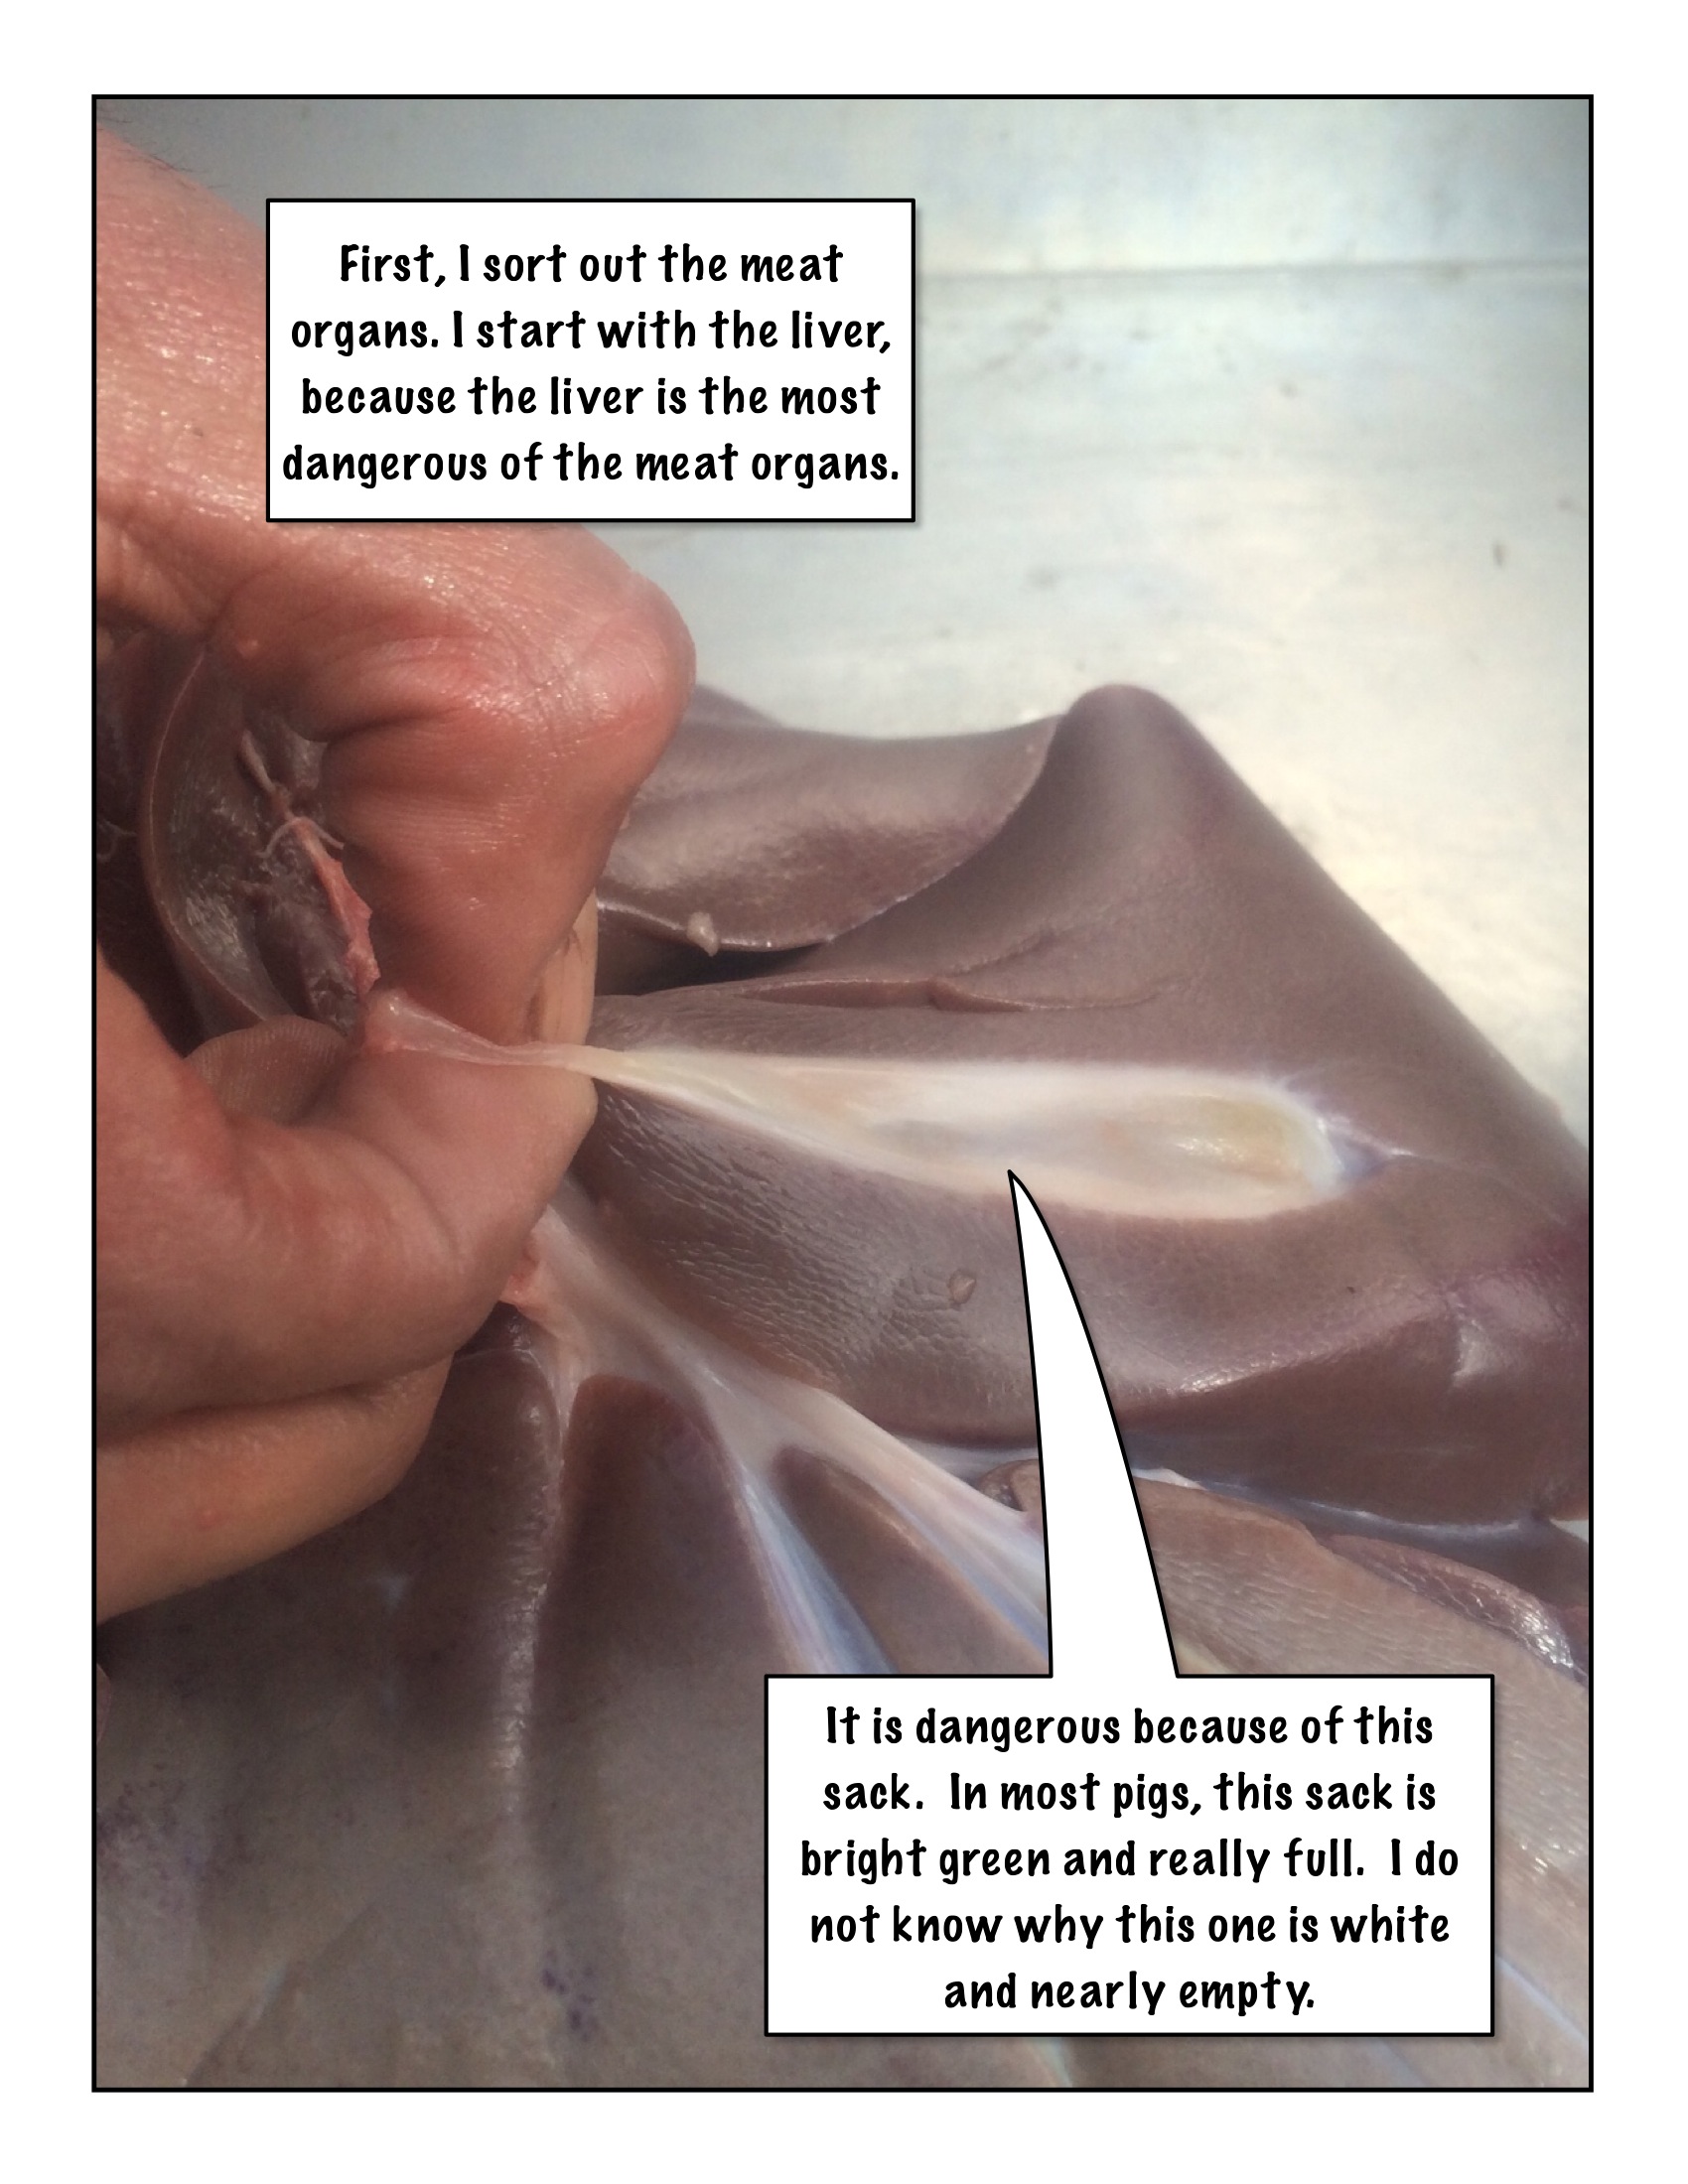
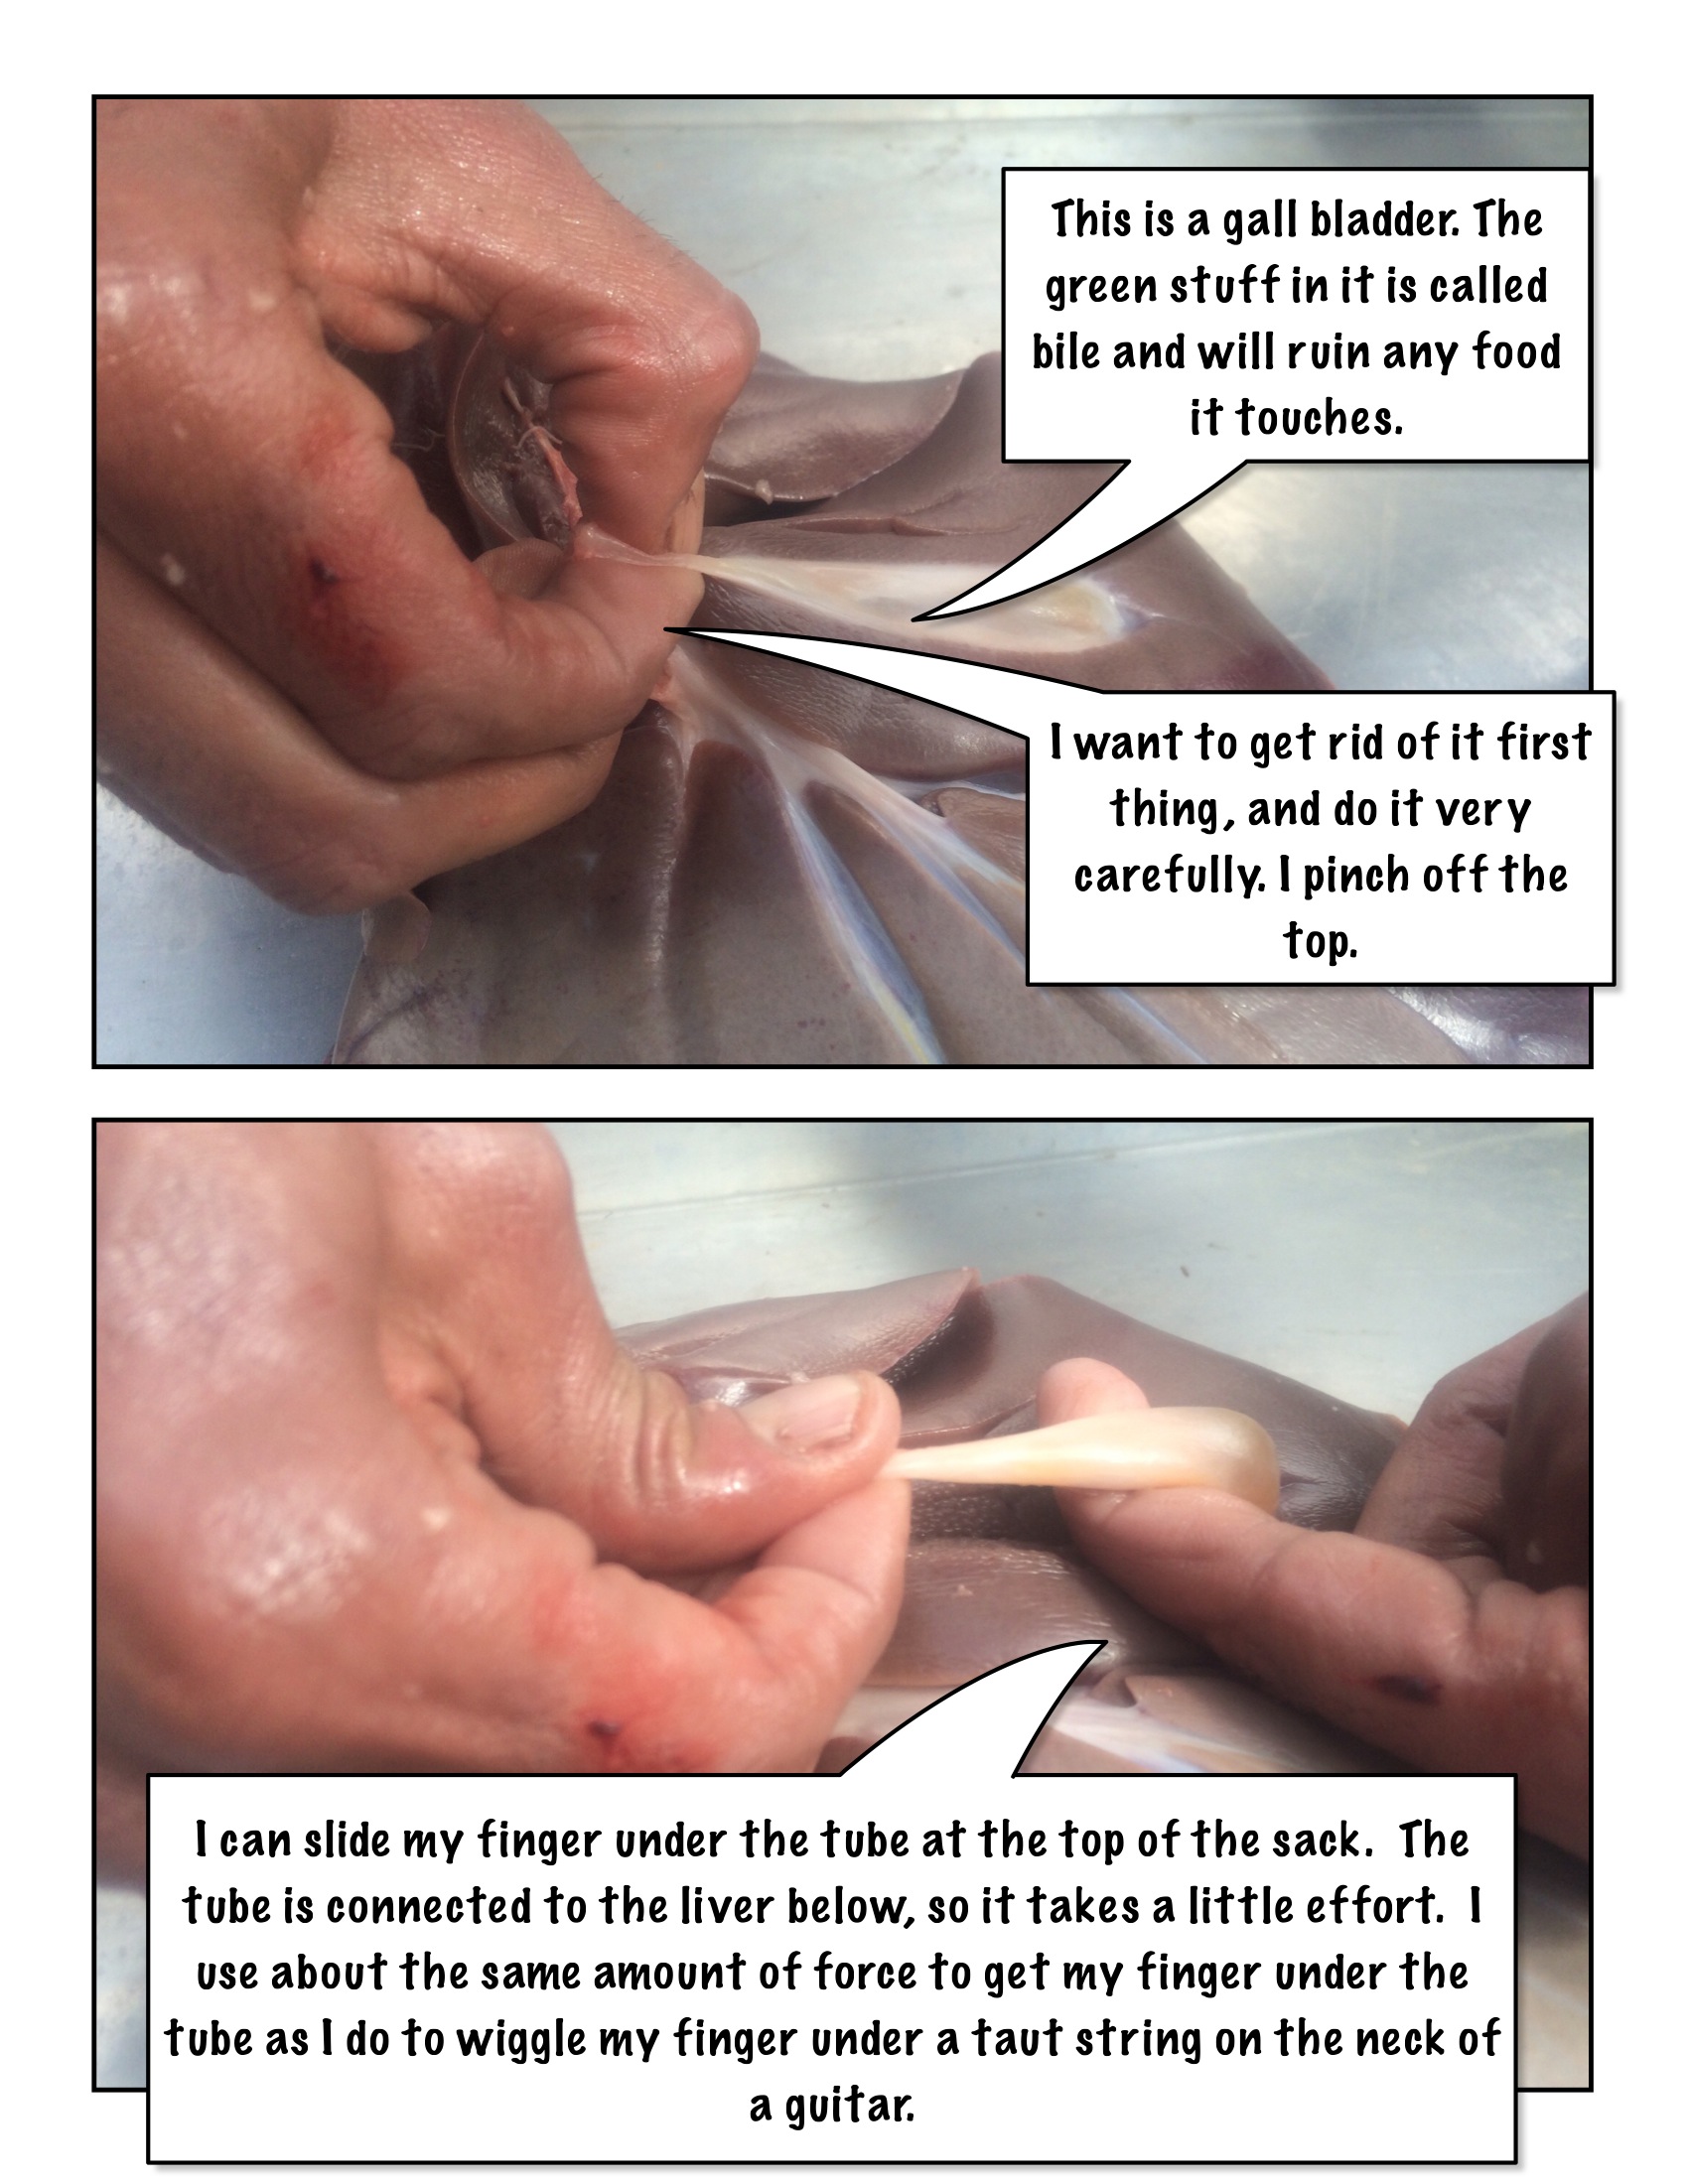
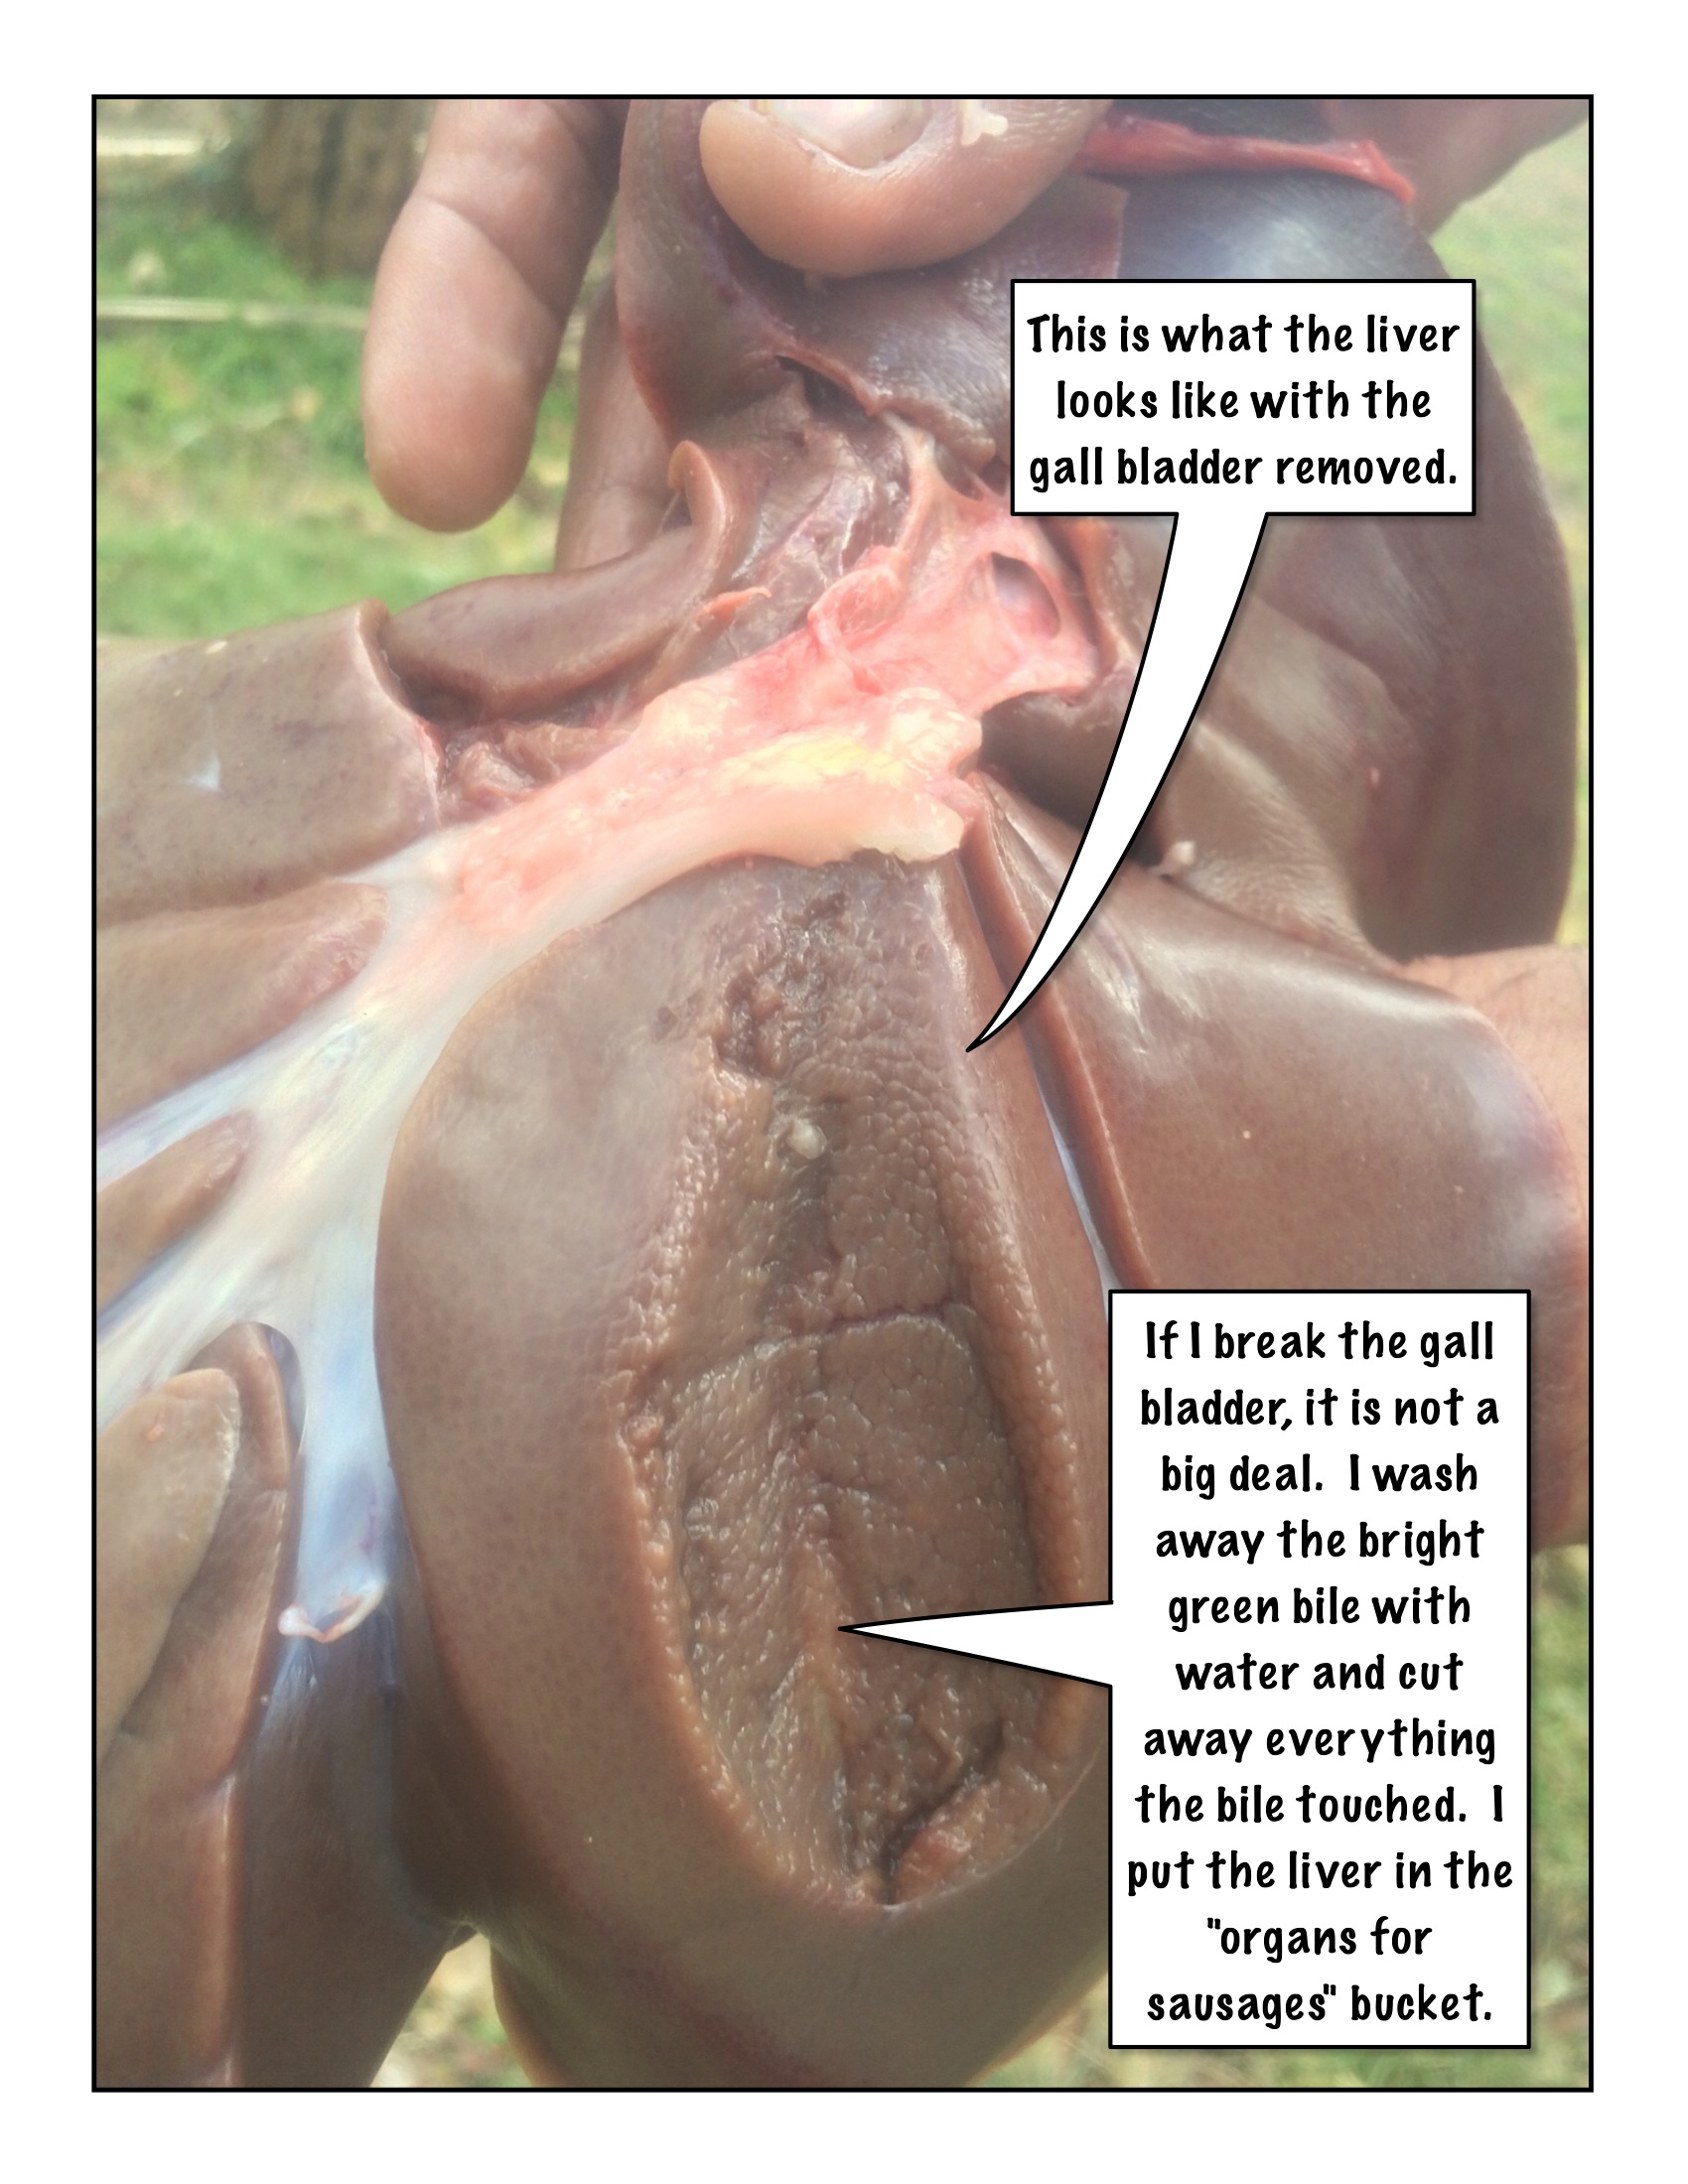
The liver is somewhat connected with sinew and blood supply too. Cut it away from the guts. Pinch the bile duct, a bright green organ, above the sac and pull it away from the liver intact. It is very import not to break the sac and it can spoil the taste of meat. Toss the bile duct aside: it is not edible. The liver will be used for sausage.
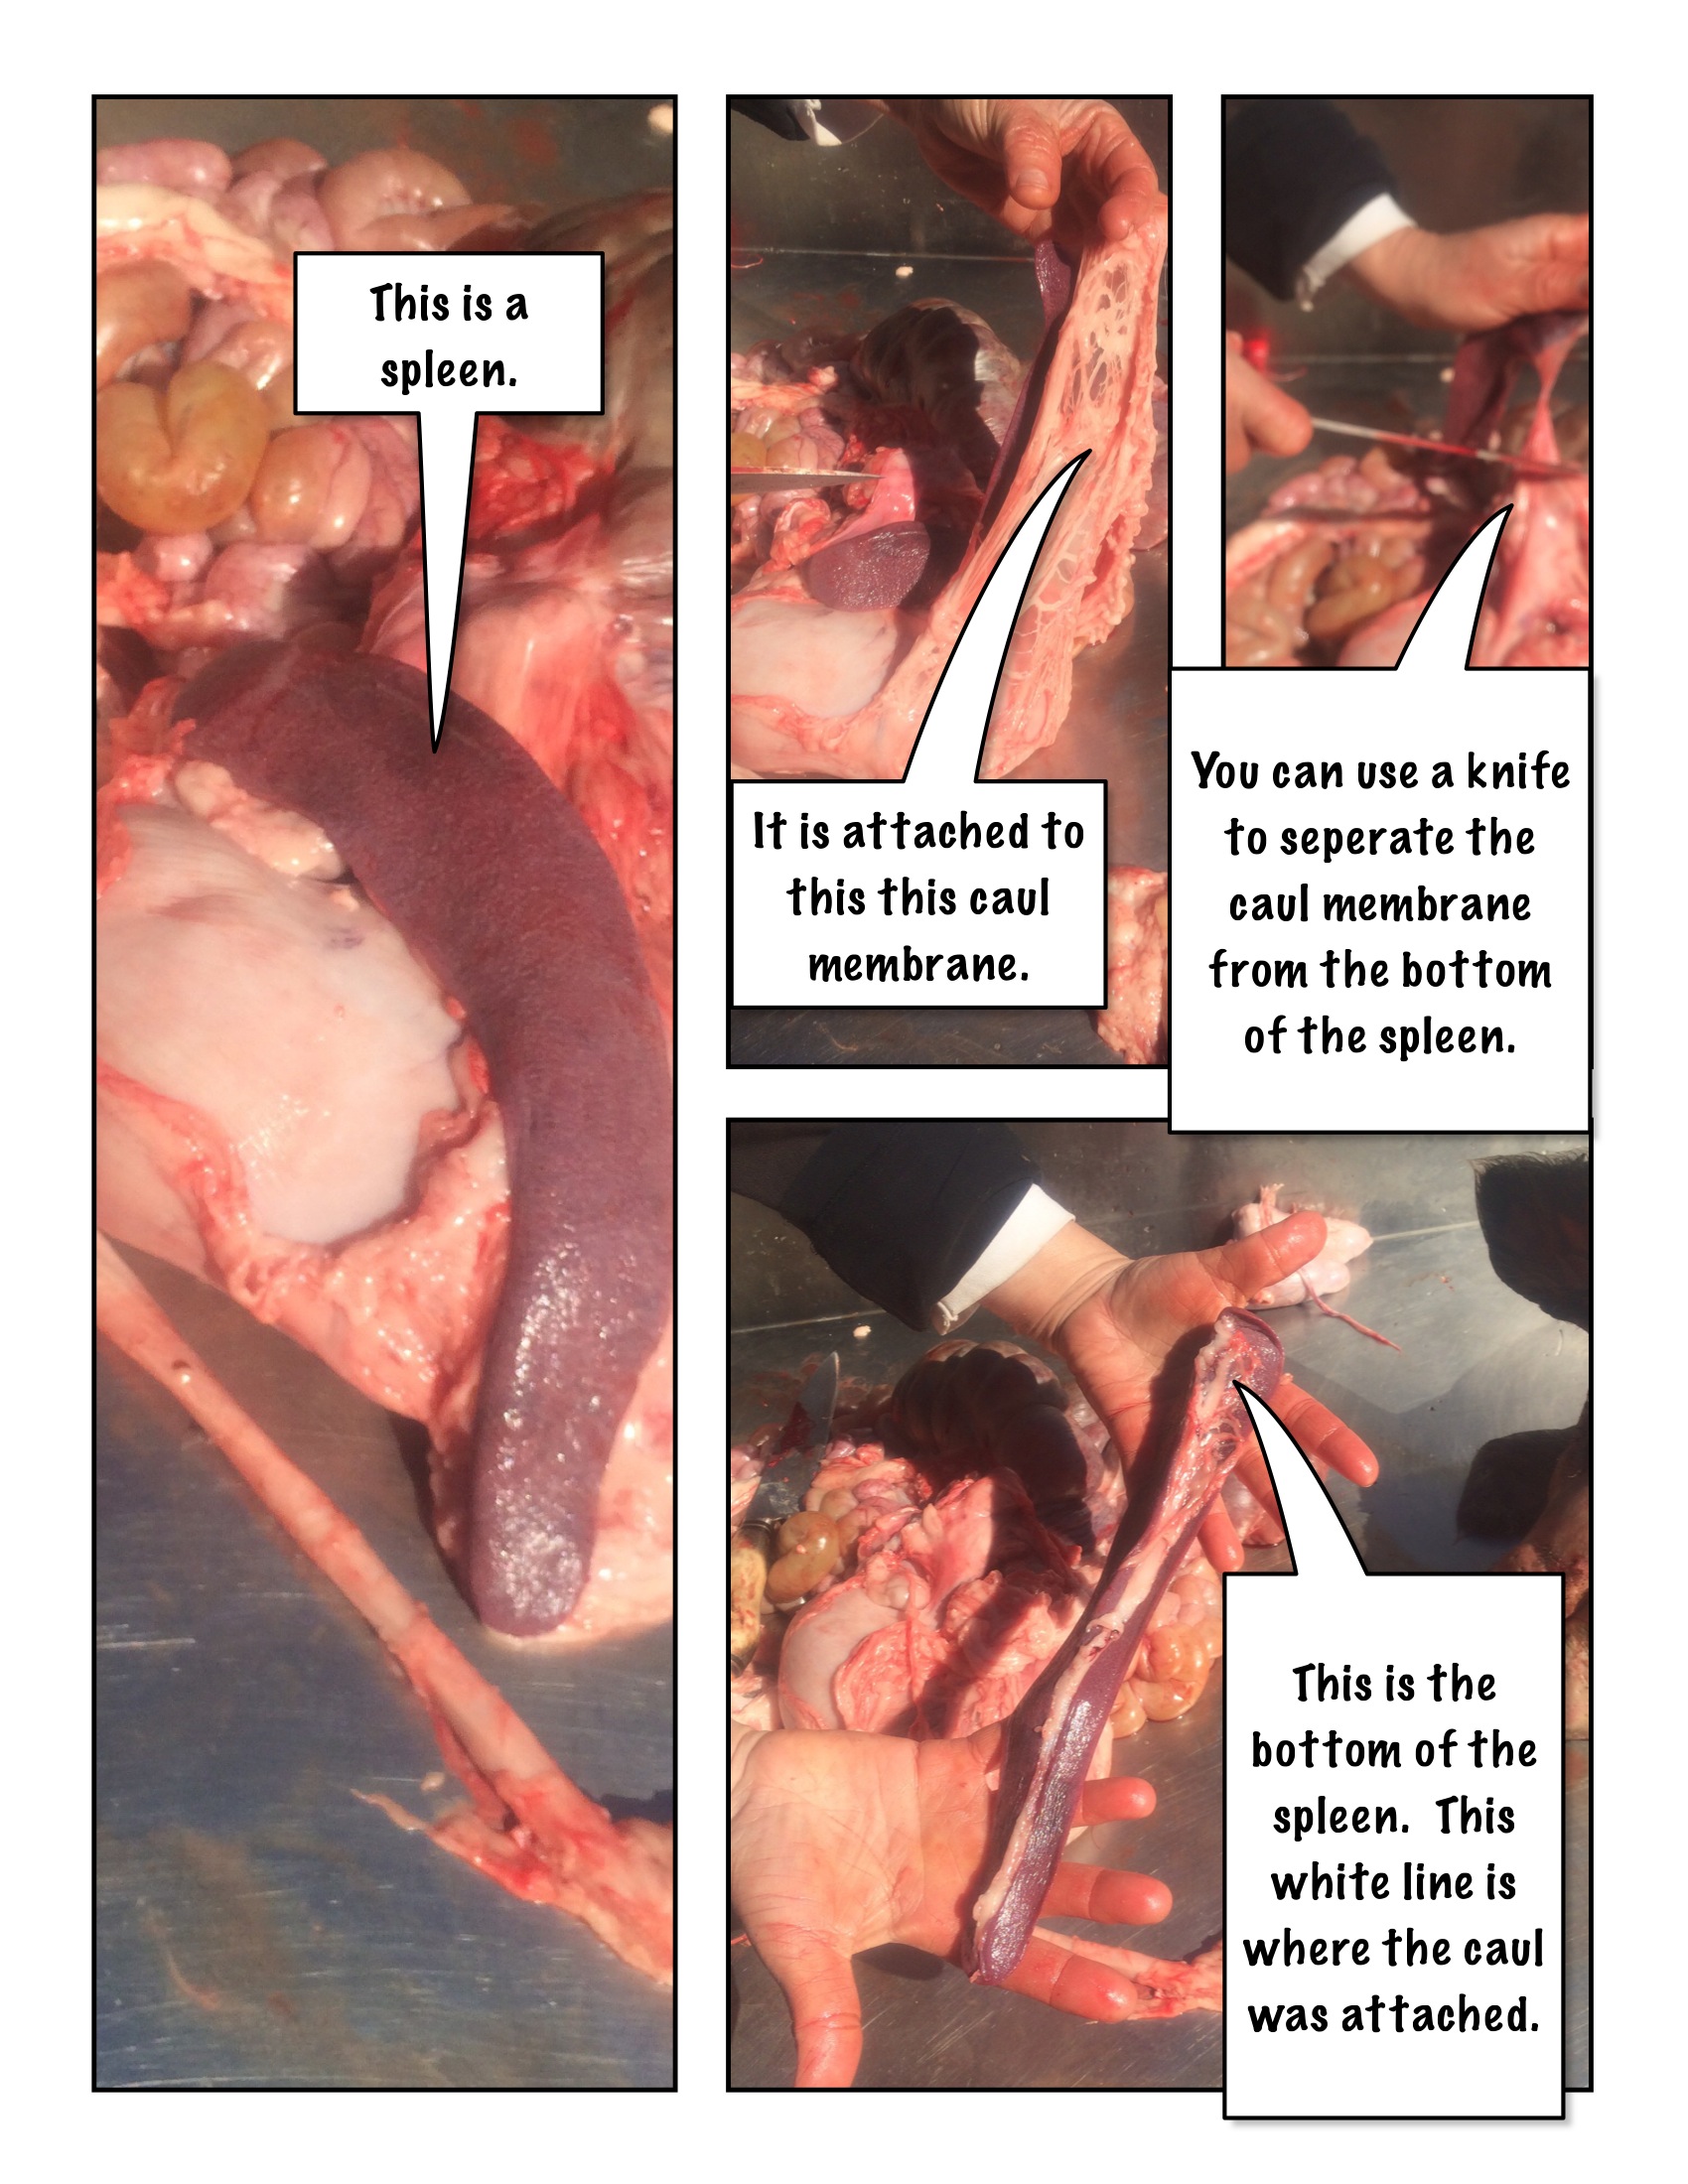
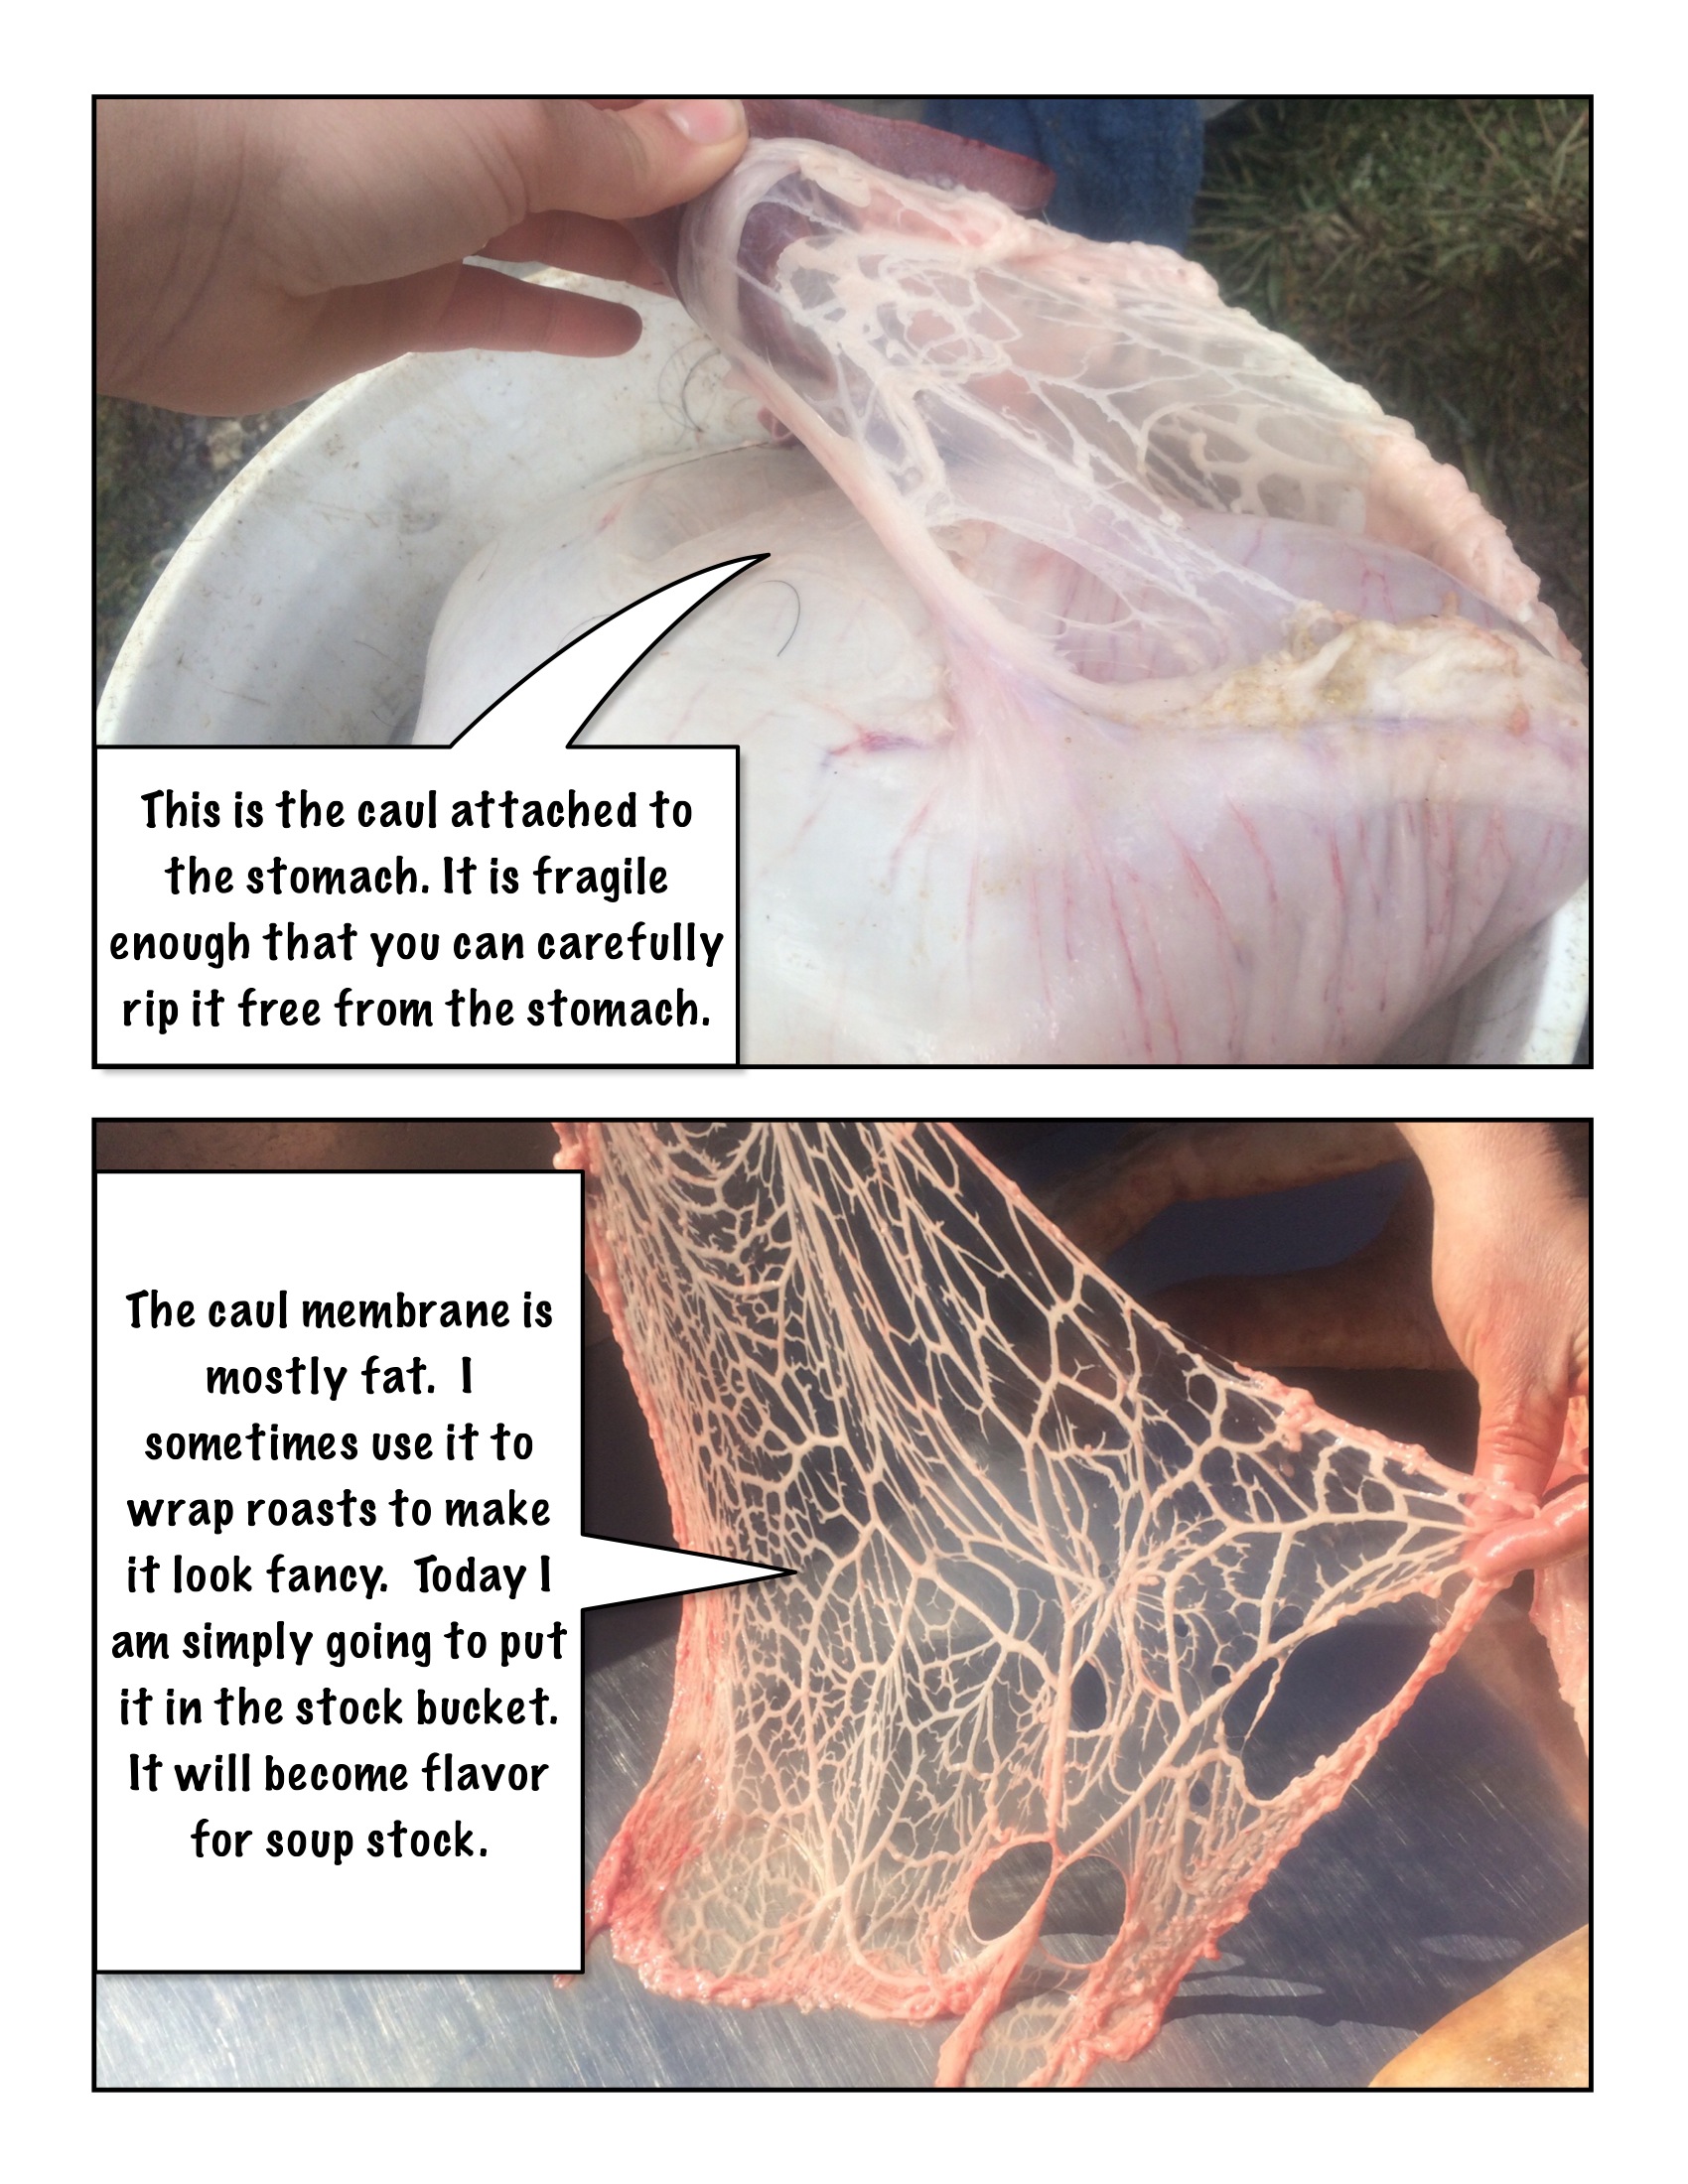
Next, detach the spleen. On the greater curvature of the stomach is a membrane called the caul. The caul also attaches to the spleen. Separate the stomach, caul, and the long red/white organ, the spleen. Put the caul membrane in its own container with lots of water to keep it from drying. It is useful for wrapping roasts or sausages.
The kidneys are located lower than the stomach, and are brown bean-shaped organs. They have a tube coming out of them called the uterer. Leave 2-3 inches of the tube when you cut them out.
Save any extra fat, especially from around the kidneys, for grade "A" lard.
1.3.1 Casing Organs
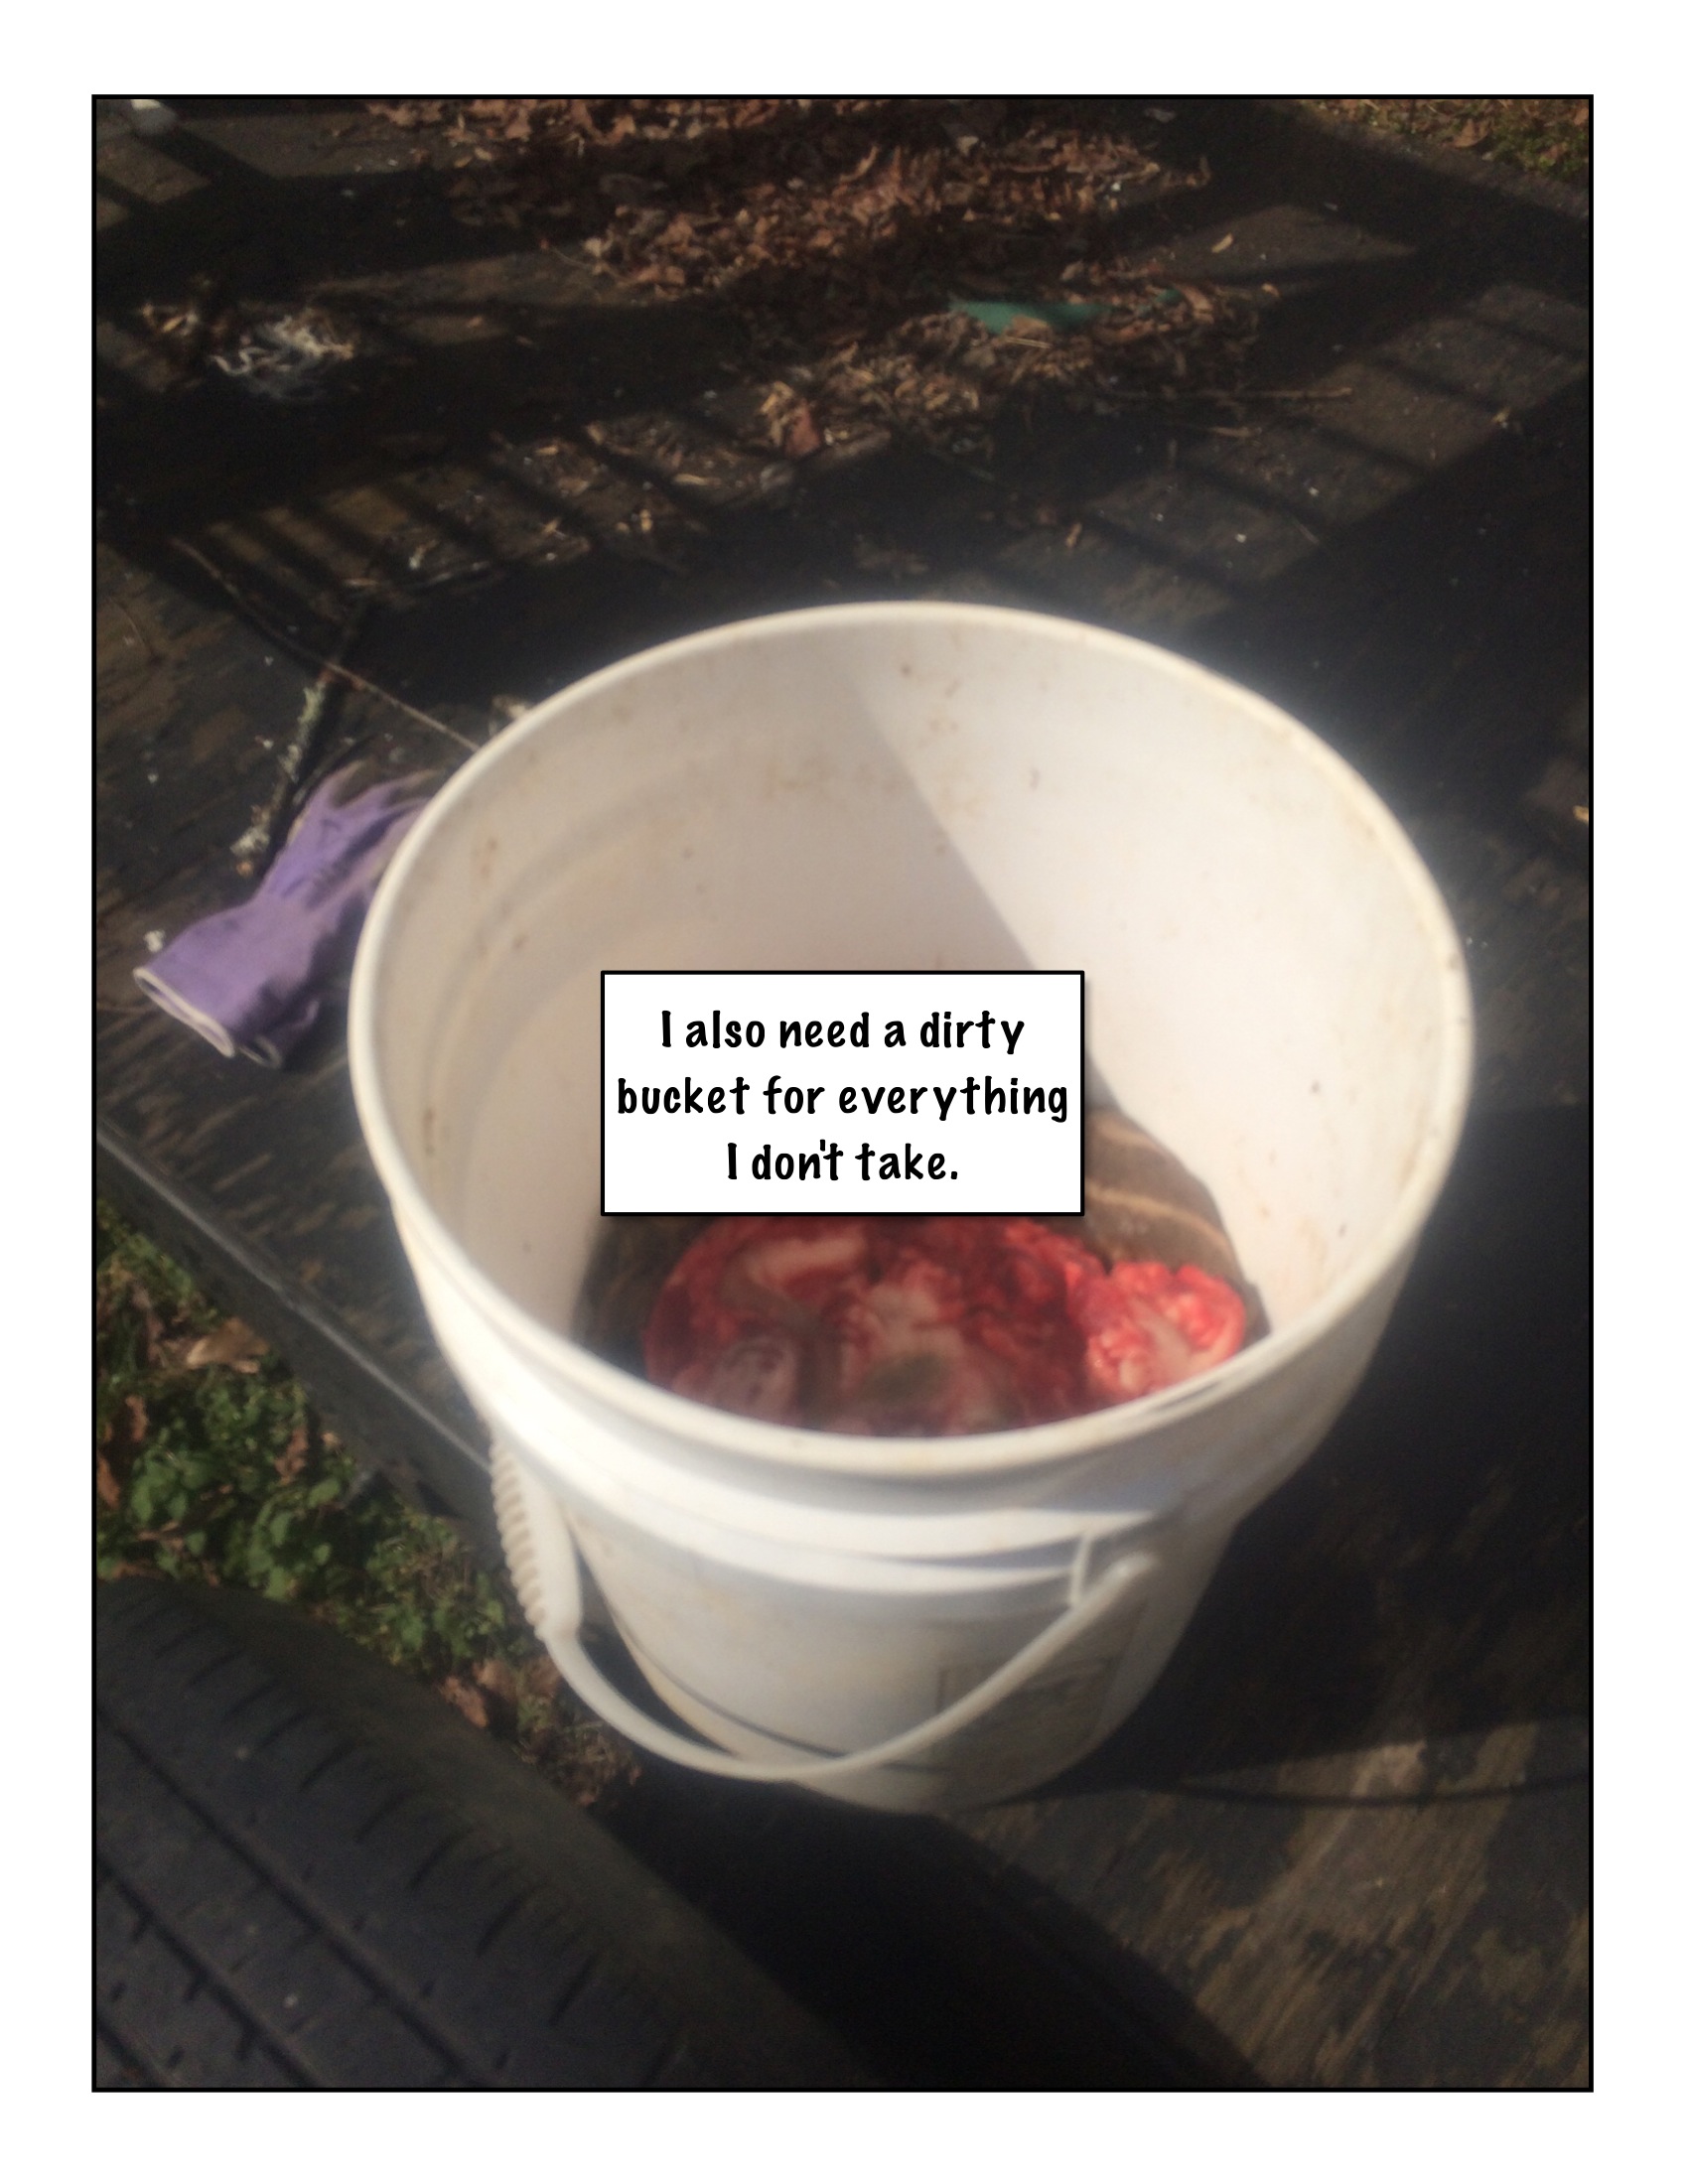
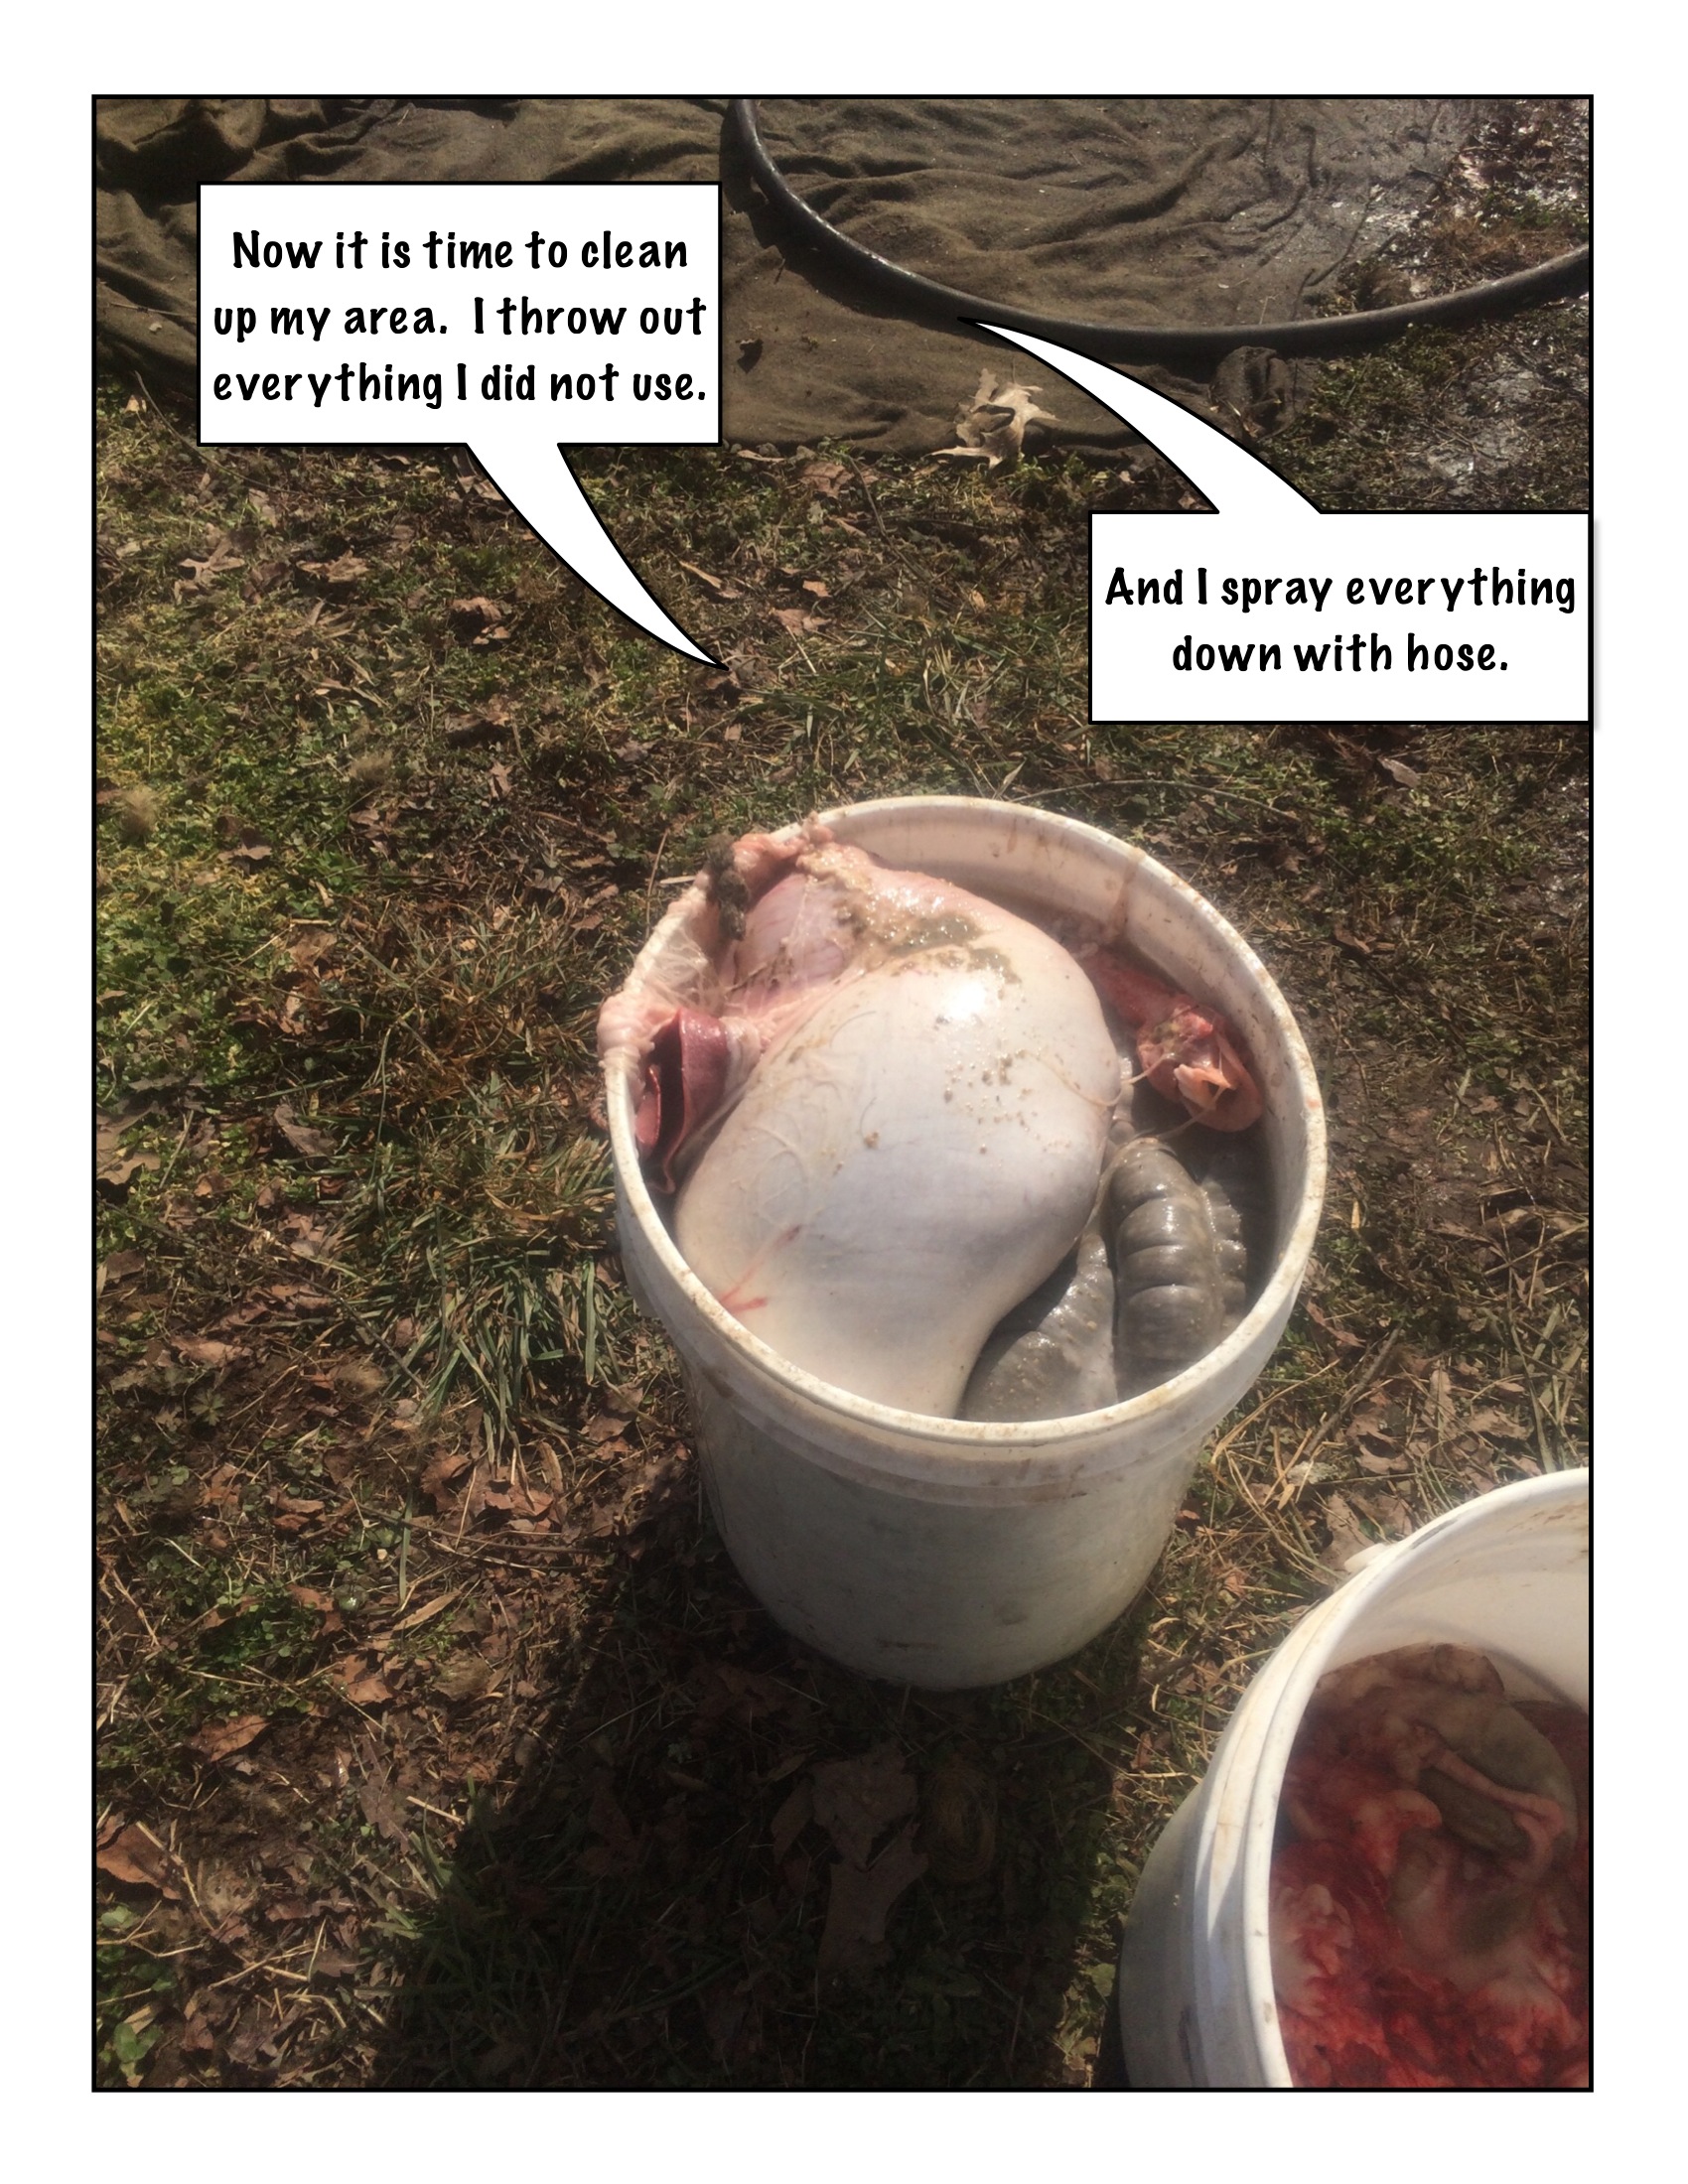
This leaves only digestive organs, which are used for sausage casings. The casing organs include the caul membrane, esophagus, the stomach, the small intestines, the blind bung, the large intestine, the colon, and the bladder. There may also be extra fat in the organs which is worth saving to render.
Cut the esophagus from the stomach, leaving 1-2" on stomach, and put the esophagus in your clean casing bucket. The muscular part can be stripped from the inner lining of the esophagus. The inner lining makes a good sausage casing. The muscular part goes in the stock.
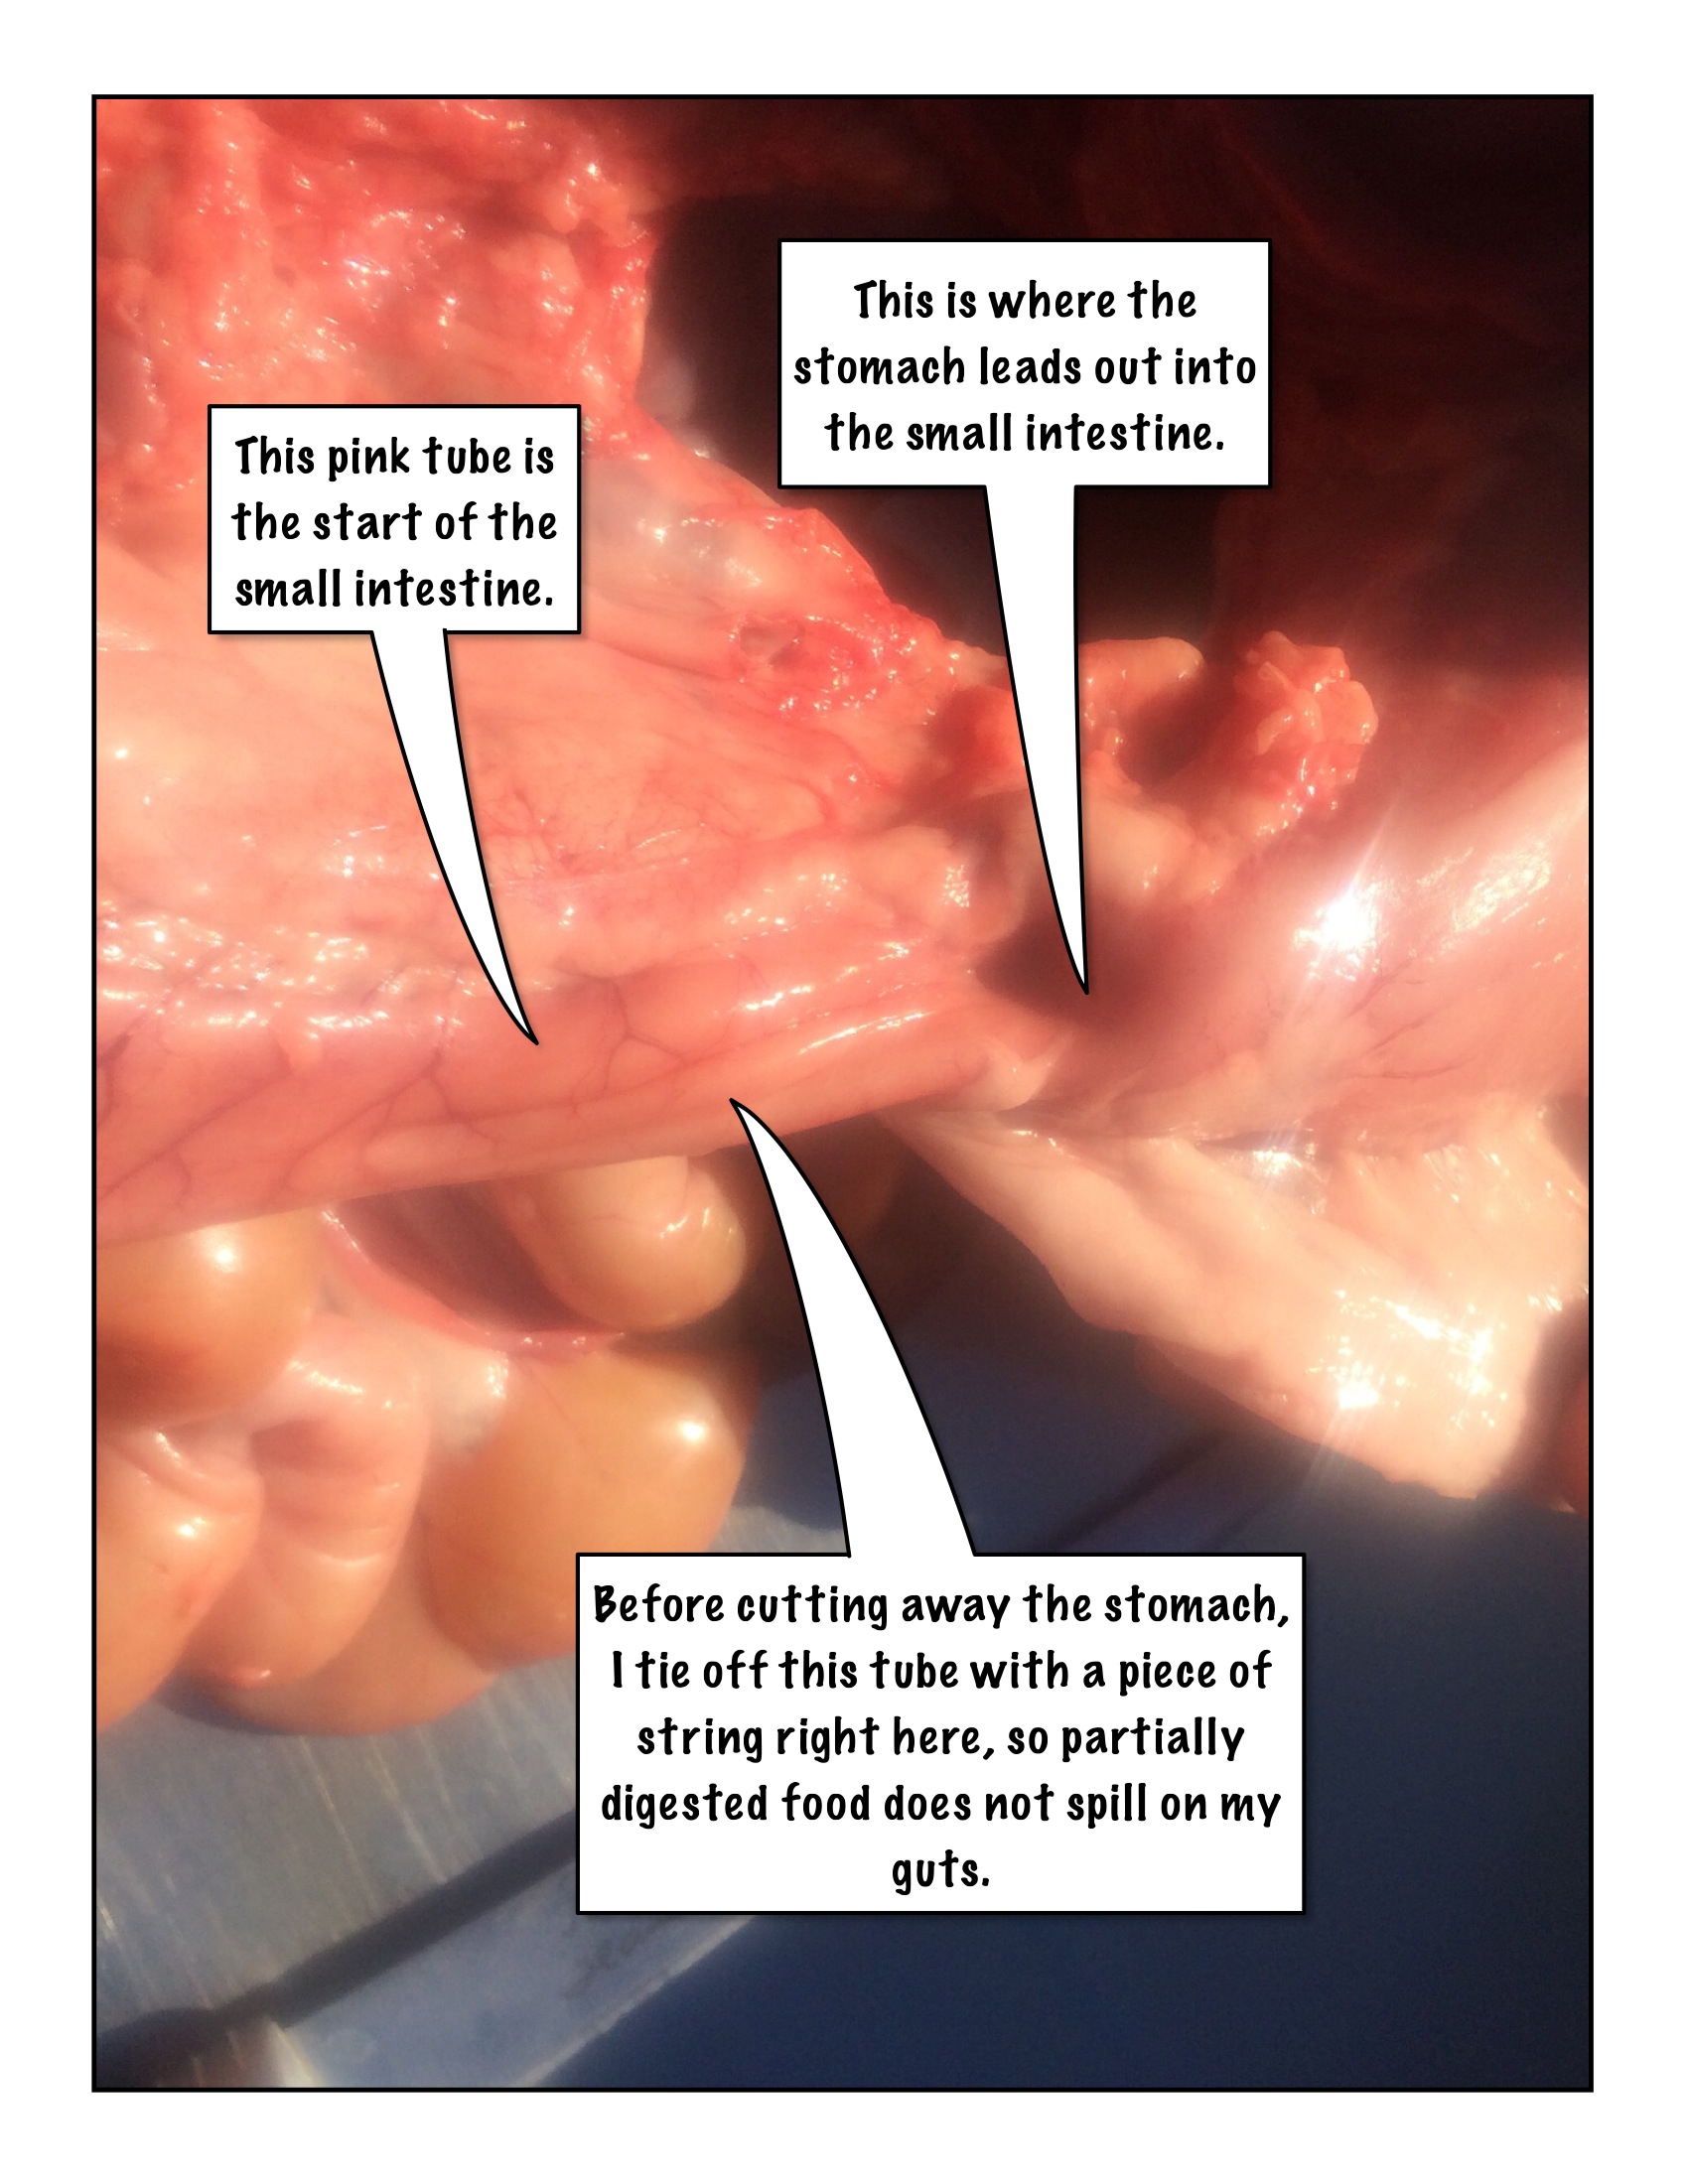
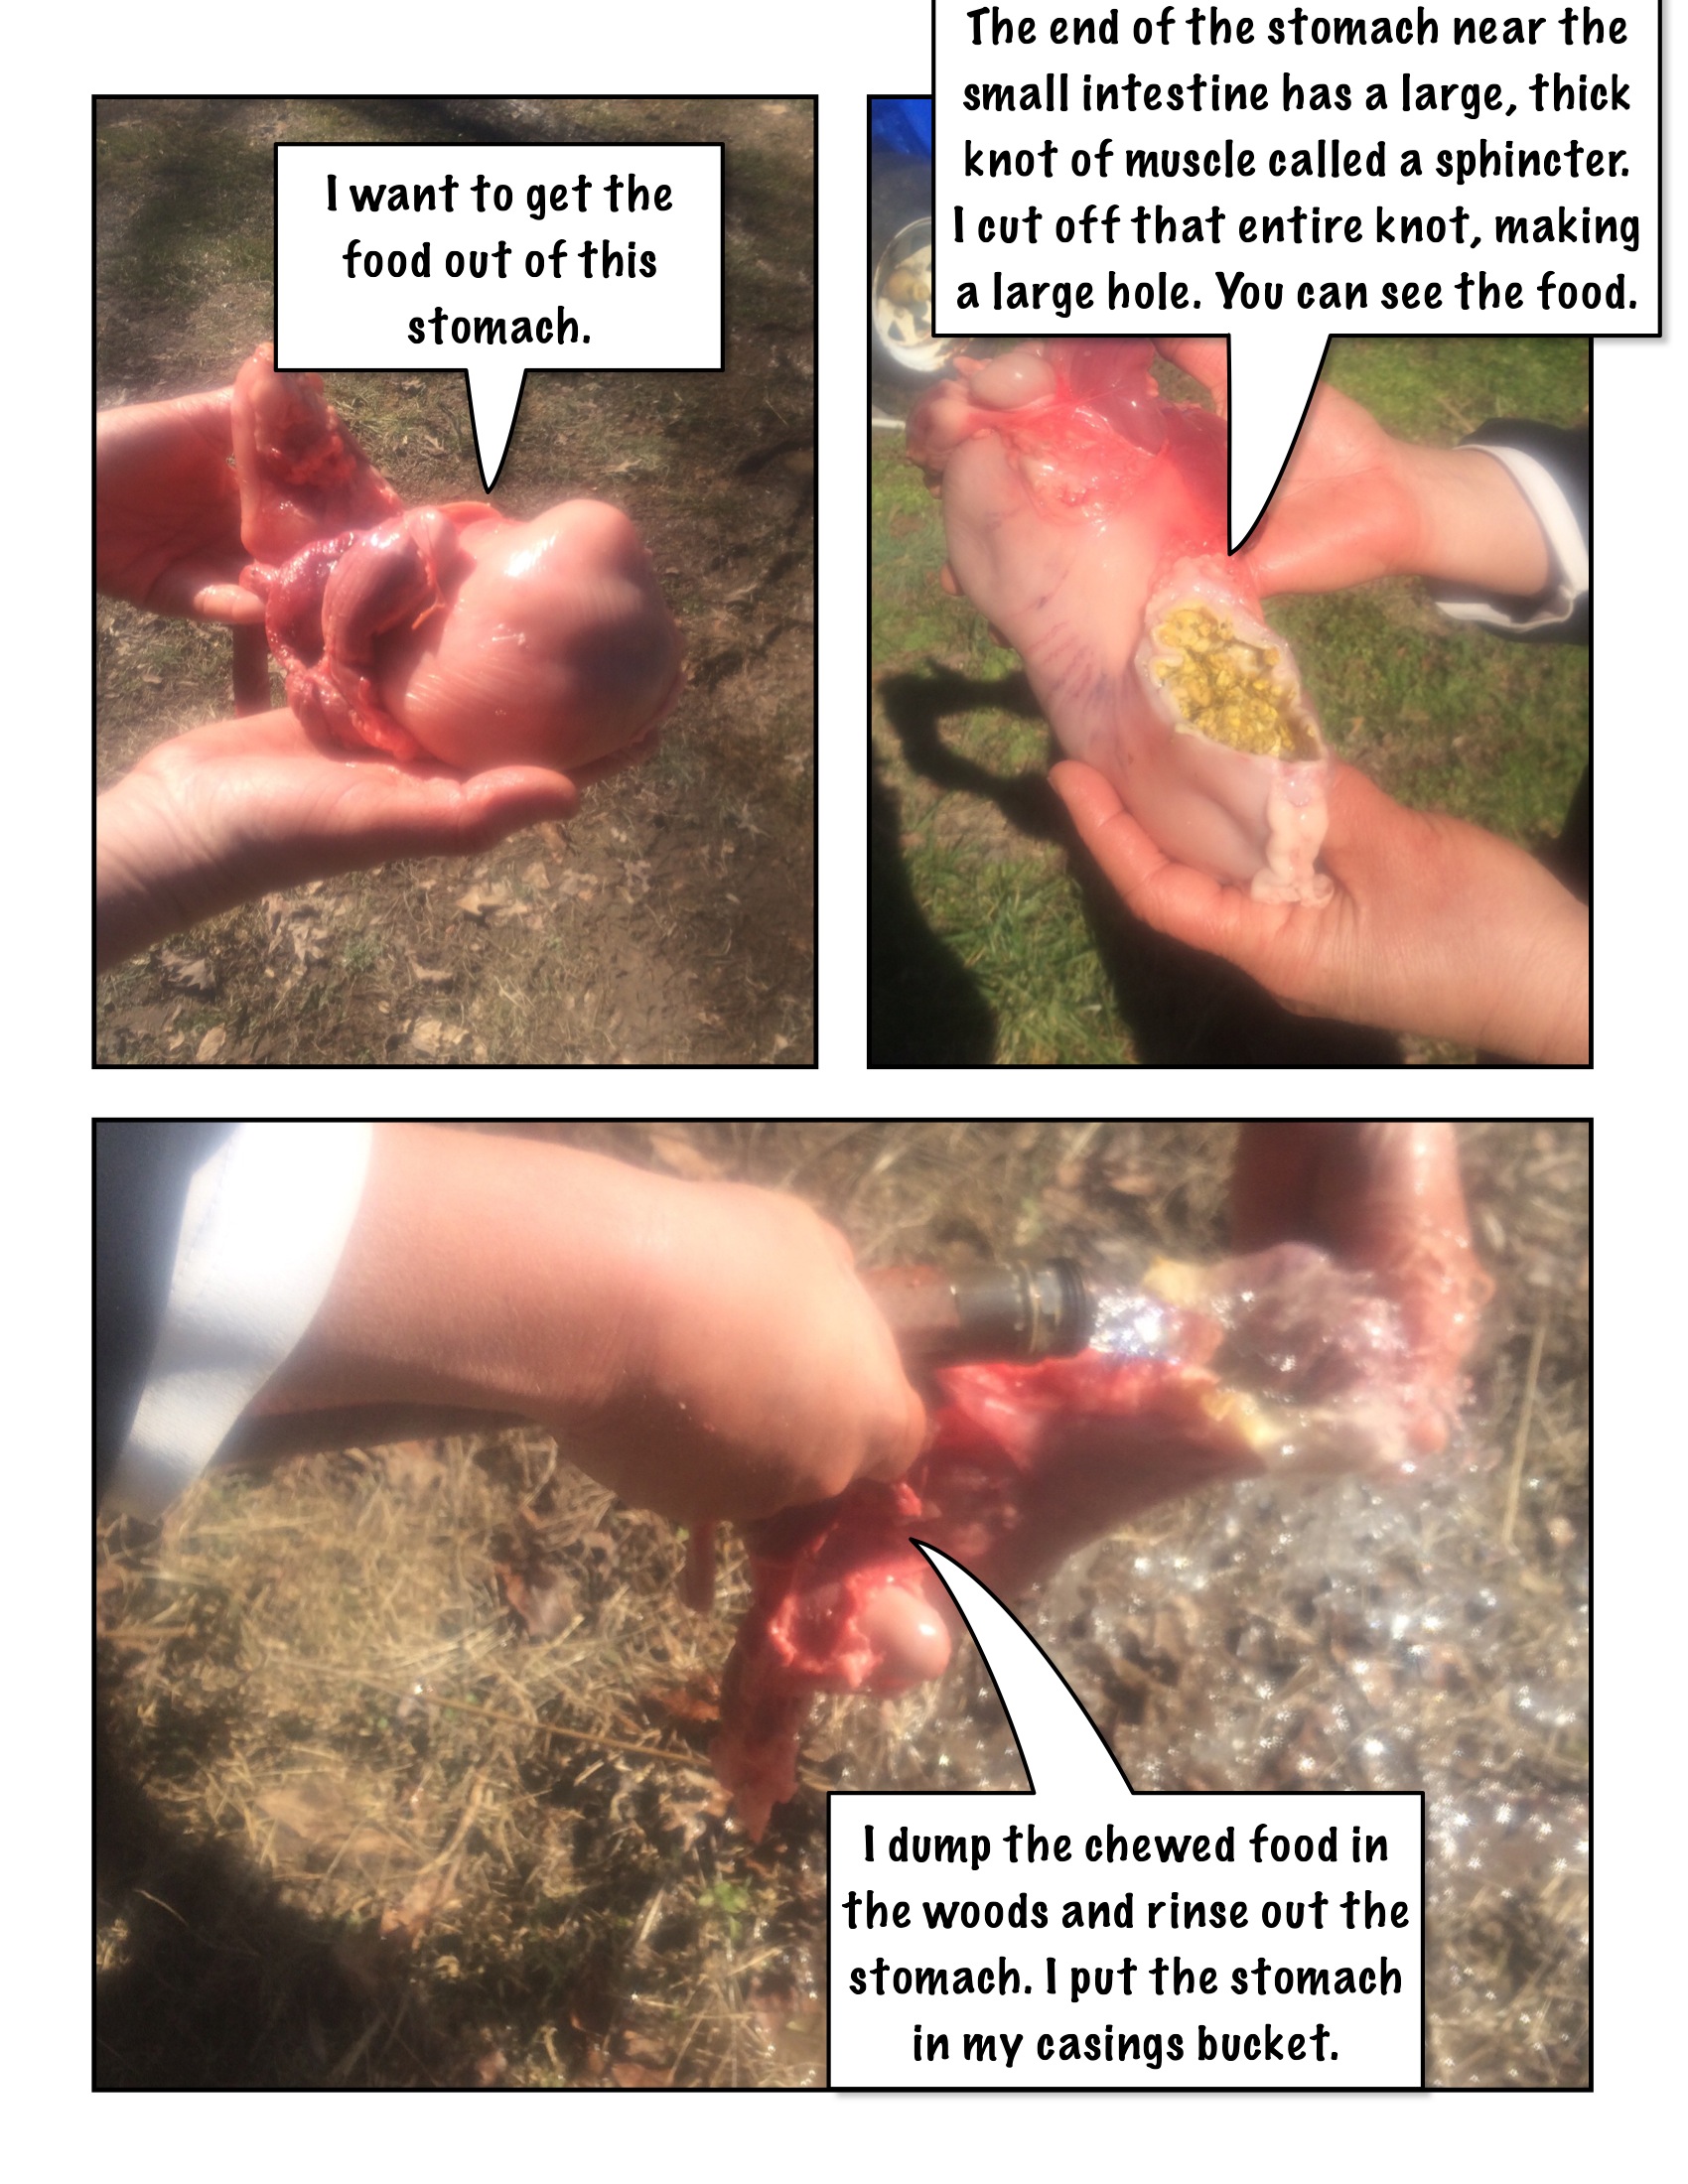
Separate out some of the small intestines as they leave the stomach. They will be surrounded by fat. Separtae the intestines from the fat and loop a string around the intestine a few inches below the stomach to tie the intestines closed. Cut the stomach free. Cut through the sphincter where the intestines leave the stomach. The hole where the sphincter is cut must be large enough to empty the contents, and turn the stomach inside out. Carry the stomach away from your workspace and squeeze out any food in the stomach. Come back and rinse the stomach out with water. Turn the stomach inside out, and rinse it out again. The stomach is a casing used to make head cheese.
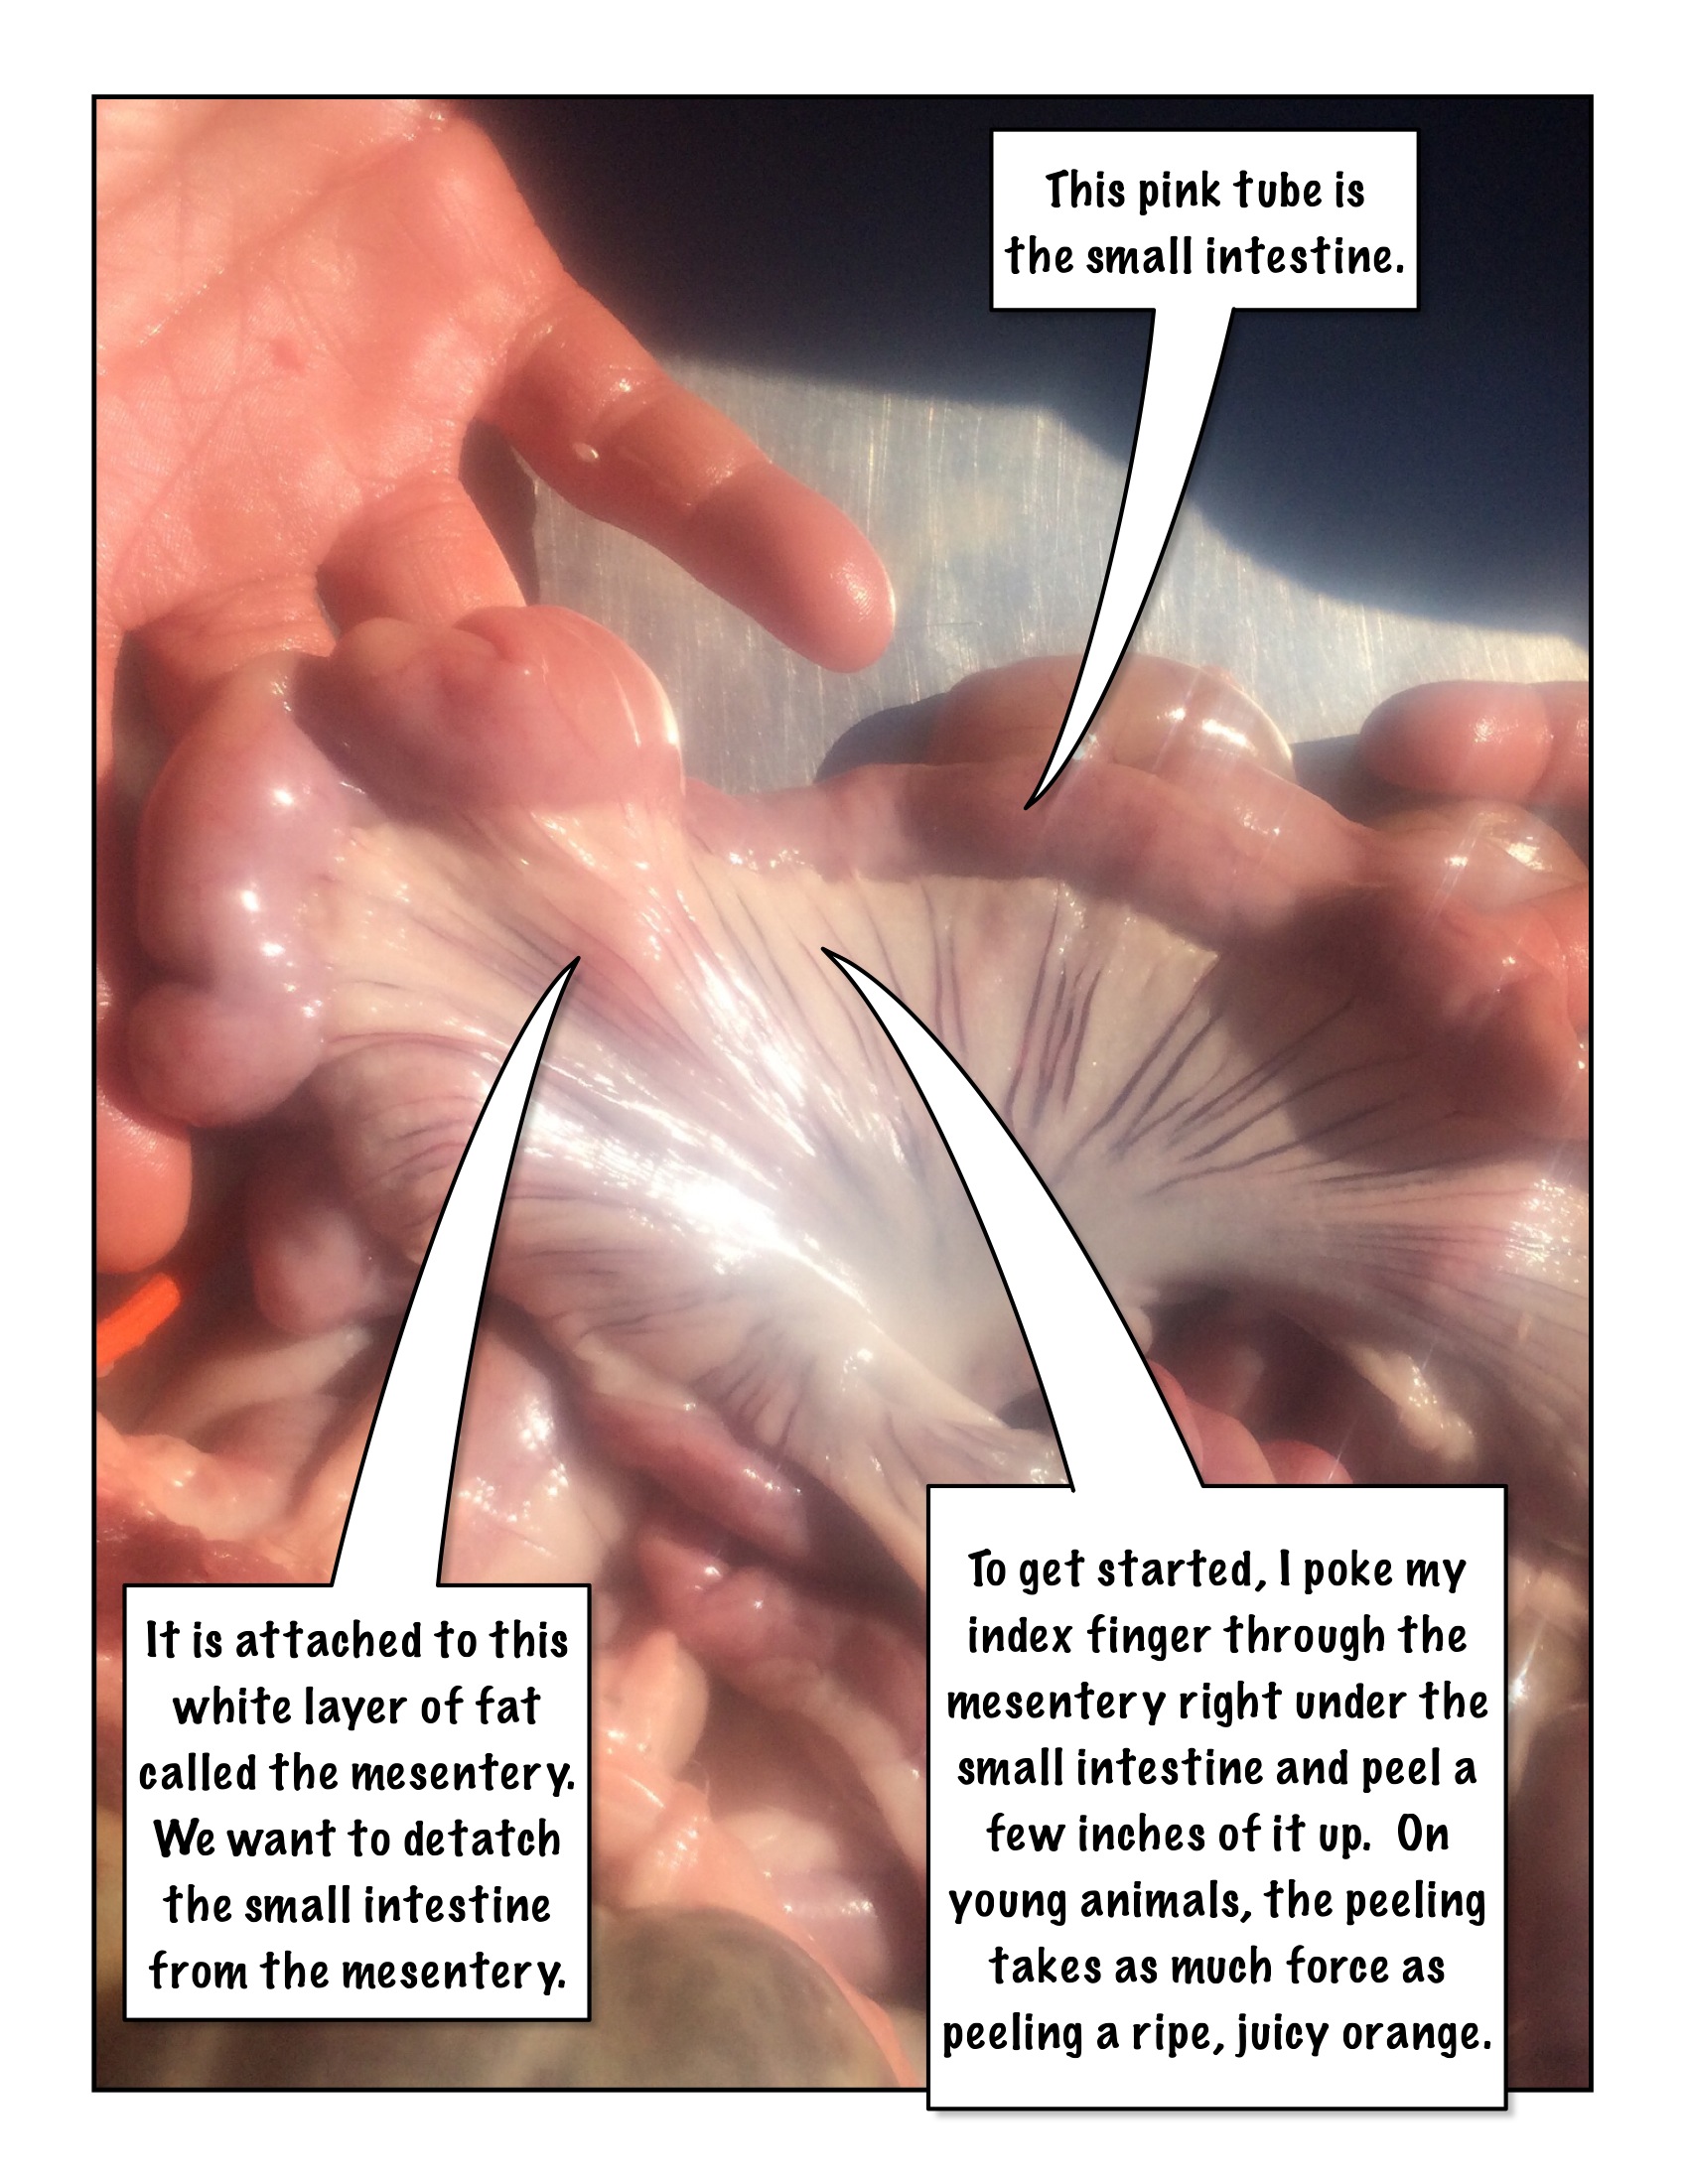
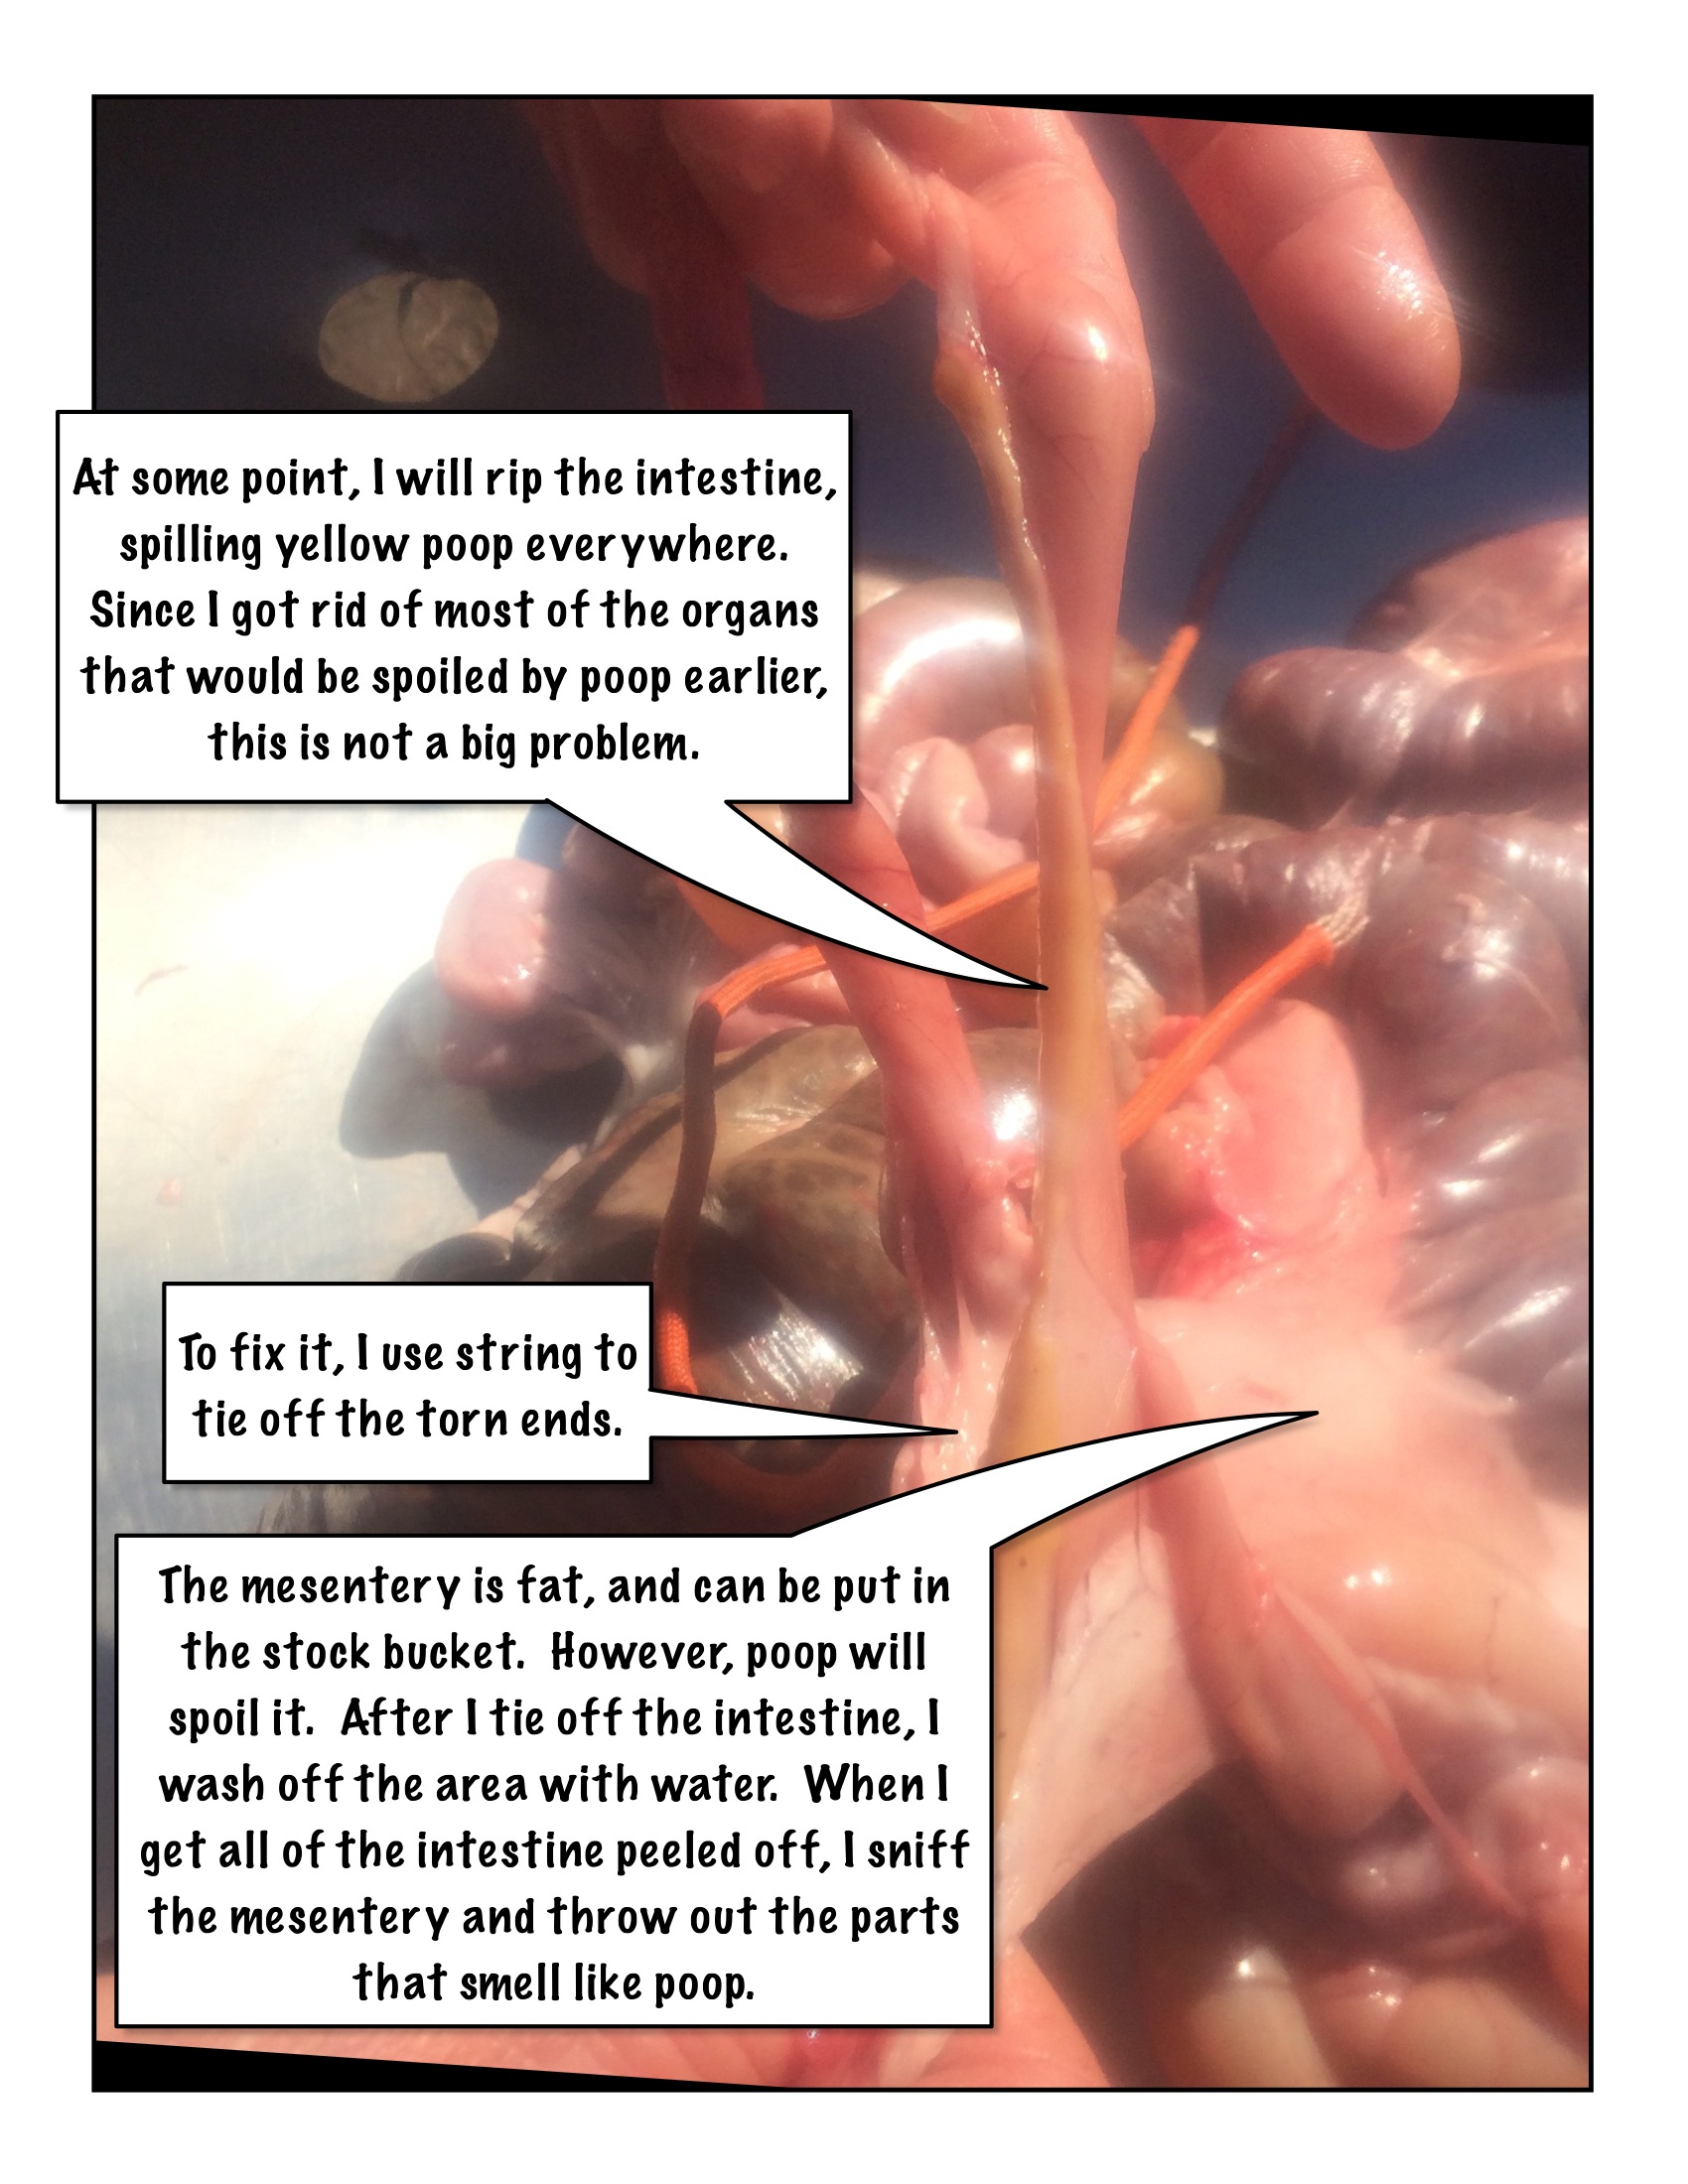
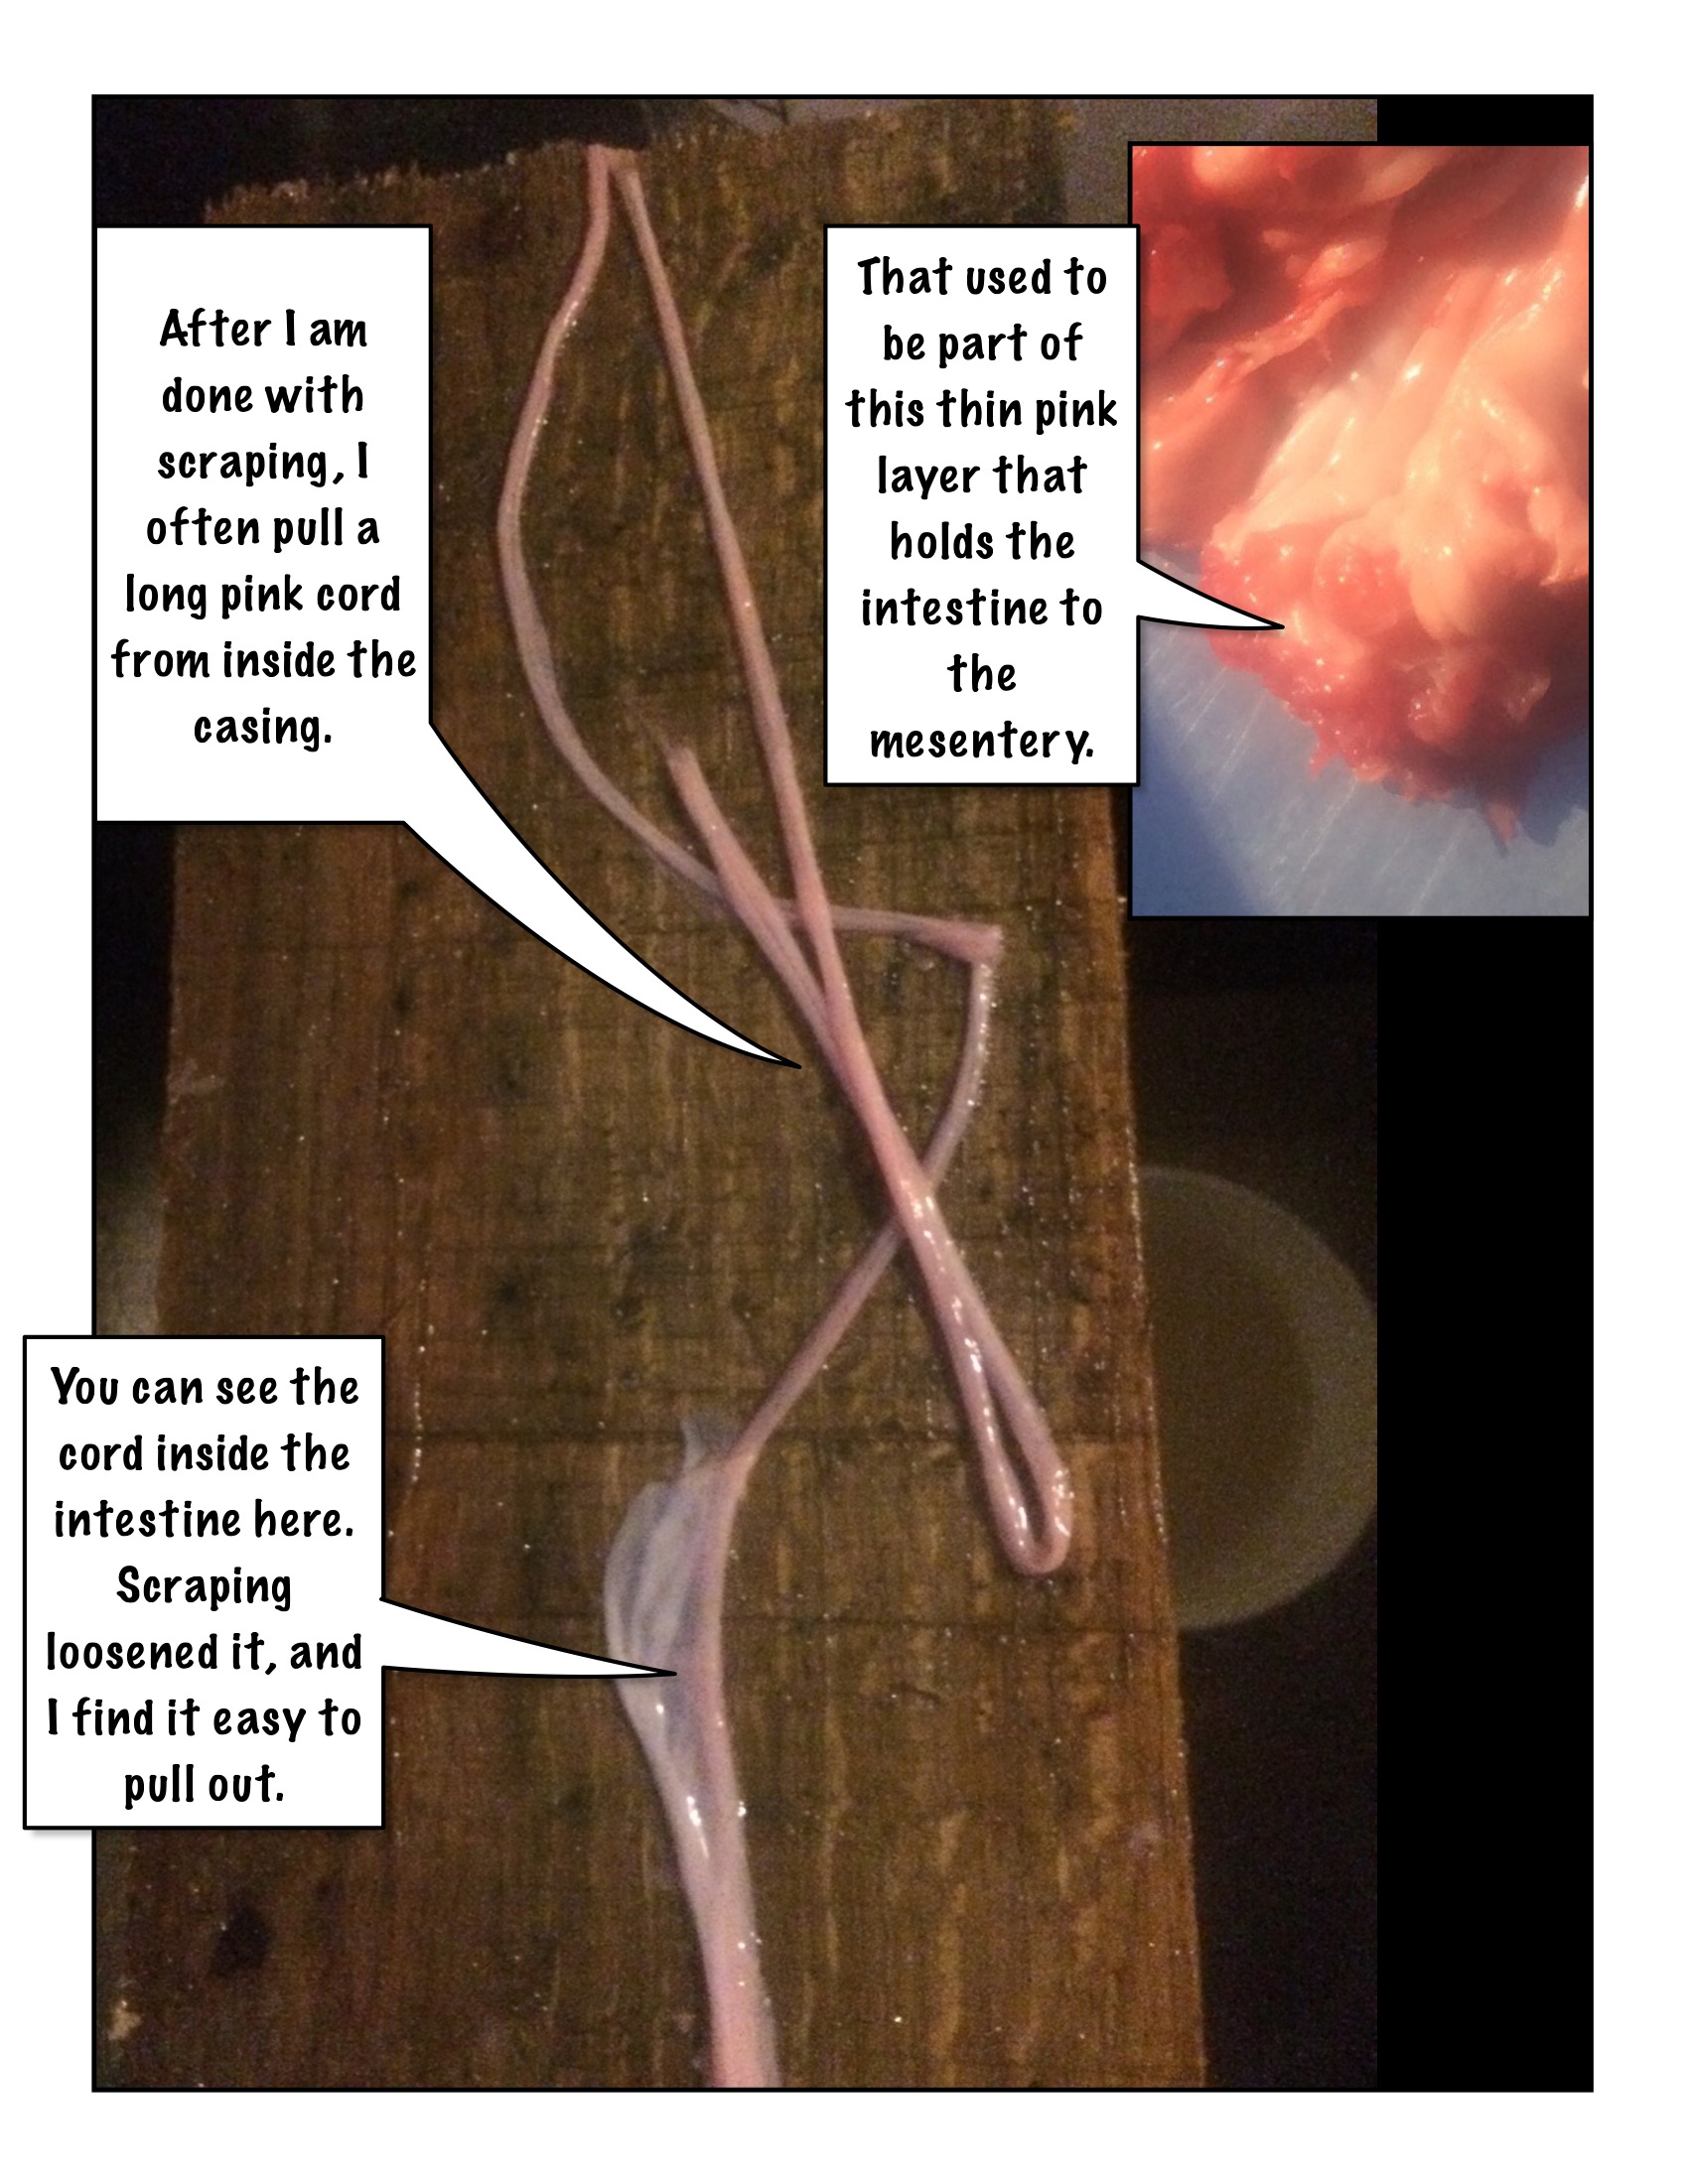
Next is the small intestine. The small intestine is the longest organ we will deal with, and it has three parts. The beginning part runs from the stomach through the gut fat. Because of the fat it is hard to follow at first. The middle part is connected to a pink membrane called the messentary, which the body uses to prevent the small intestine from getting tied in knots. It will help to the same thing as we separate the middle from the messentary. The end is short straight piece between the middle part and the junction with the large intestine.
The middle part is the easiest to follow and clean, so it is helpful to start there. These intestines spiral around in one direction and are held and prevented from tangling by the mesentary. The messentary is creamy white with blood vessels running out to the intestines. The messentary actually has a very thin clear membrane that surrounds the middle intestine, and as you pull the intestine away from the creamy white part, you probably won't get all the clear membrane off as well. Don't worry, this will come off in a later stage of cleaning. The messentary has some lymph nodes on the inside, away brom the small intestine, near it's other where it buds along the large intestine coil.
Now we can follow the freed middle part intestine until we find the beginning, near where the stomach used to be. The issue with the beginning is that it runs into connective tissue and fat, and following it will lead you to the pancreas. At this point, you may cut out the pancreas and put it in with the stock organs. The large intestines and the colon are also nearby, an this portion runs through a small space between these three organs. This makes it confusing to follow the first couple of times.
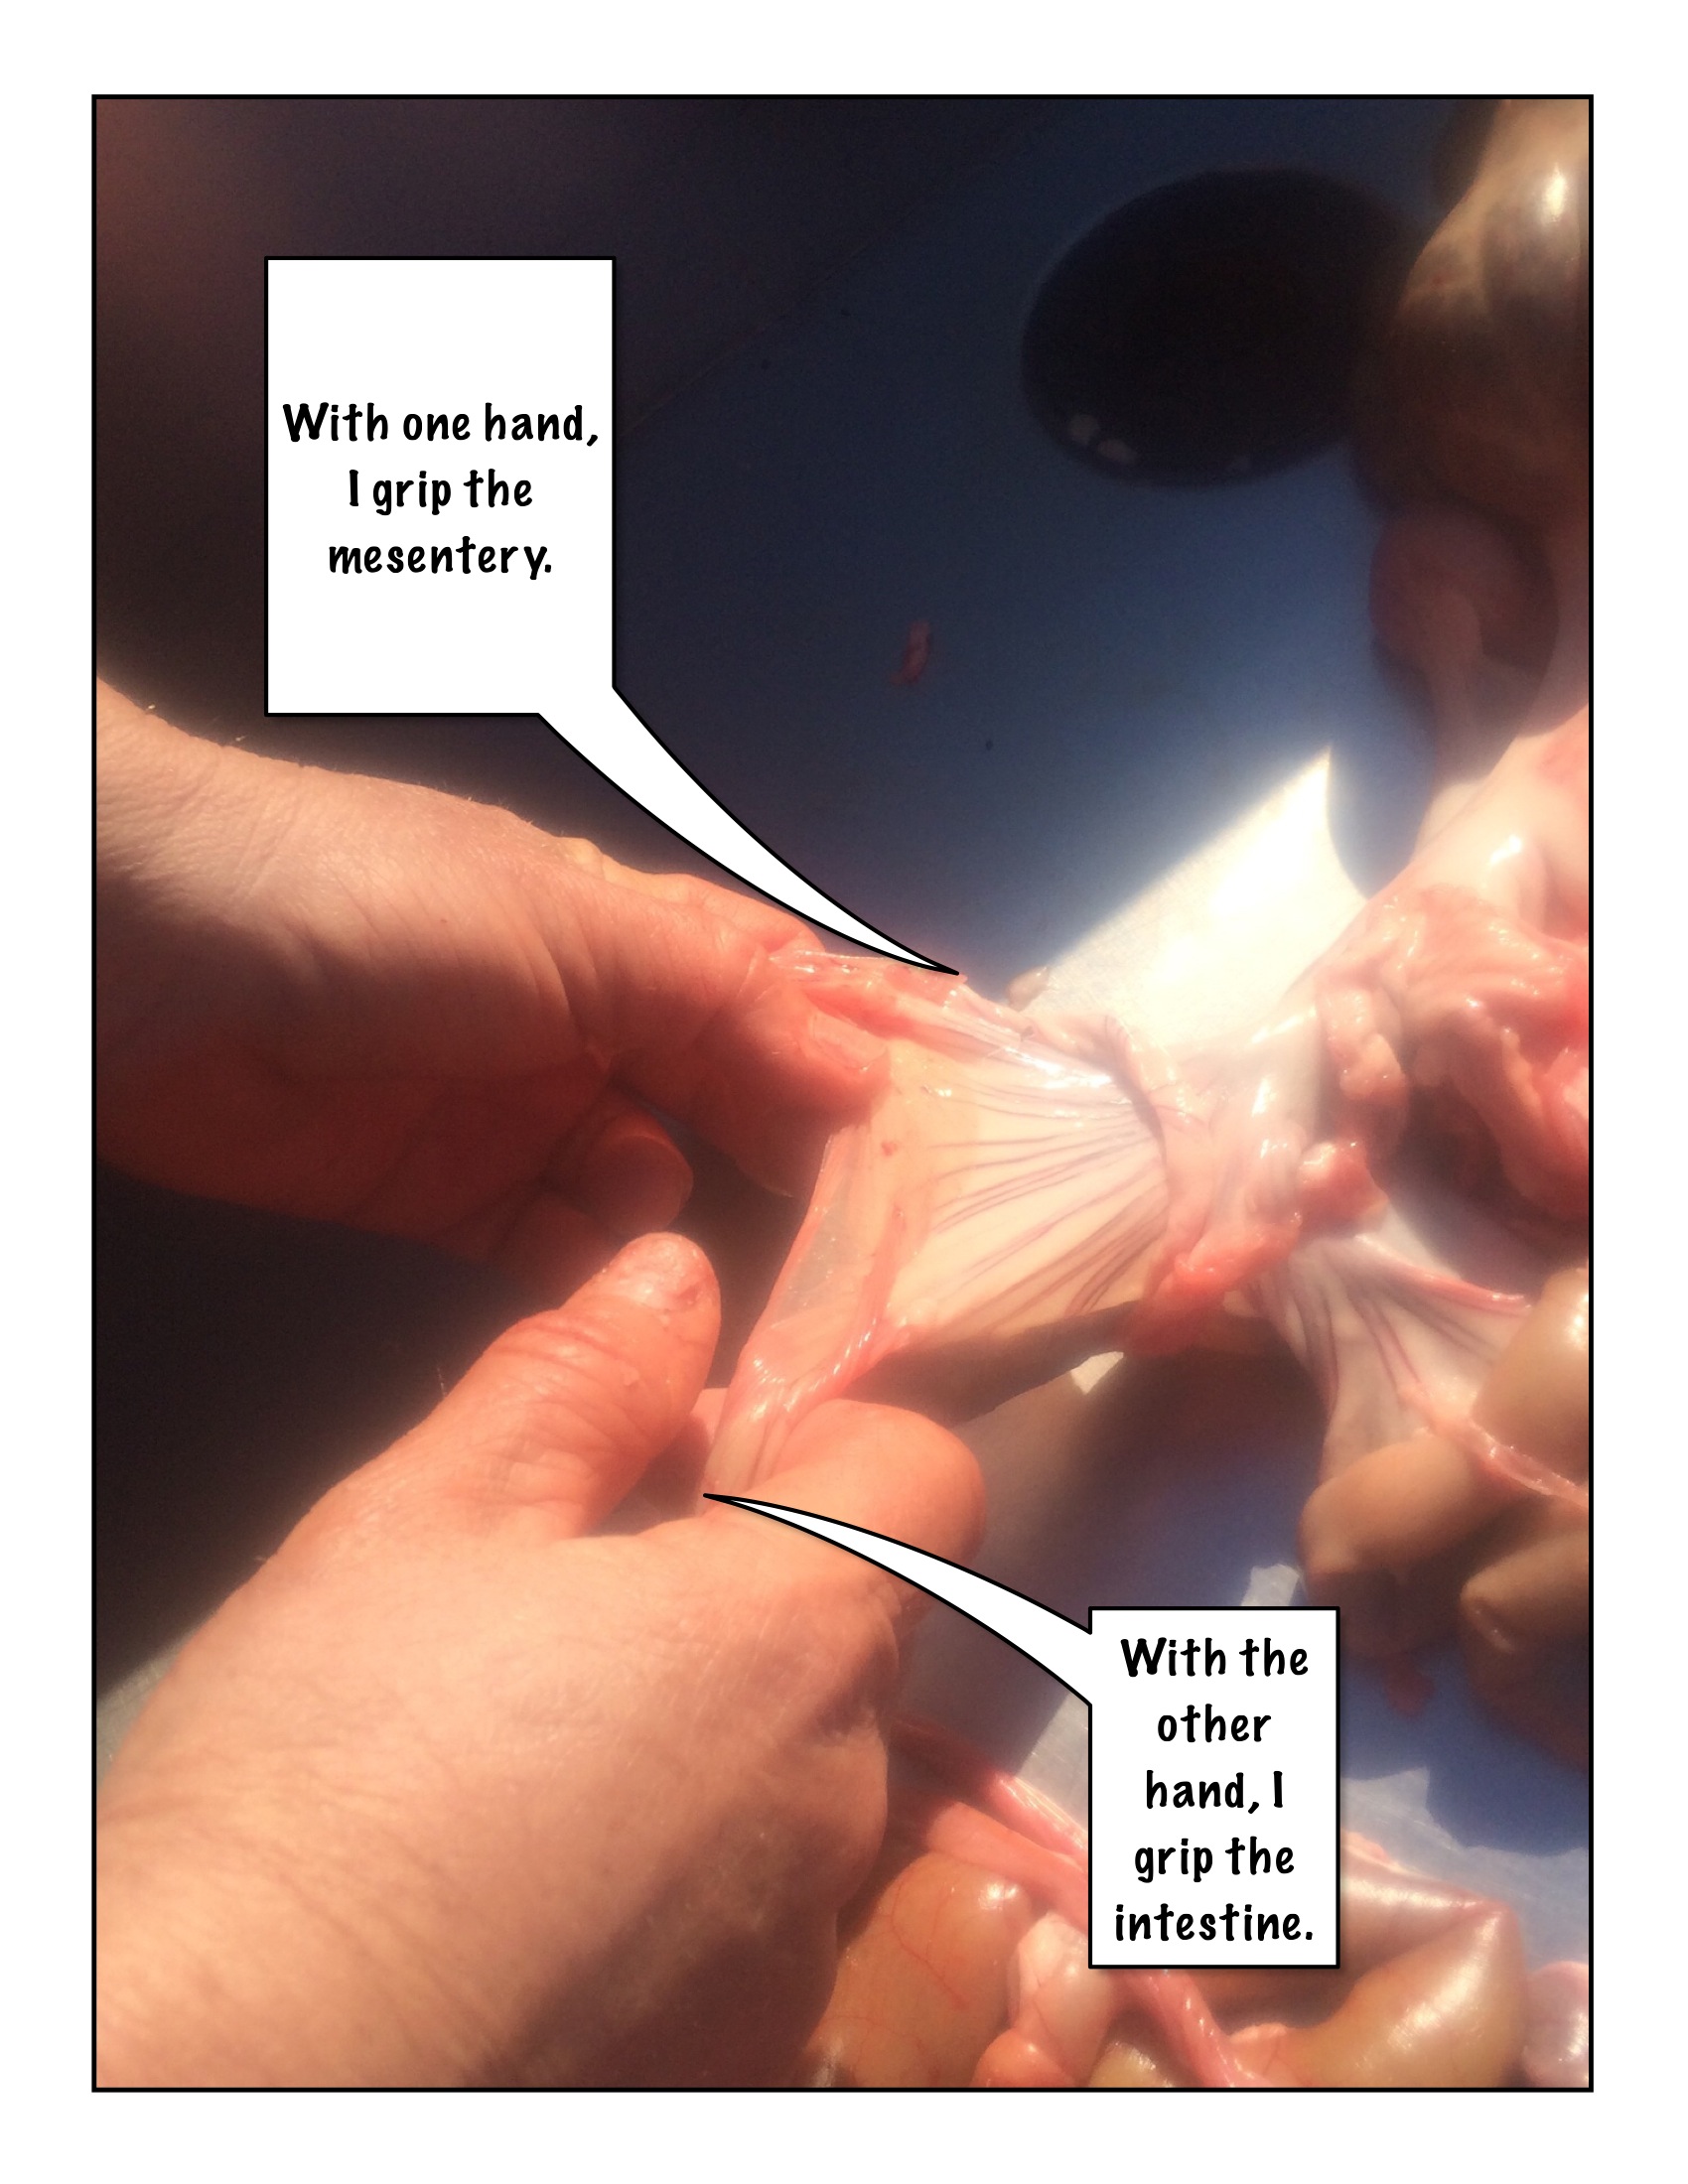
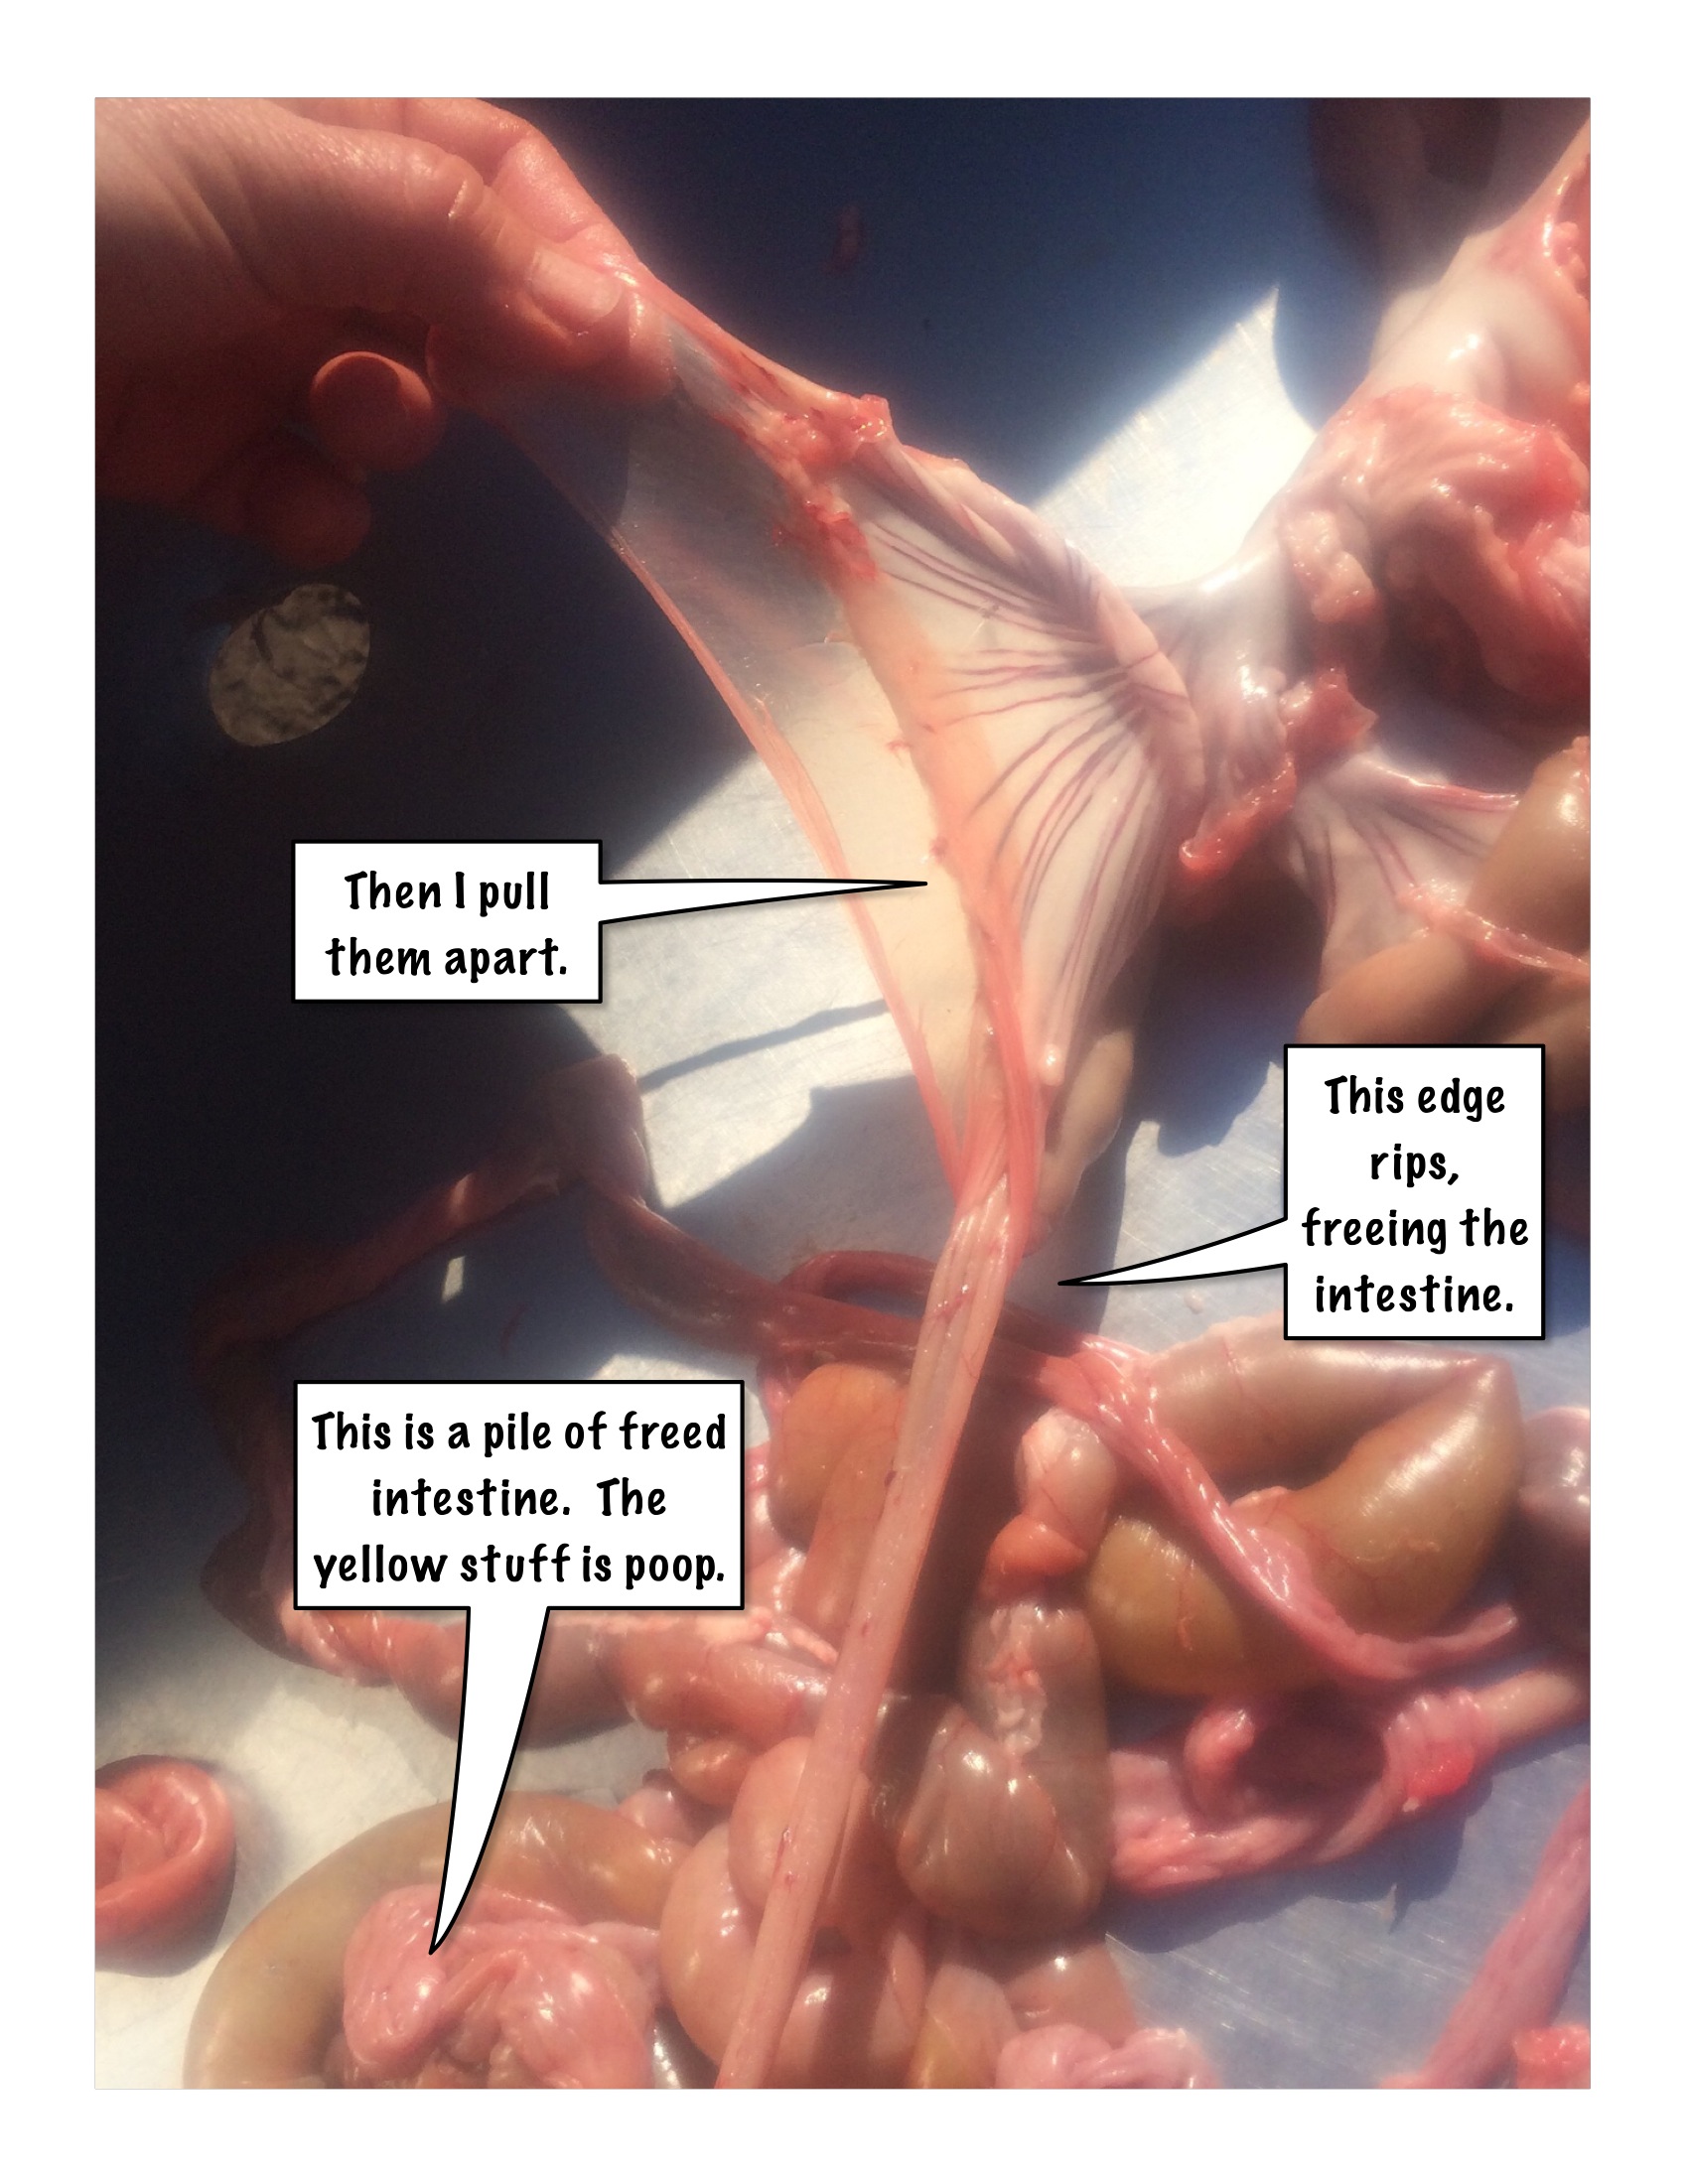
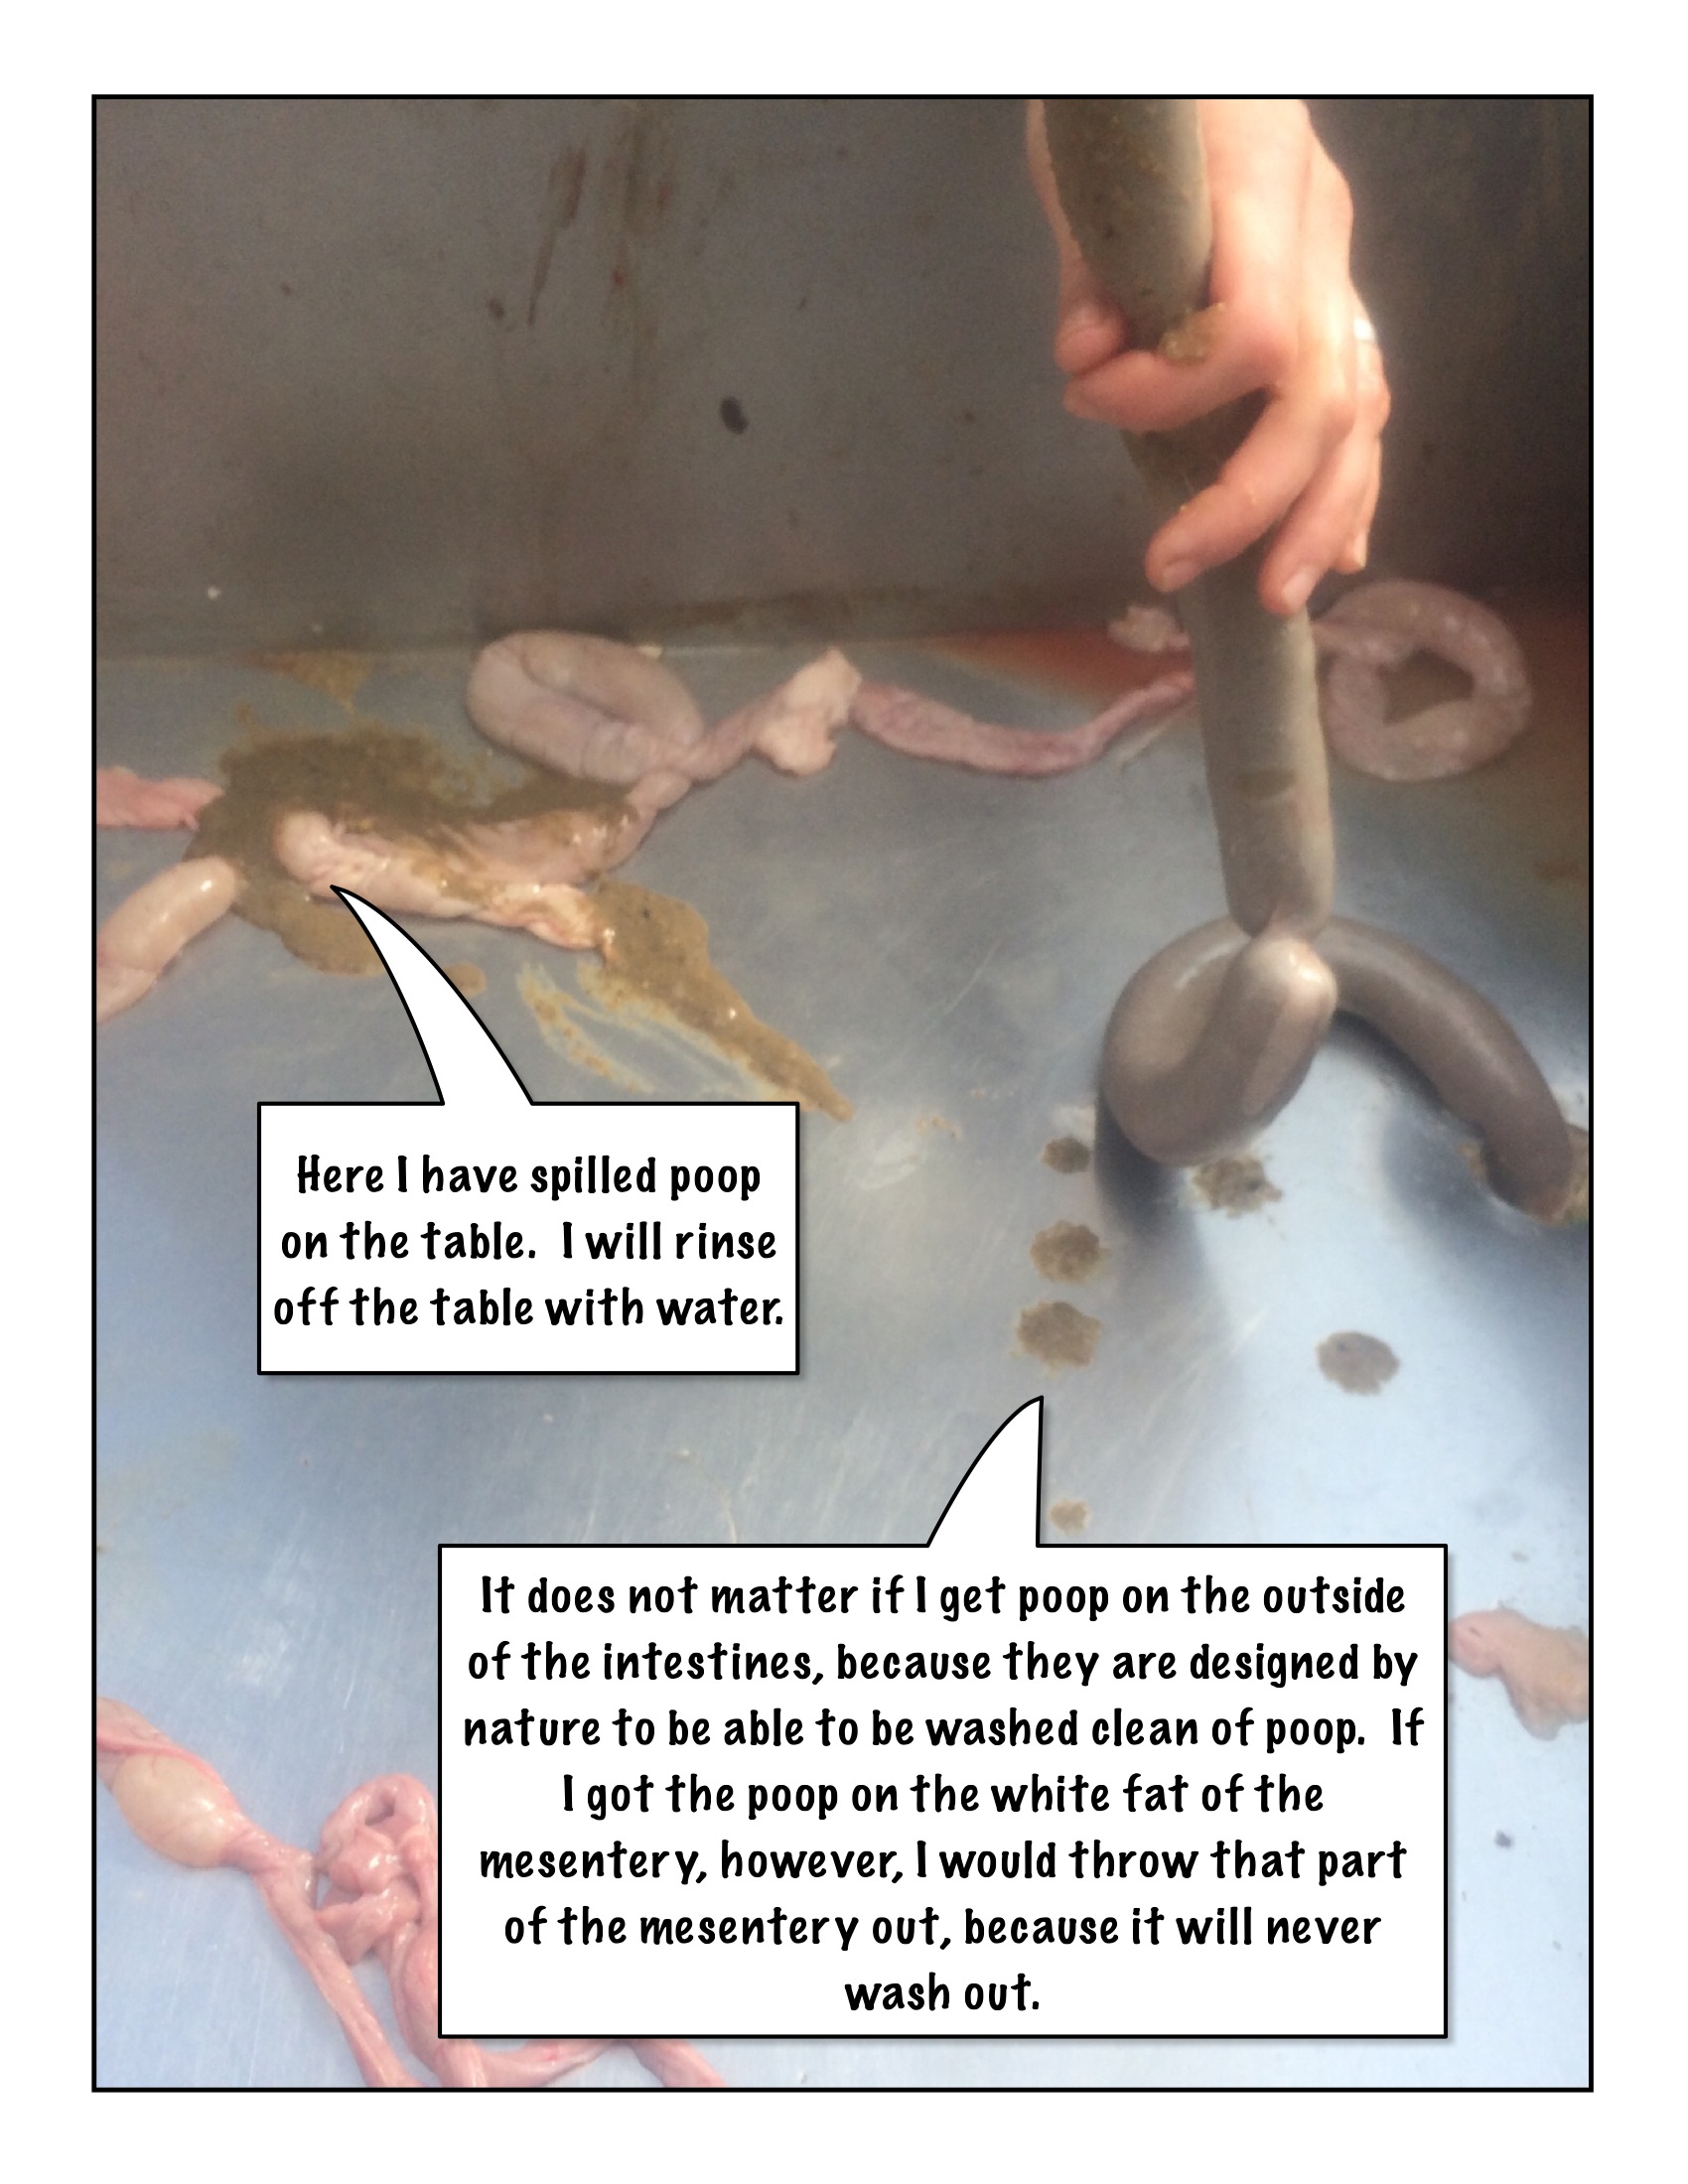
When stripping the middle small intestines, try to hold the messentary in one hand and pull straight back to tear the connective membrane holding it as well as carefully breaking the blood vessels. Some blood vessels may be tightly bound, and inattentiveness could cause breakage in the intestines. When it breaks, it is likely that poop will come out. Wash the area immediately and proceed. Do not save contaminated fats.
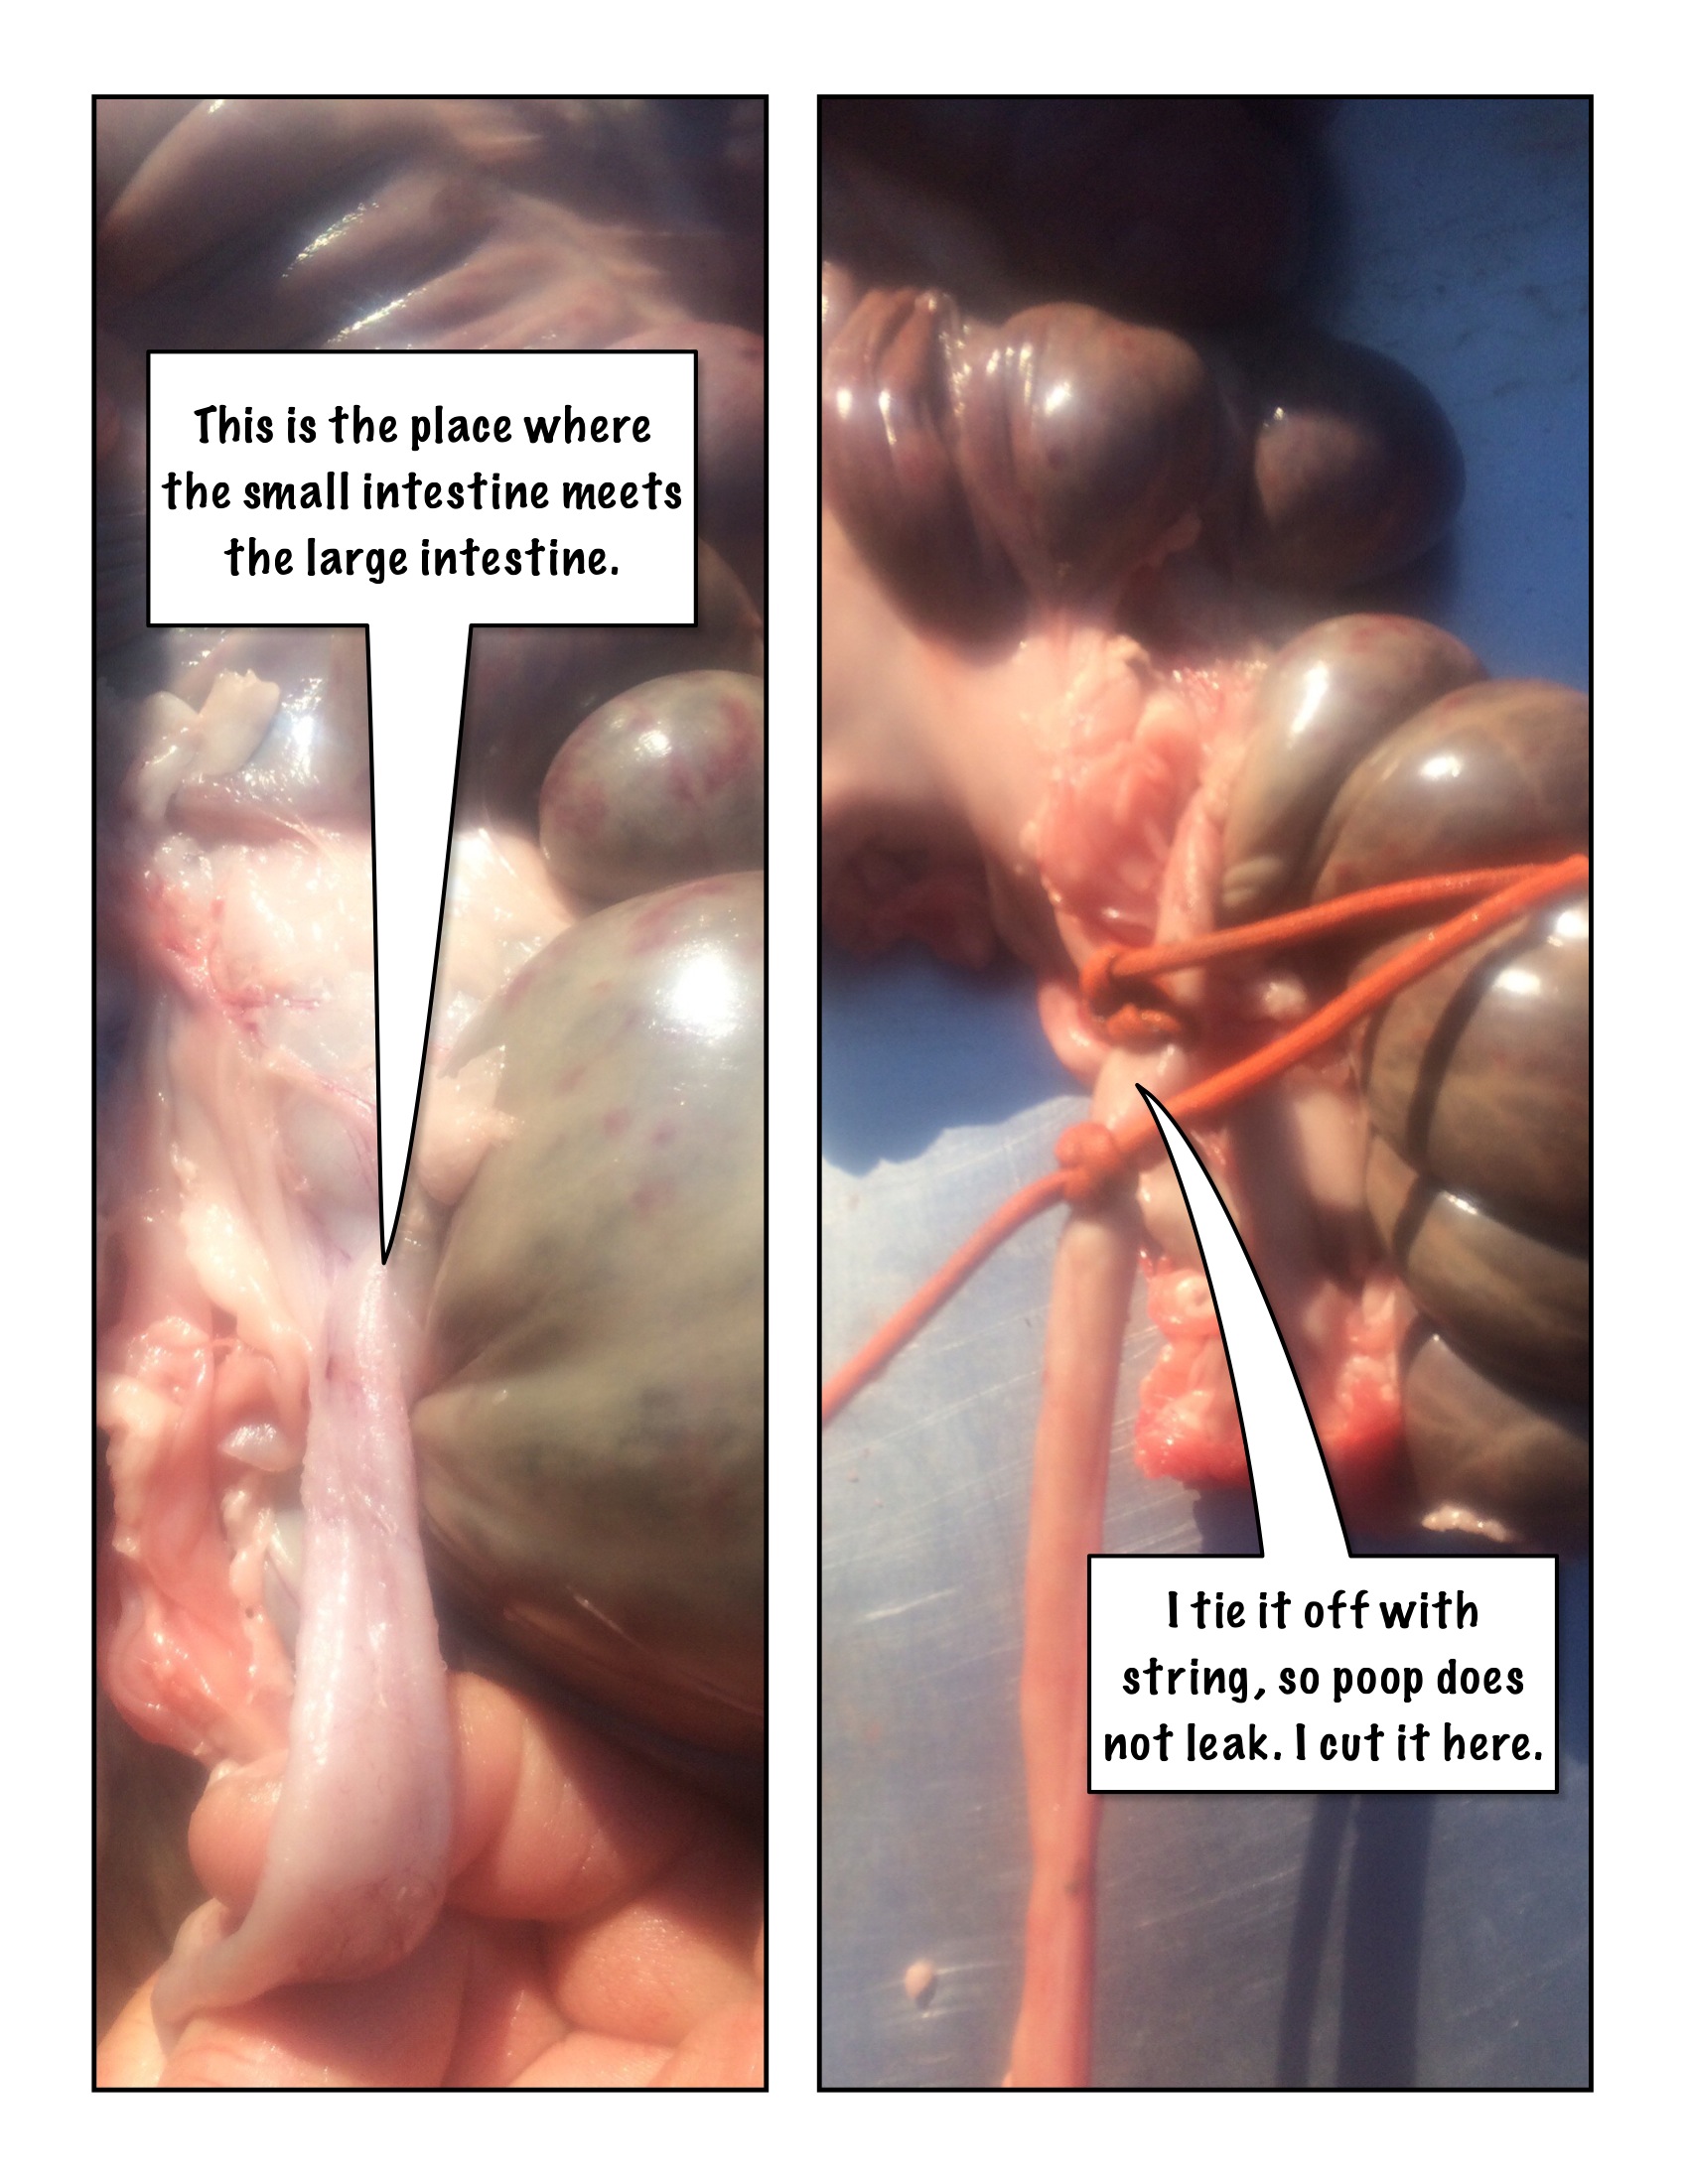
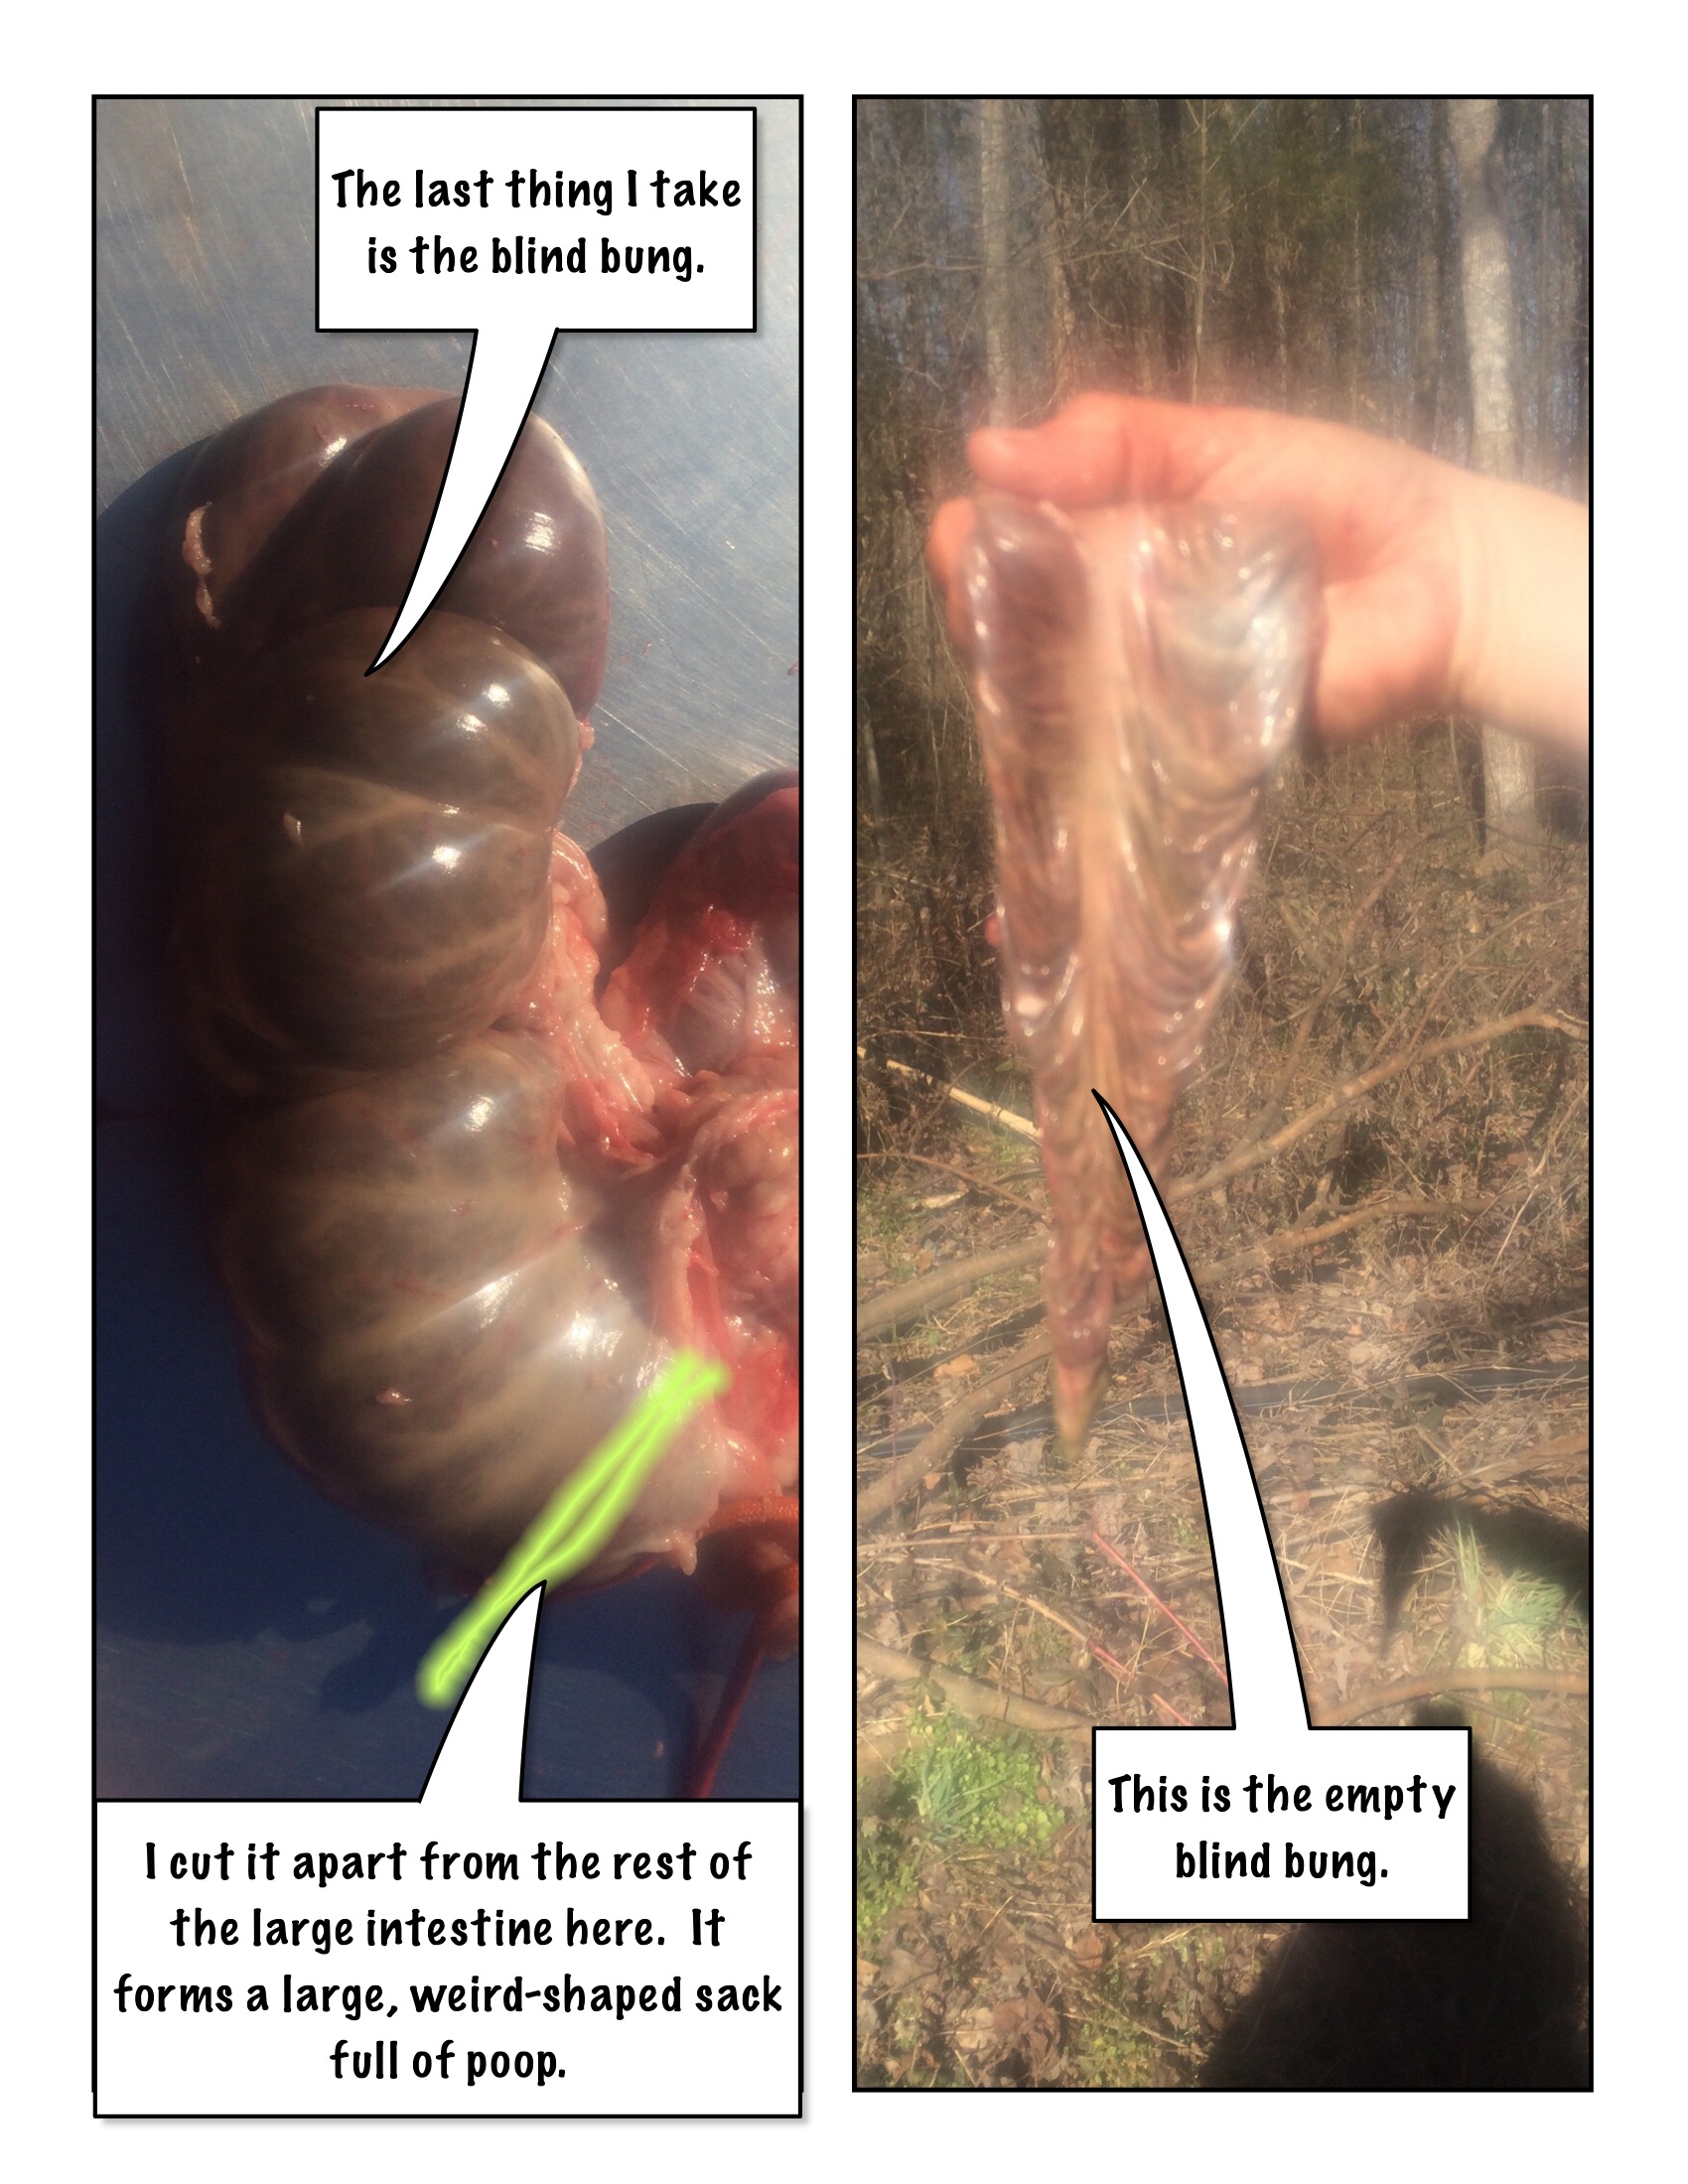
It is not necessary to remove the entire messentary membrane yet, just stripping it on one side is enough. At the far end of the messentary the small intestine straightens out again. It runs into the large intestine at the blind bung or diverticulum. Tie it off twice a few inches from the large intestine and sever it between ties. If it is still clean, cut the messentary from the remaining guts and save it for lard.
If you have a plan for it, harvest the blind bung and large intestines. The blood vessels are stronger, more tightly bound and apt to tear the intestines while being separated. The colon is straight, and trumpet shaped, so somewhat larger, and not as bad to clean. The blind bung is also a bit wider than most of the large intestines, which coil directly around themselves. I don't normally mess with any but the blind bung.
Before discarding the rest be sure to search down by the rectum for the bladder, which can be very small if empty, and very huge if full. It is a good casing for certain recipes.
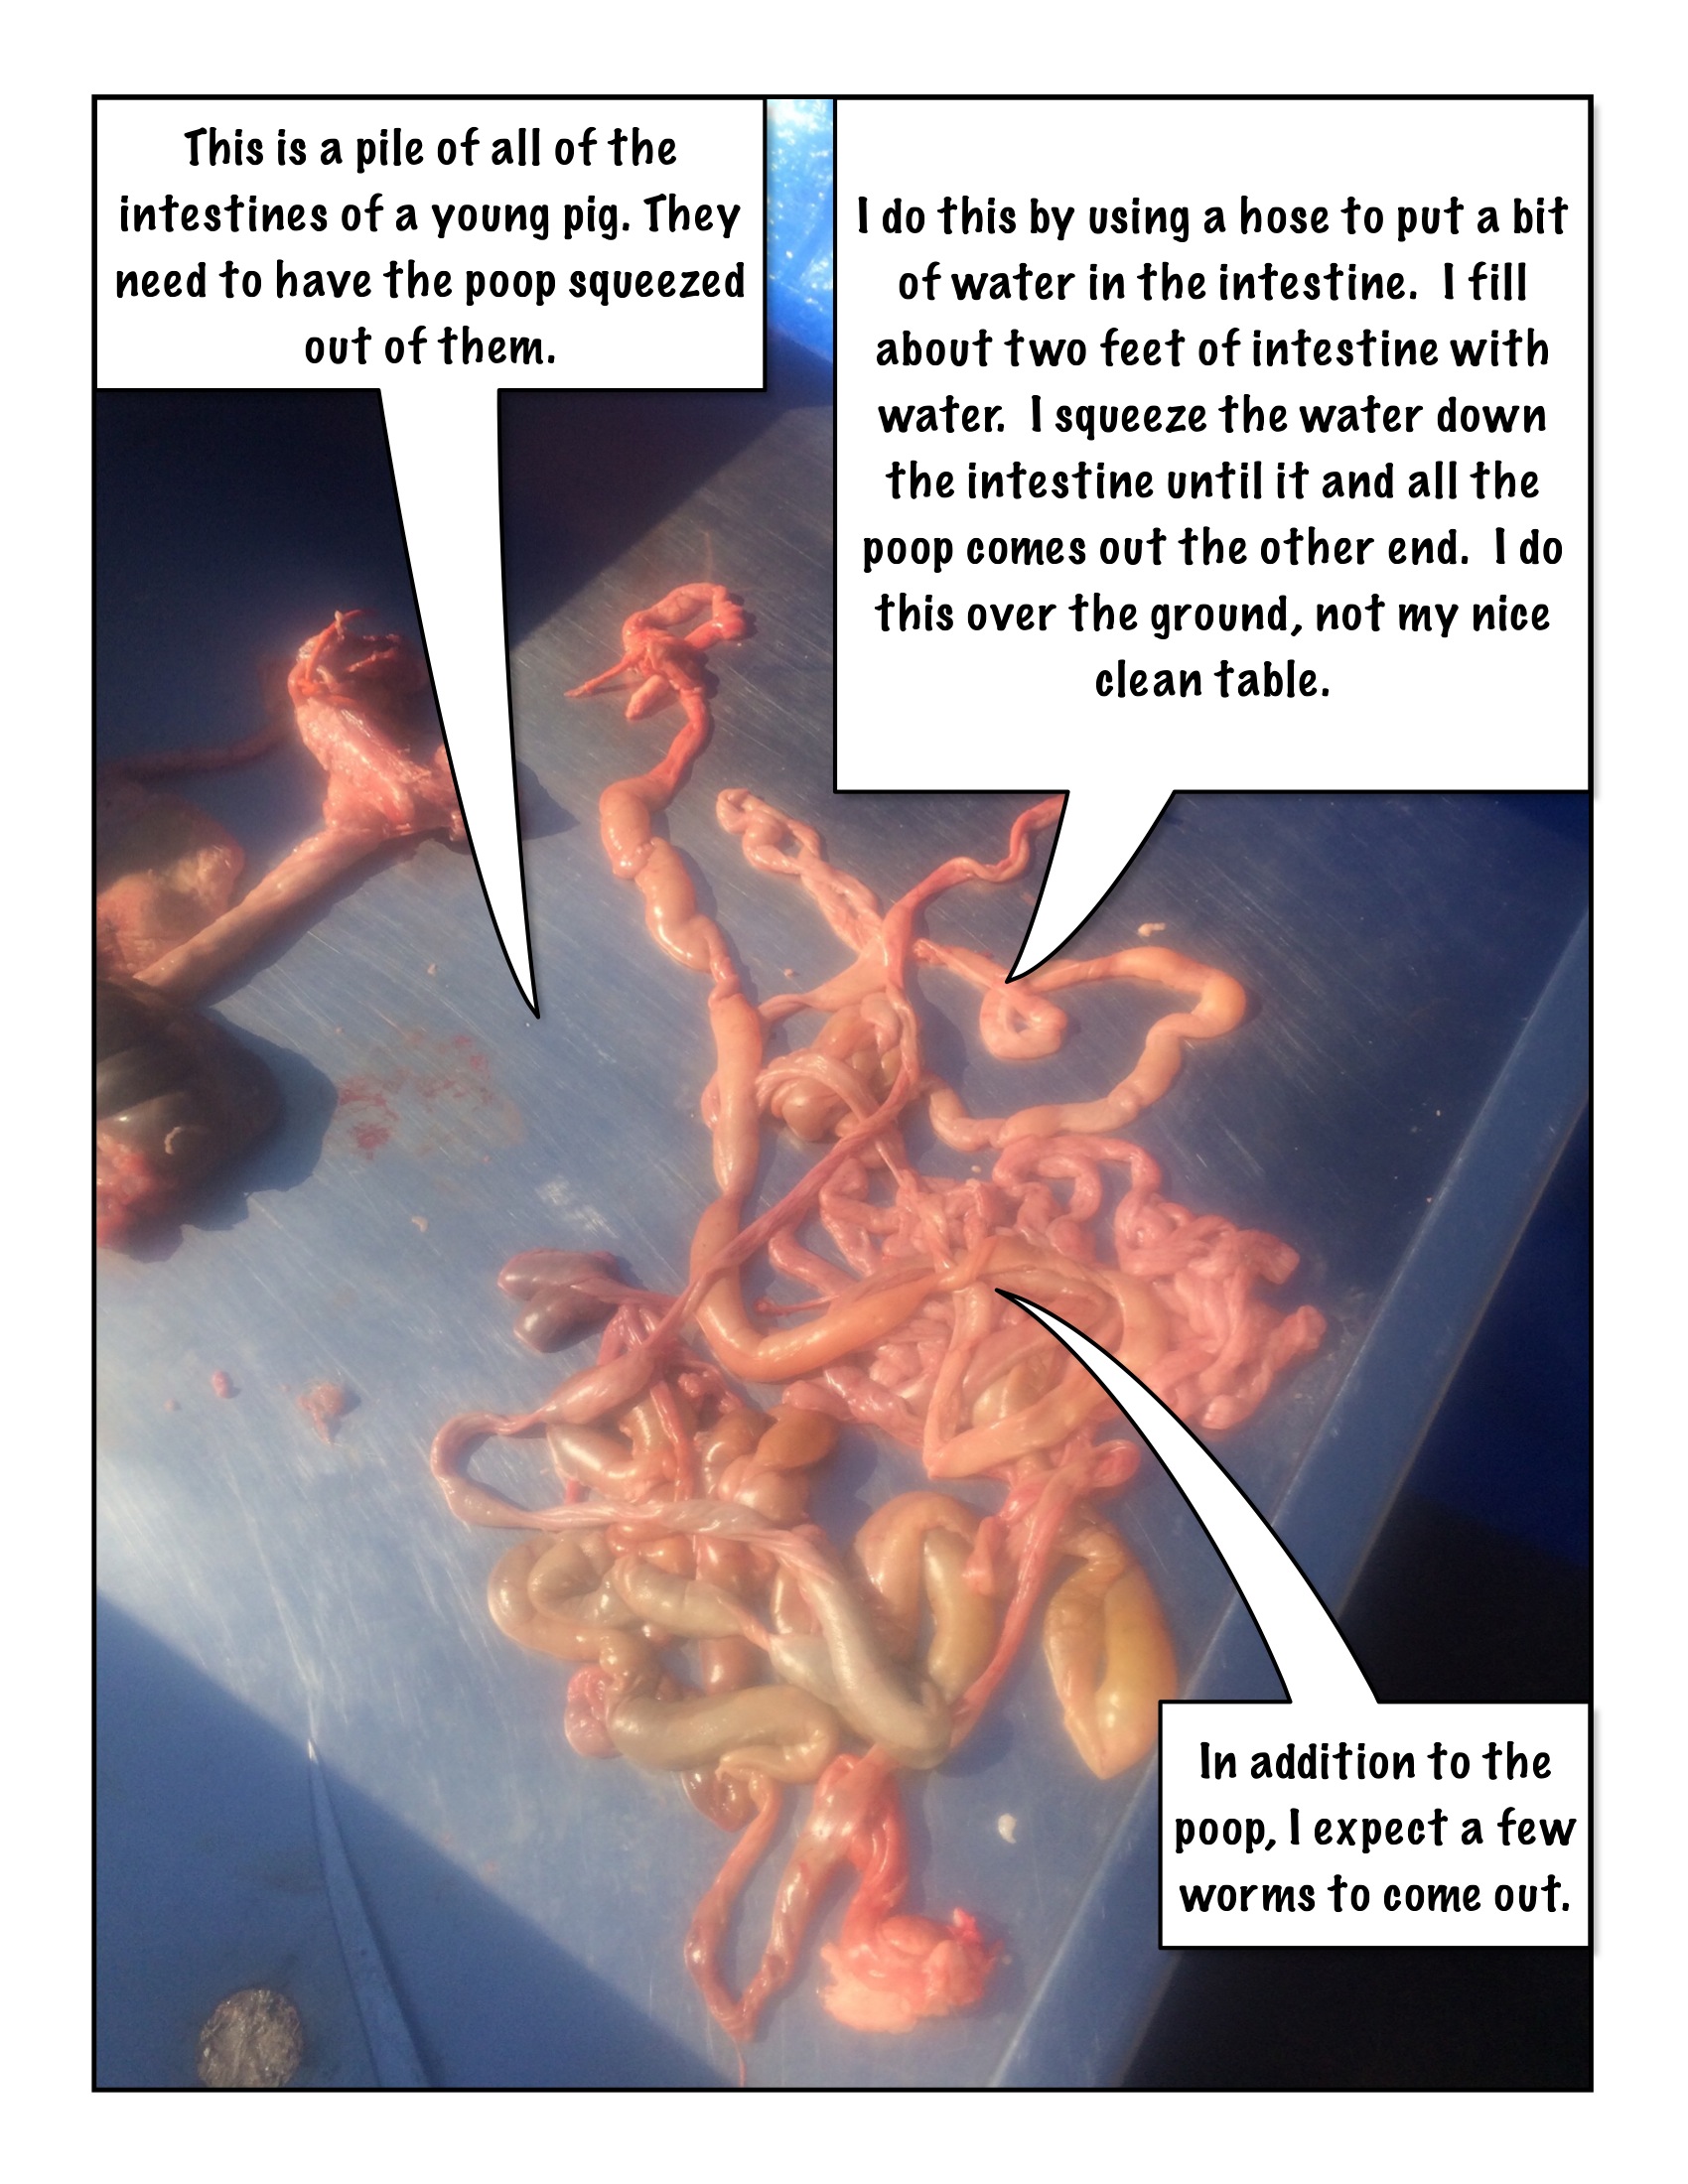
Once all the edibles have been separated and the casing found and separated, move on to emptying/rinsing. A hose with some sort of on/off nozzle is essential. Large casings, like the colon, direticulum and stomach may need content dumped before they can be flushed and rinsed. Do this away from your main work area. Keep in mind that what you are washing out of these casings is actually poop, and you don't want poop on your other organs.
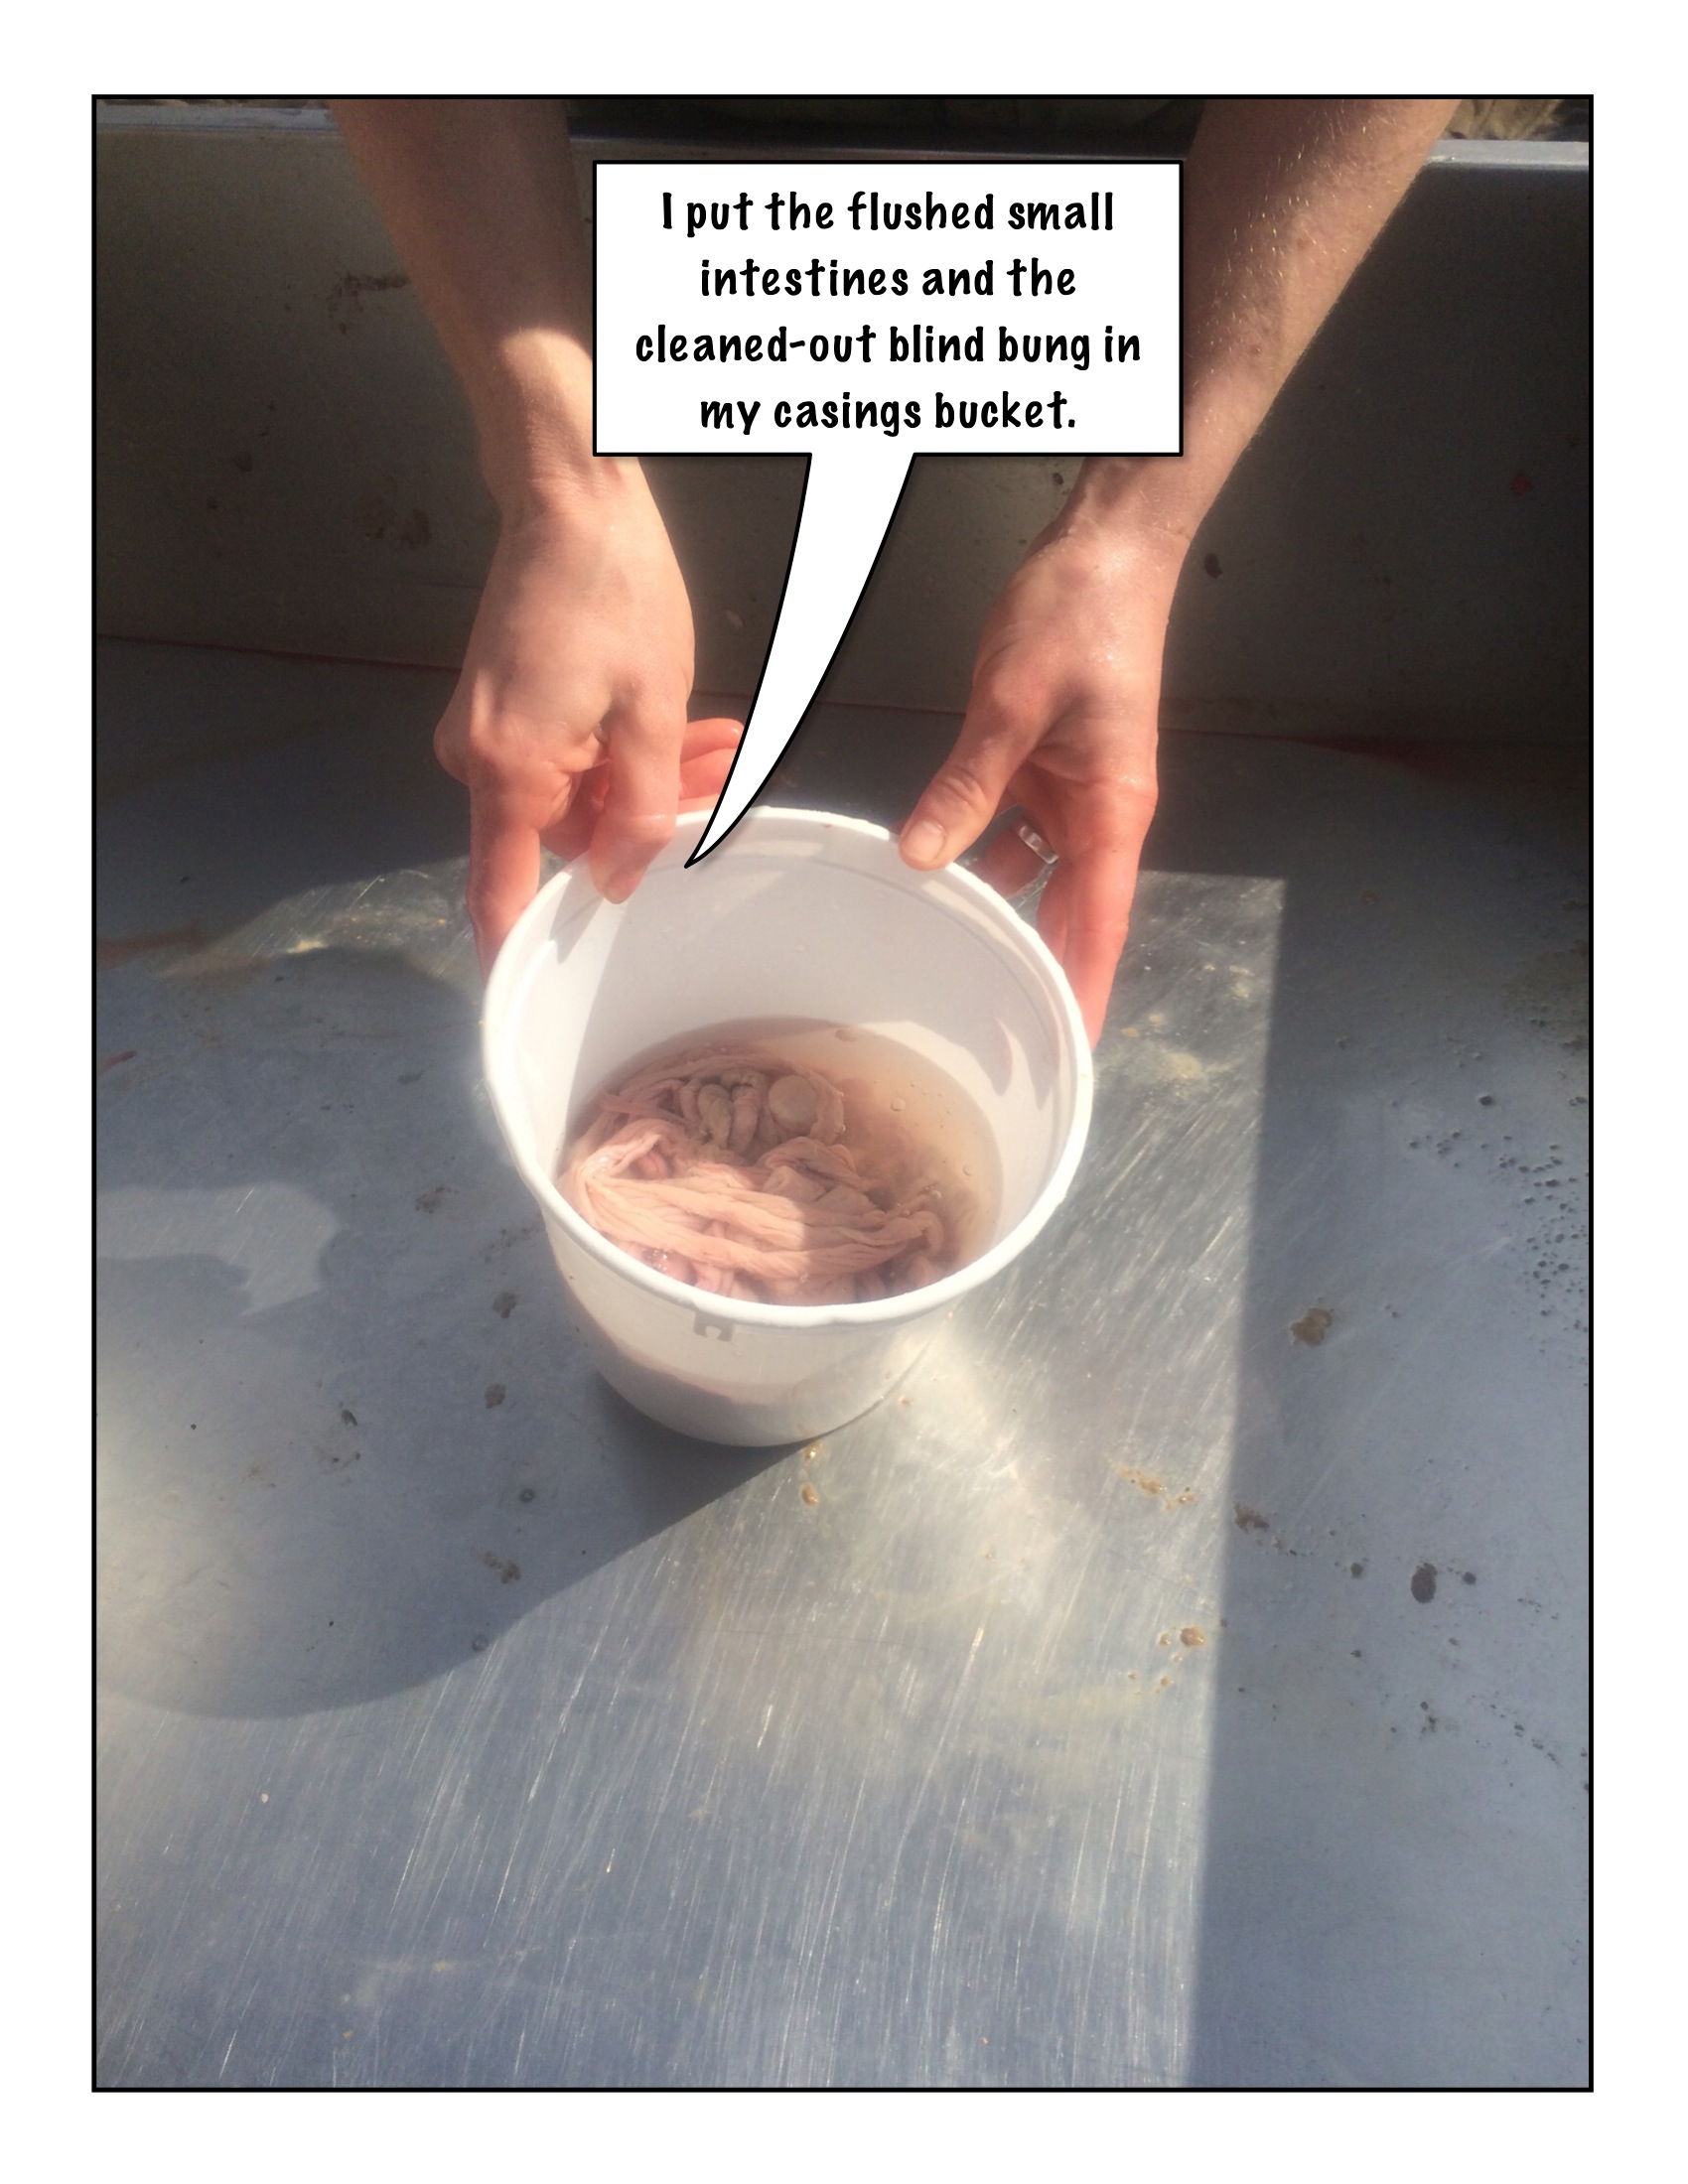
Small intestines are too long for practicality. If you noticed any breaks in the casing, cut your casing there. If the casing is flawless cut it into 3-4 parts anyways. Flush water through the parts until the water comes through clean. After all casings have been rinsed/flushed, bring them to a processing area with a sink. There is still a very long way to go until you have proper casings. At the moment the casings will have a dark pinkish color.
Now that all of the organs are sorted, carry them to the kitchen and put them in the refrigerator.
Day 1 Part 2: In the Kitchen
1.3 Cleaning Casings
Do not mess with any meat while working with casings. You are still working with the part of the animal that digested food, and all of the food remains will not be gone yet.
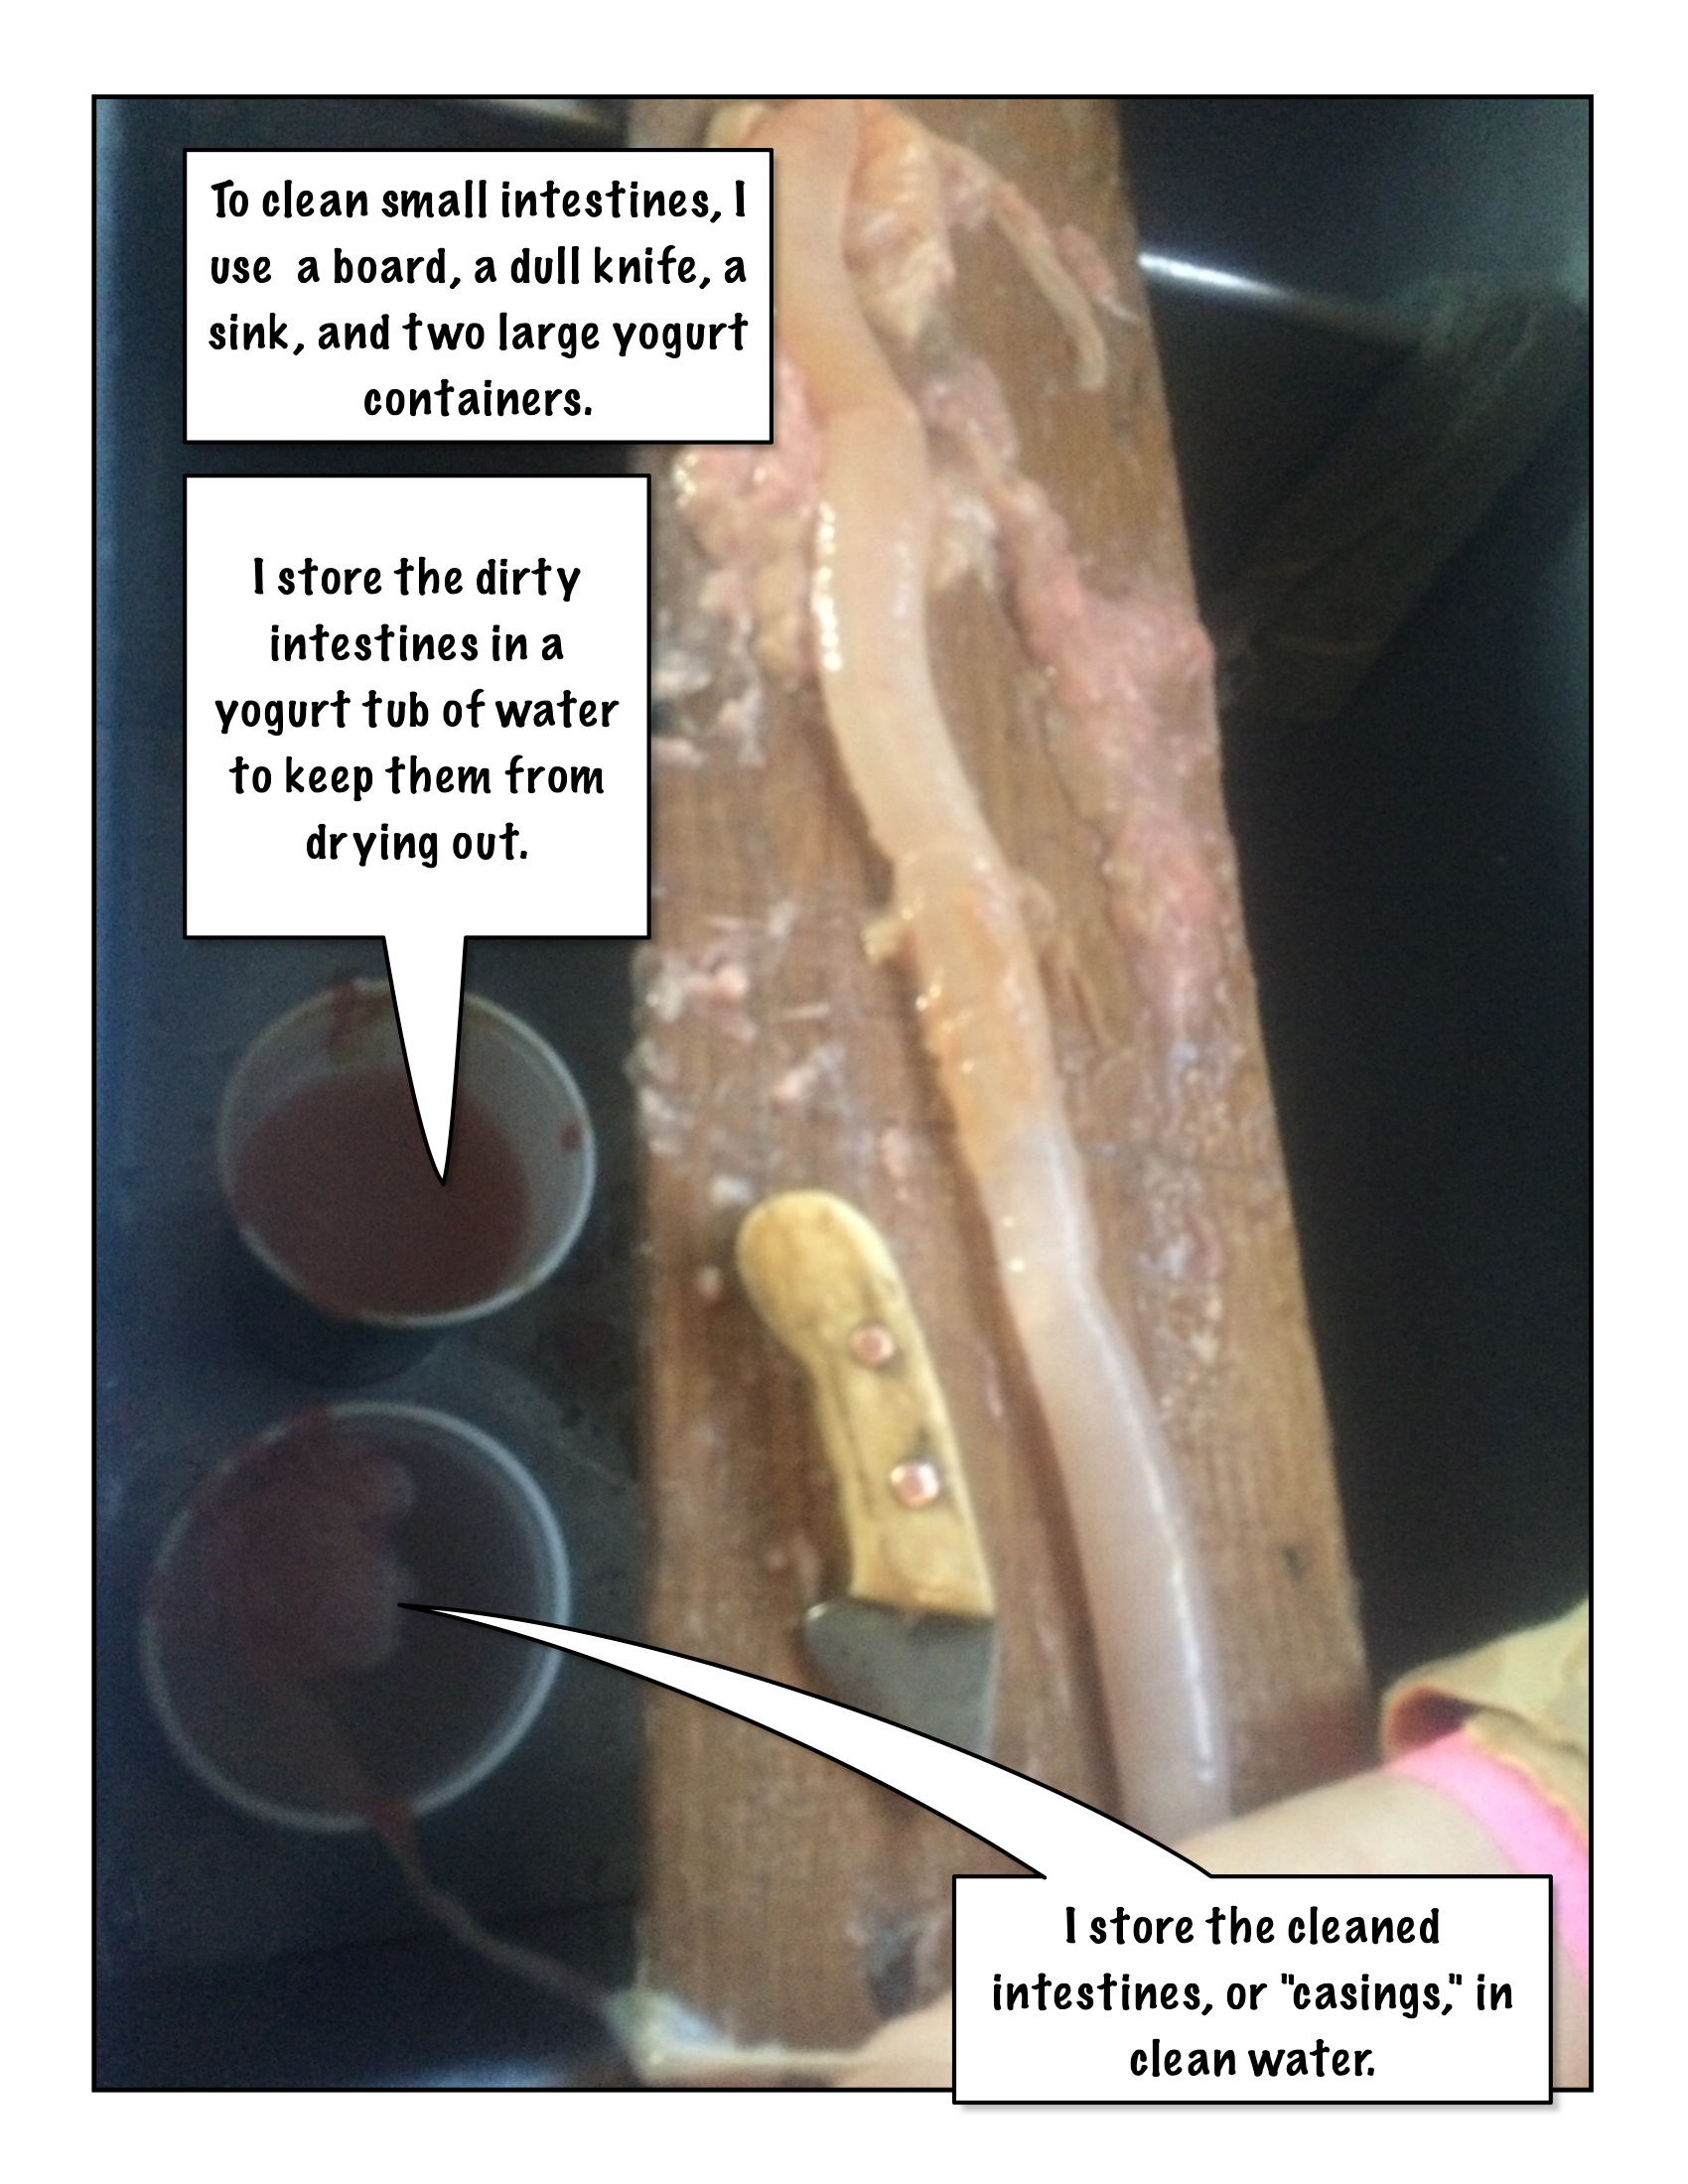
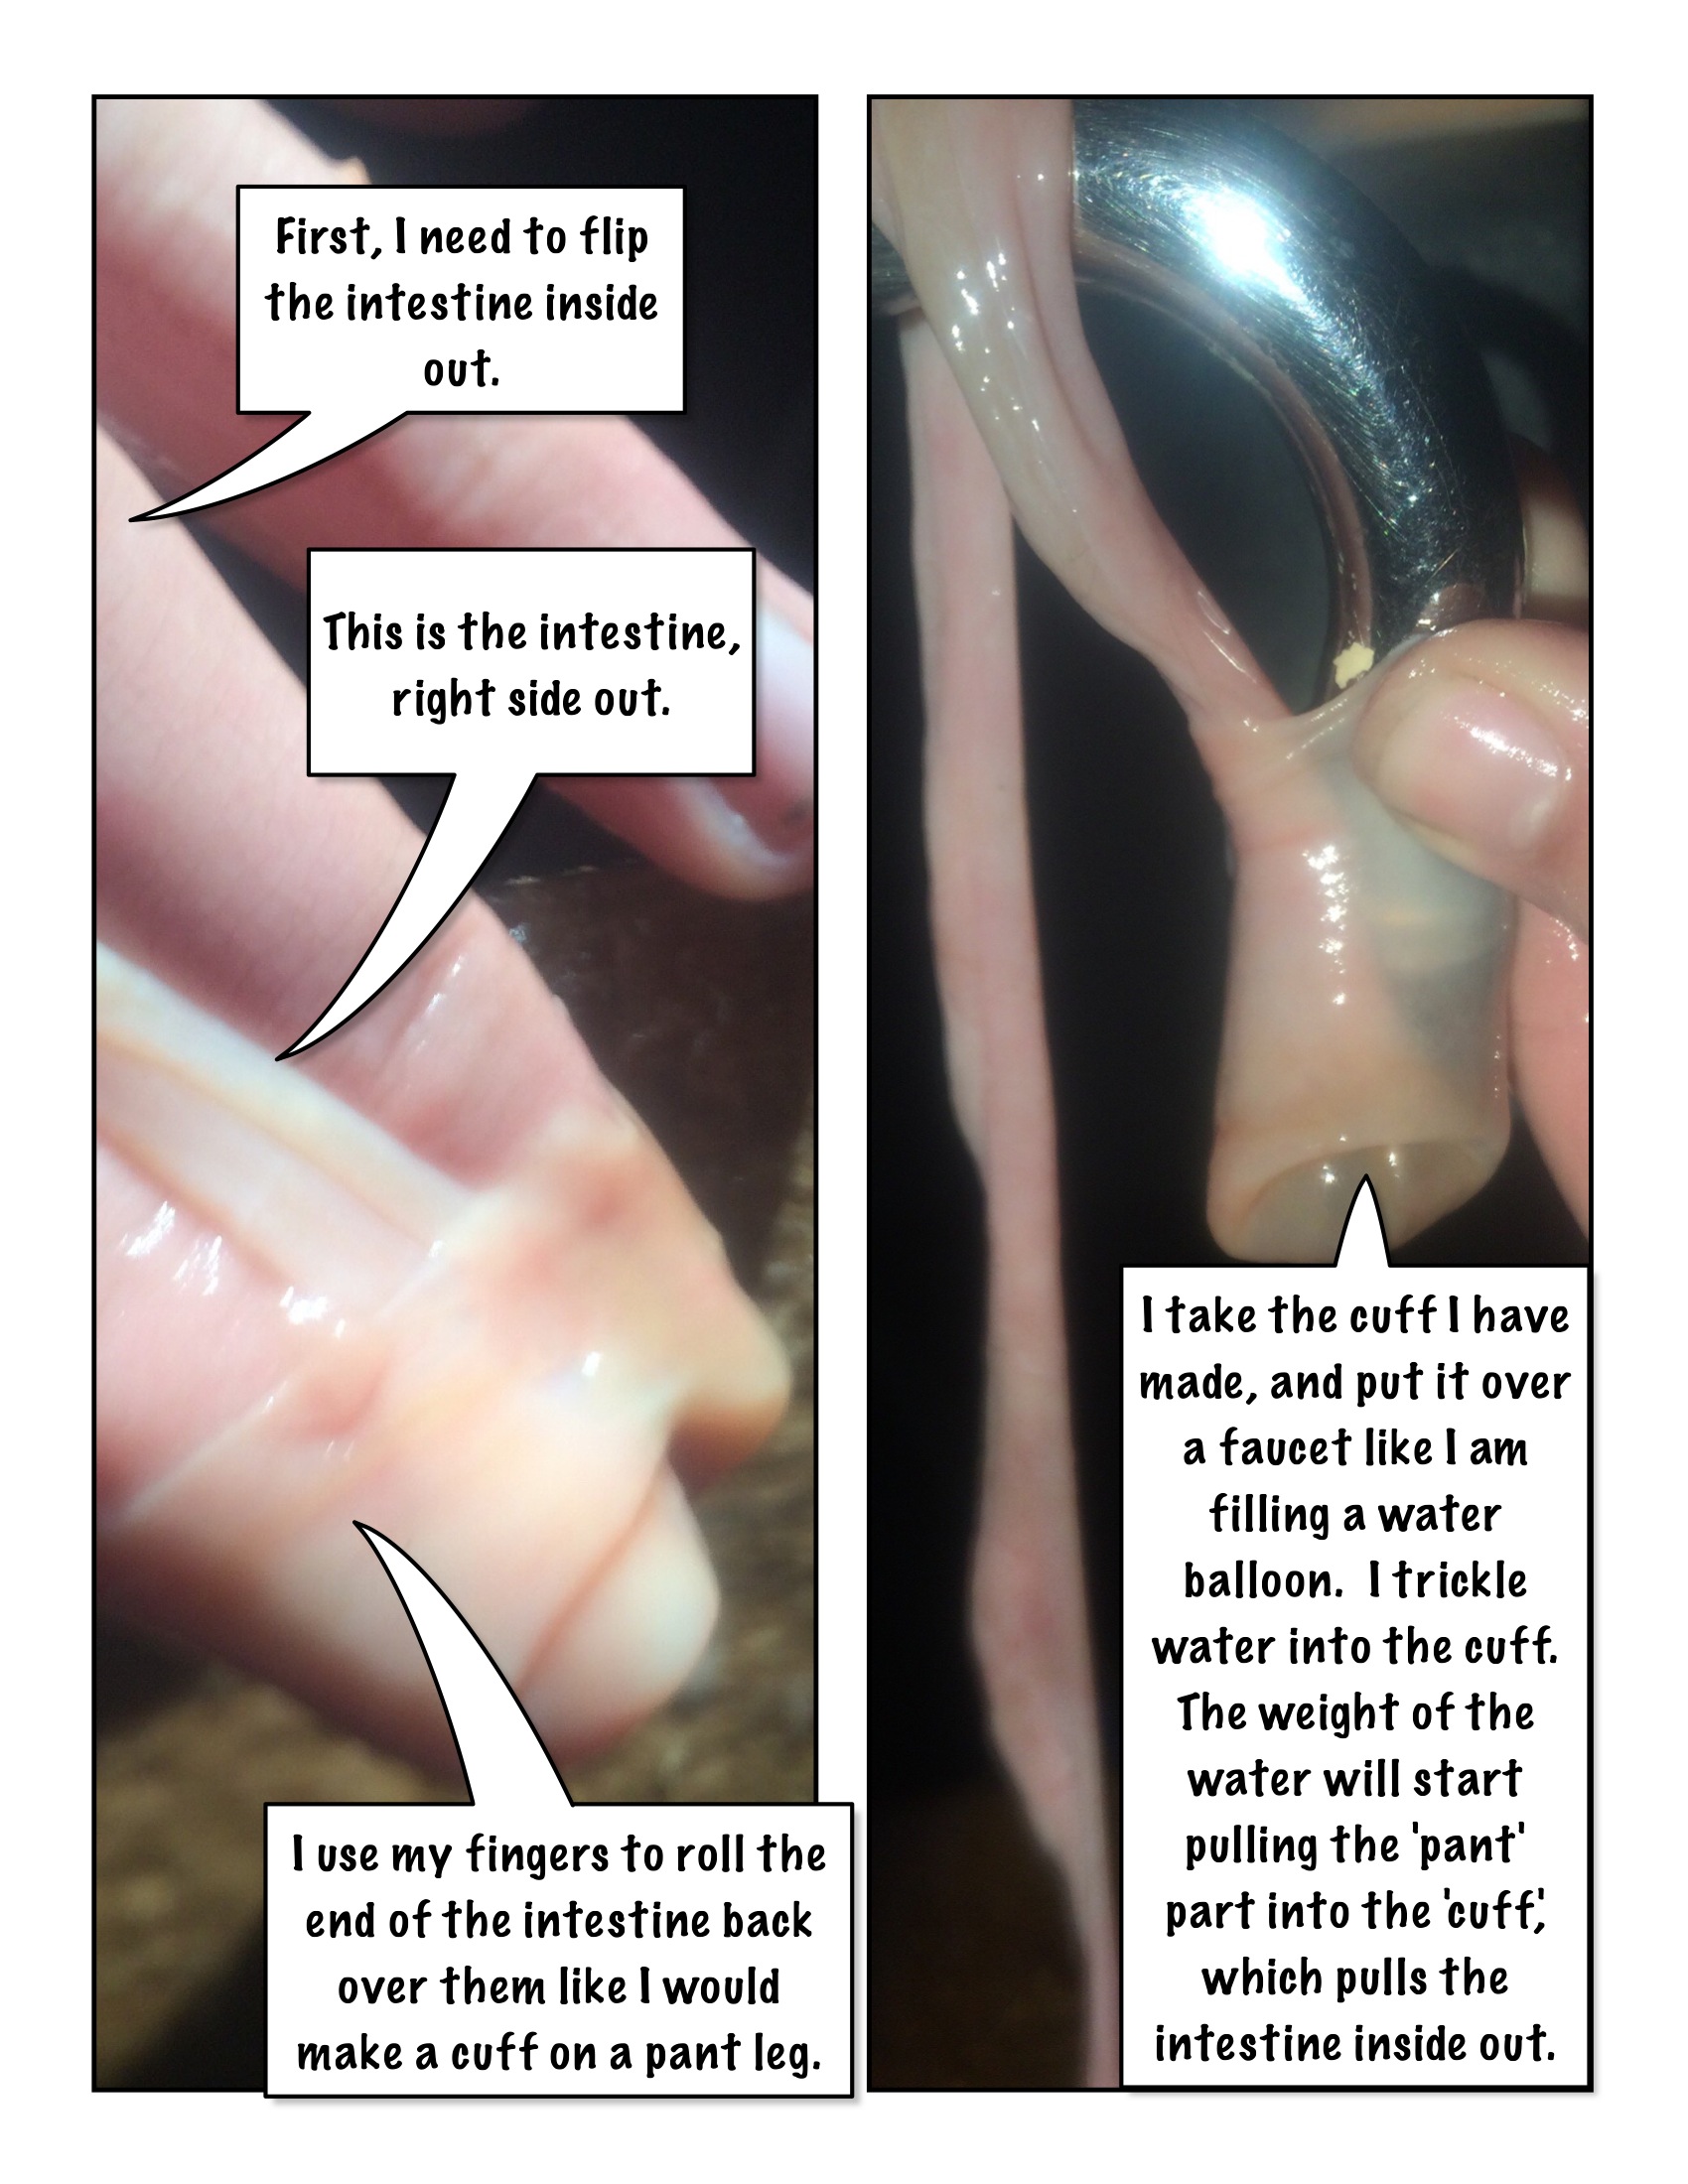
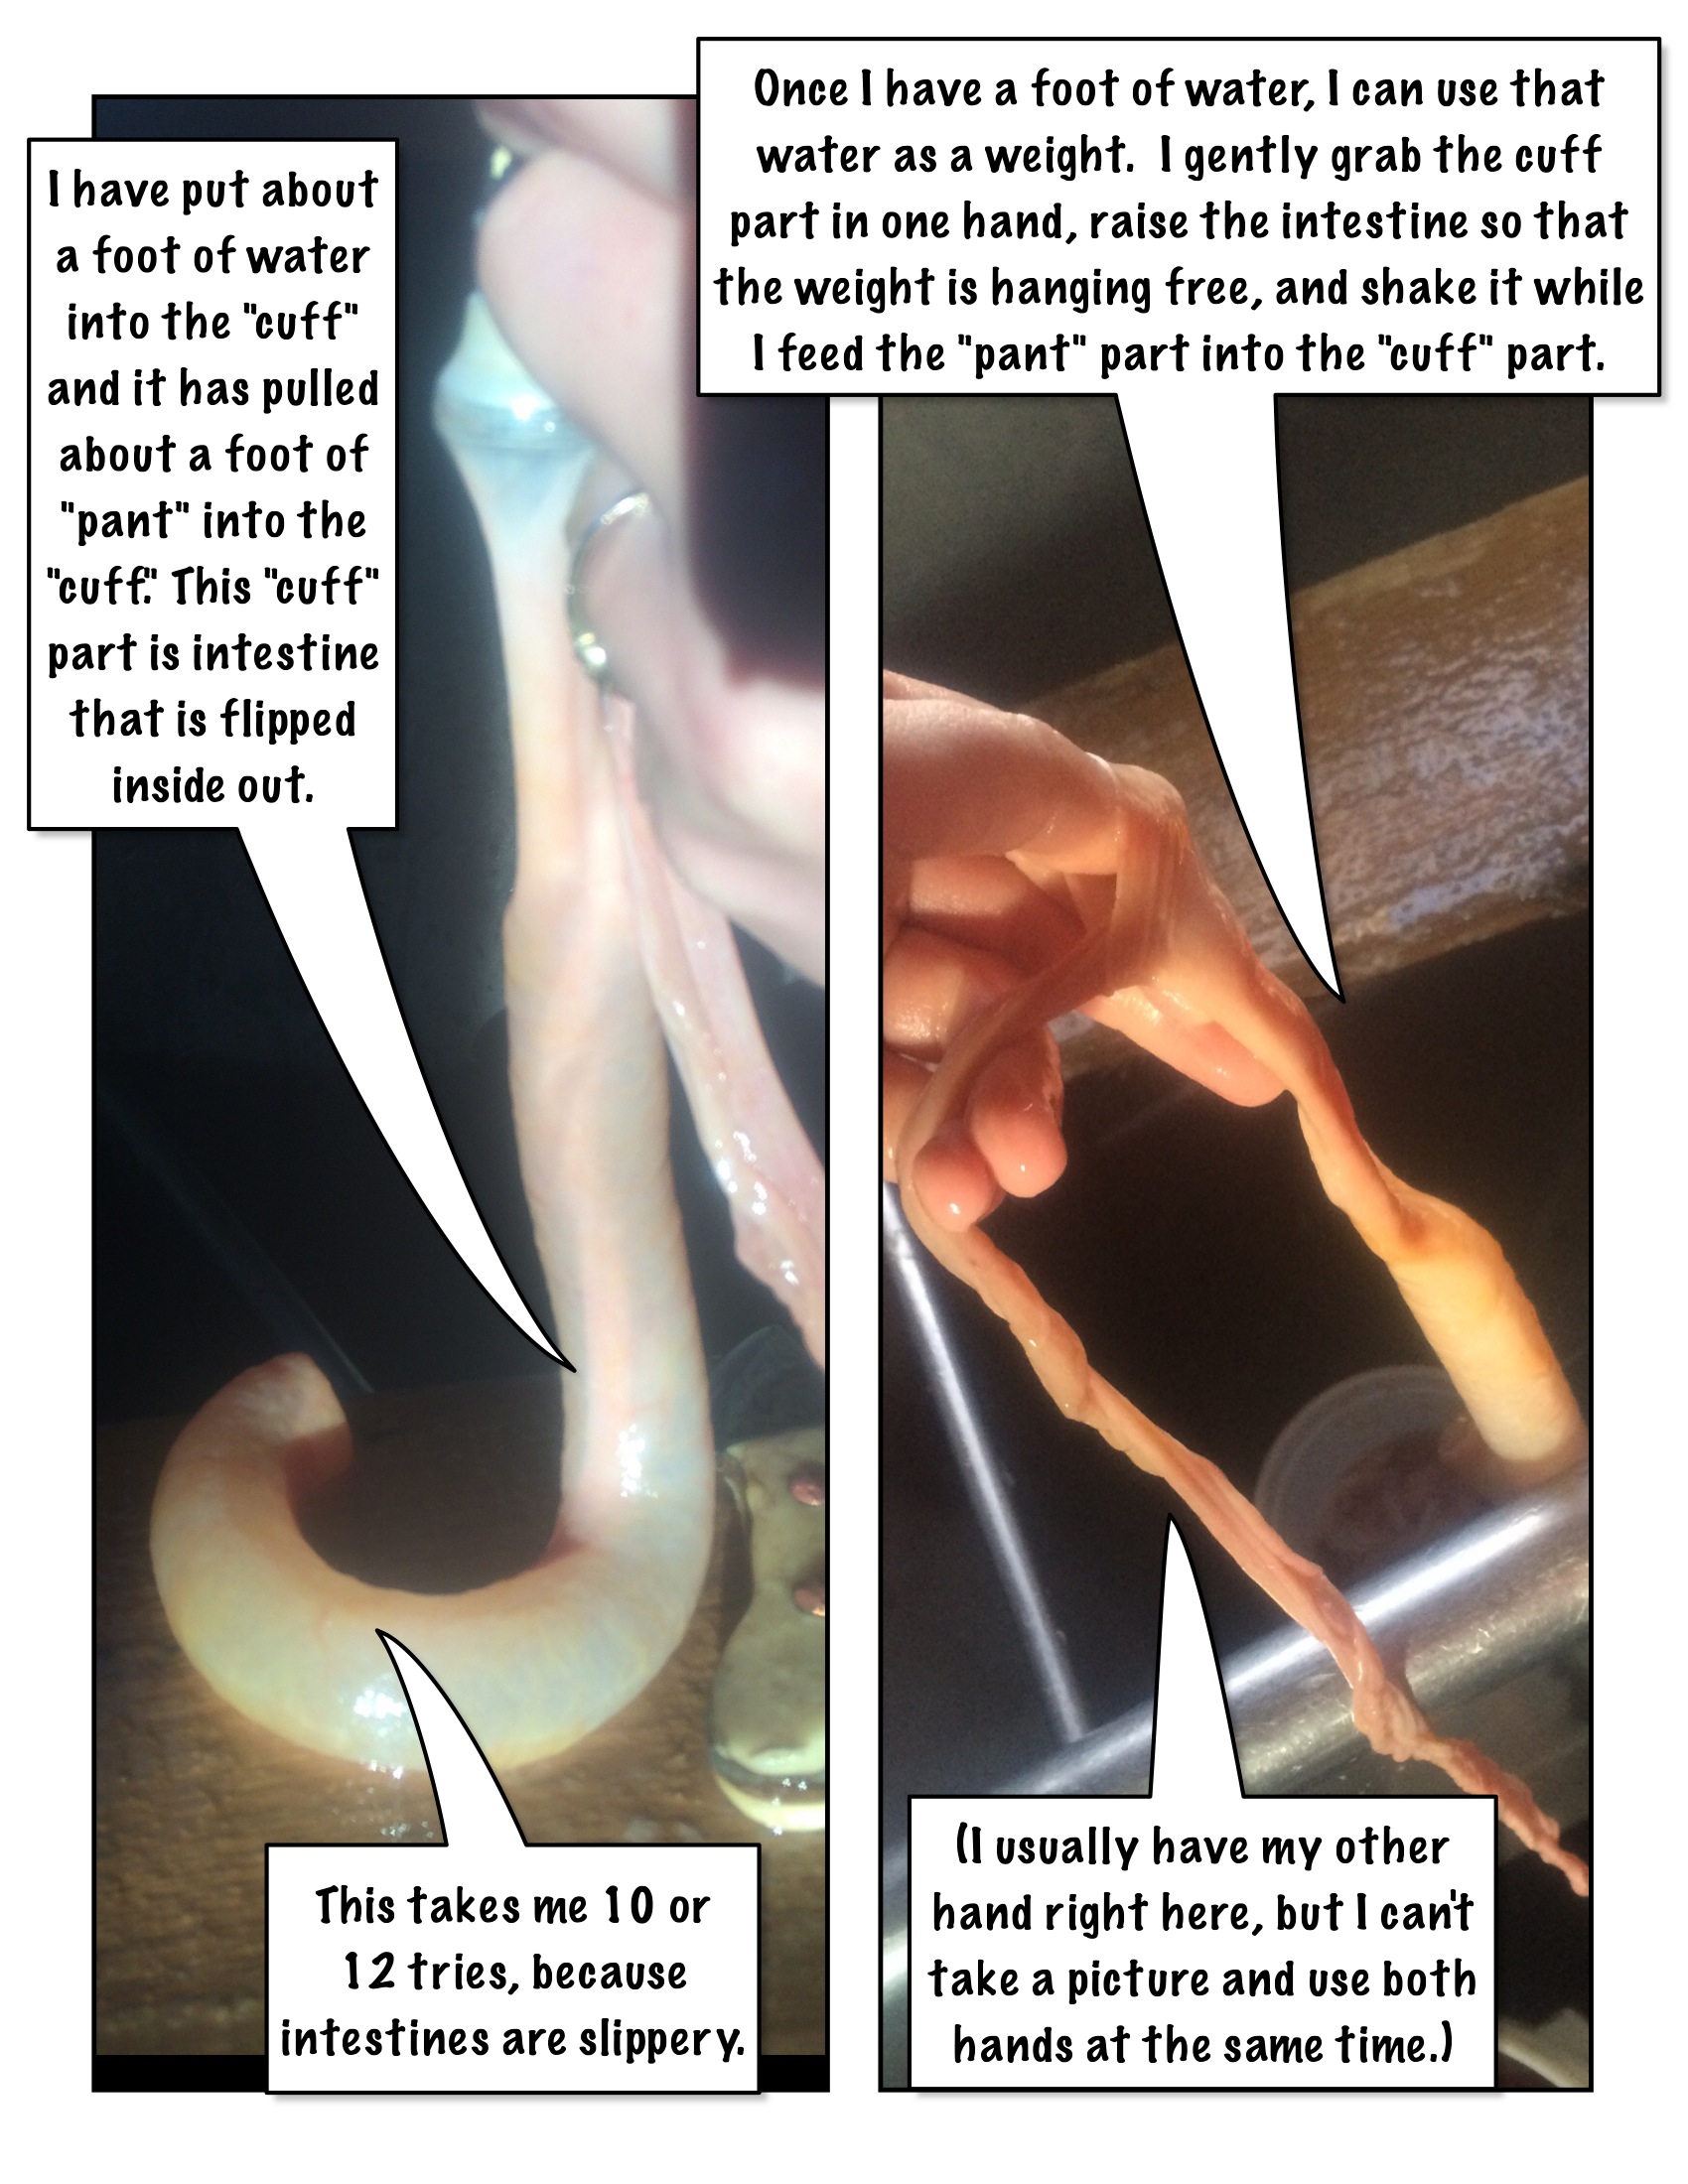
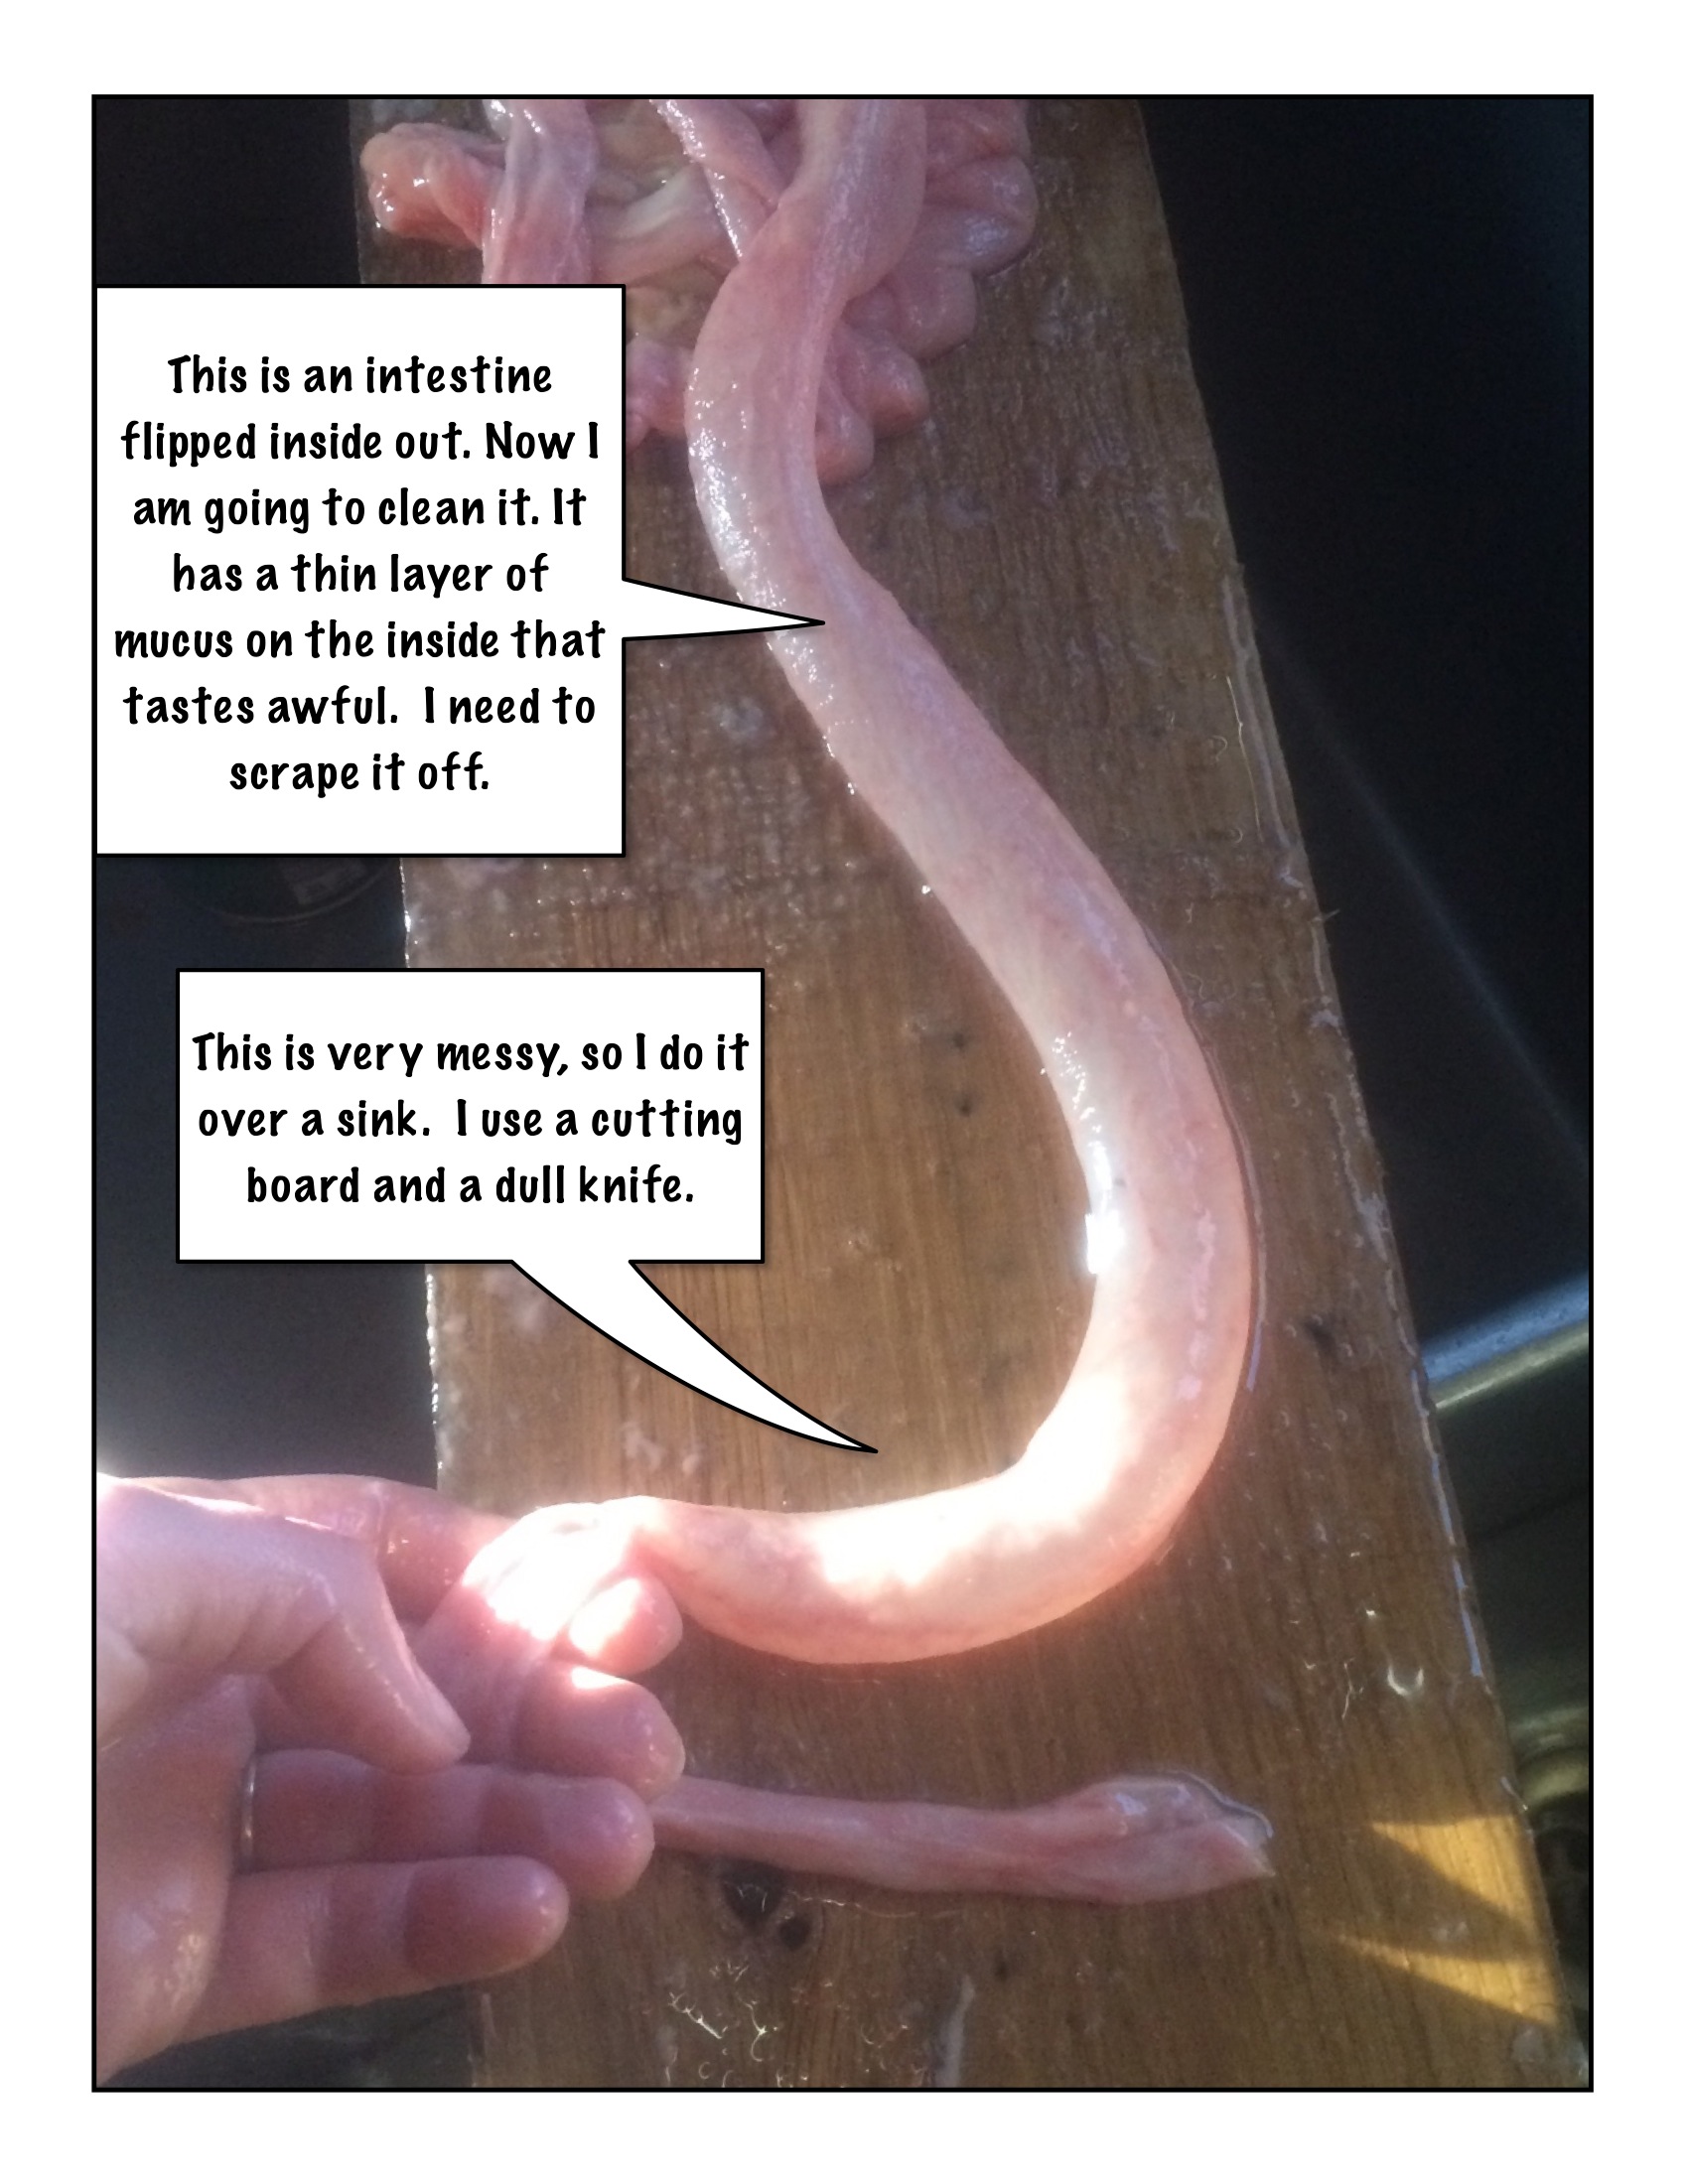
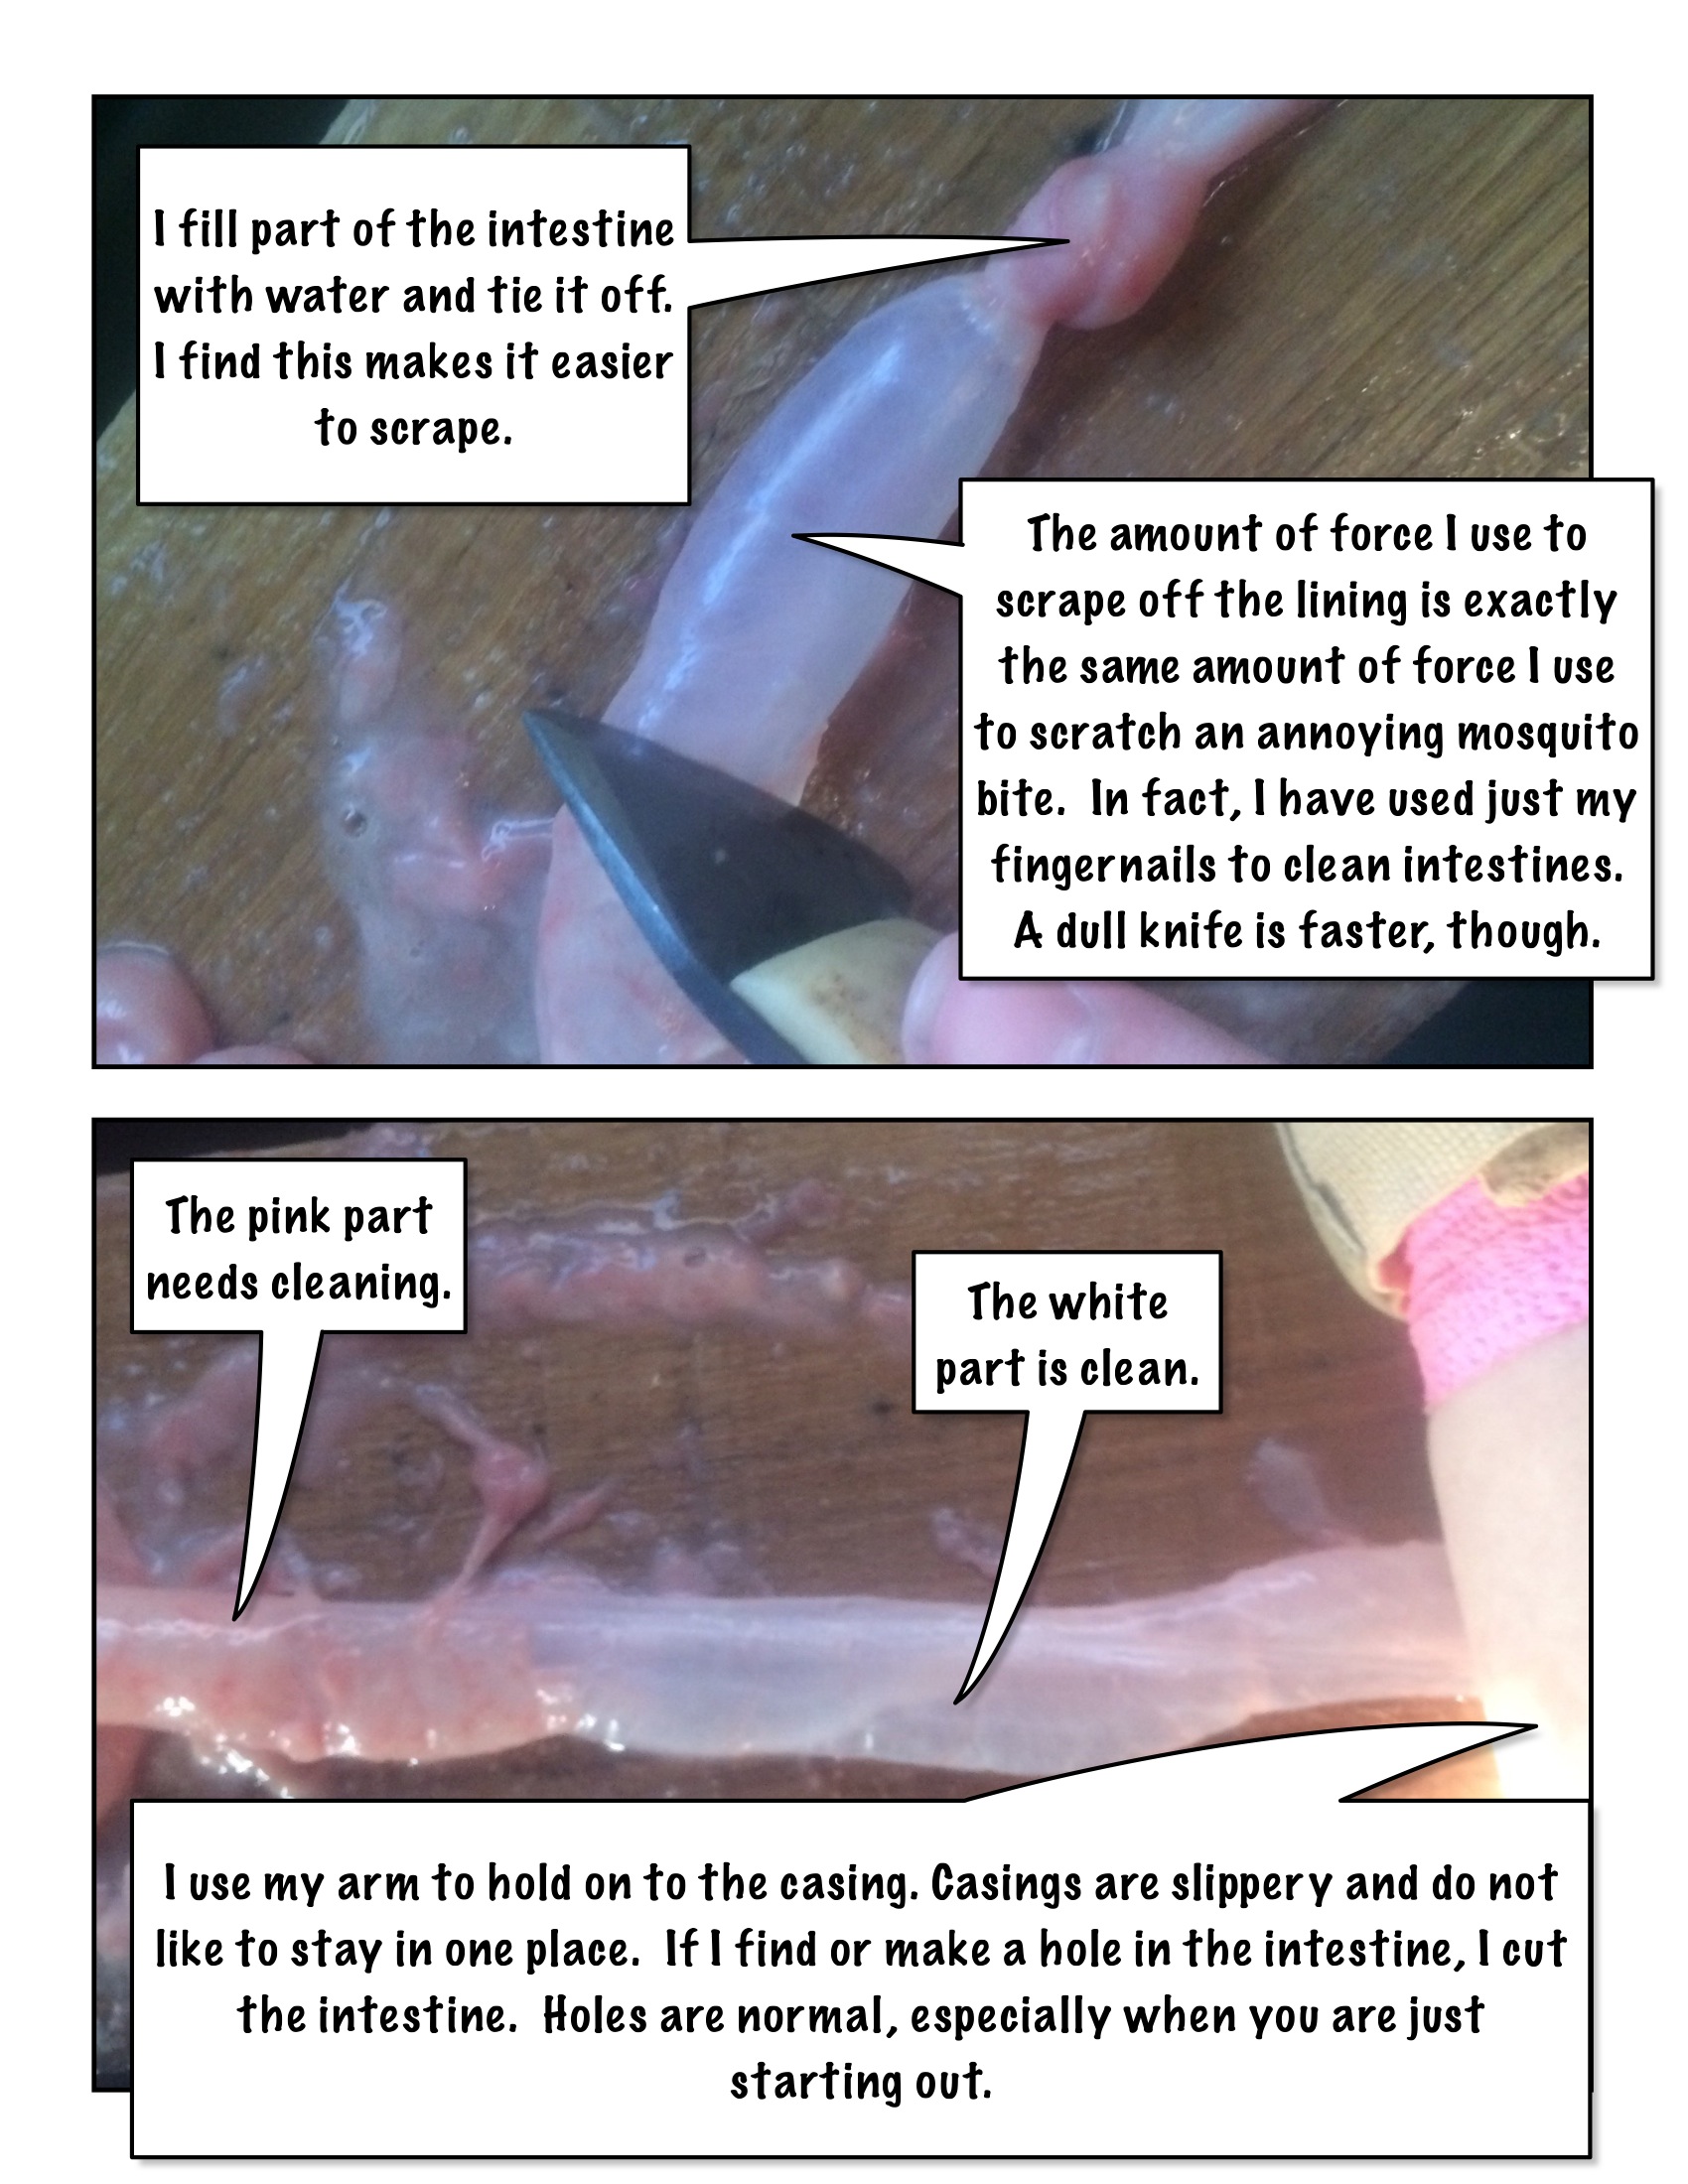
Set up a lightly tilted cutting board in a sink. Make sure the board is braced securely. Take one section of casing and run a little water in it. This will keep the casing aligned and untwisted as it is turned insde out. Turning a casing inside out is pretty easy. Start by flipping the first inch or so inside out like a rolled-up pants cuff. This creates a little pocket all the way round. Run water down in that pocket and feed the casing down into the pocket. The weight and lubrication of the water will pull the casing inside out. Casings are incredibly slick, so this happens fairly fast. If your casing gets stuck, sometimes your casing will get twisted or bound inside itself. Normally, a little agitation is all that is necessary and the casing should release.
It is worth noting here that casings go where water goes, and that includes down the drain. For the next step a short, sturdy, dull implement is essential. I use a special knife, but have seen it done with the back edge of a sharp knife, table knife, or even a spoon. Gently but firmly scrape the interior, intestinal mucous lining from the underlying smooth muscle casing. The mucus is a dark pink, while what is left behind is a transparent white. At the same time, the remnants of the outer mesantary membrane will separate, forming small balls of tissue on the inside that slide inisde the intestine forcing it always into an open orientation. If this tissue does not come out, you can flip the intestine back inside out a the end and peel it off by hand. There are thicker patches on the intestines with little circles that sort of look like golf balls. These are called peyer patches and are a form of lymphatic tissue. They are slightly harder to clean.
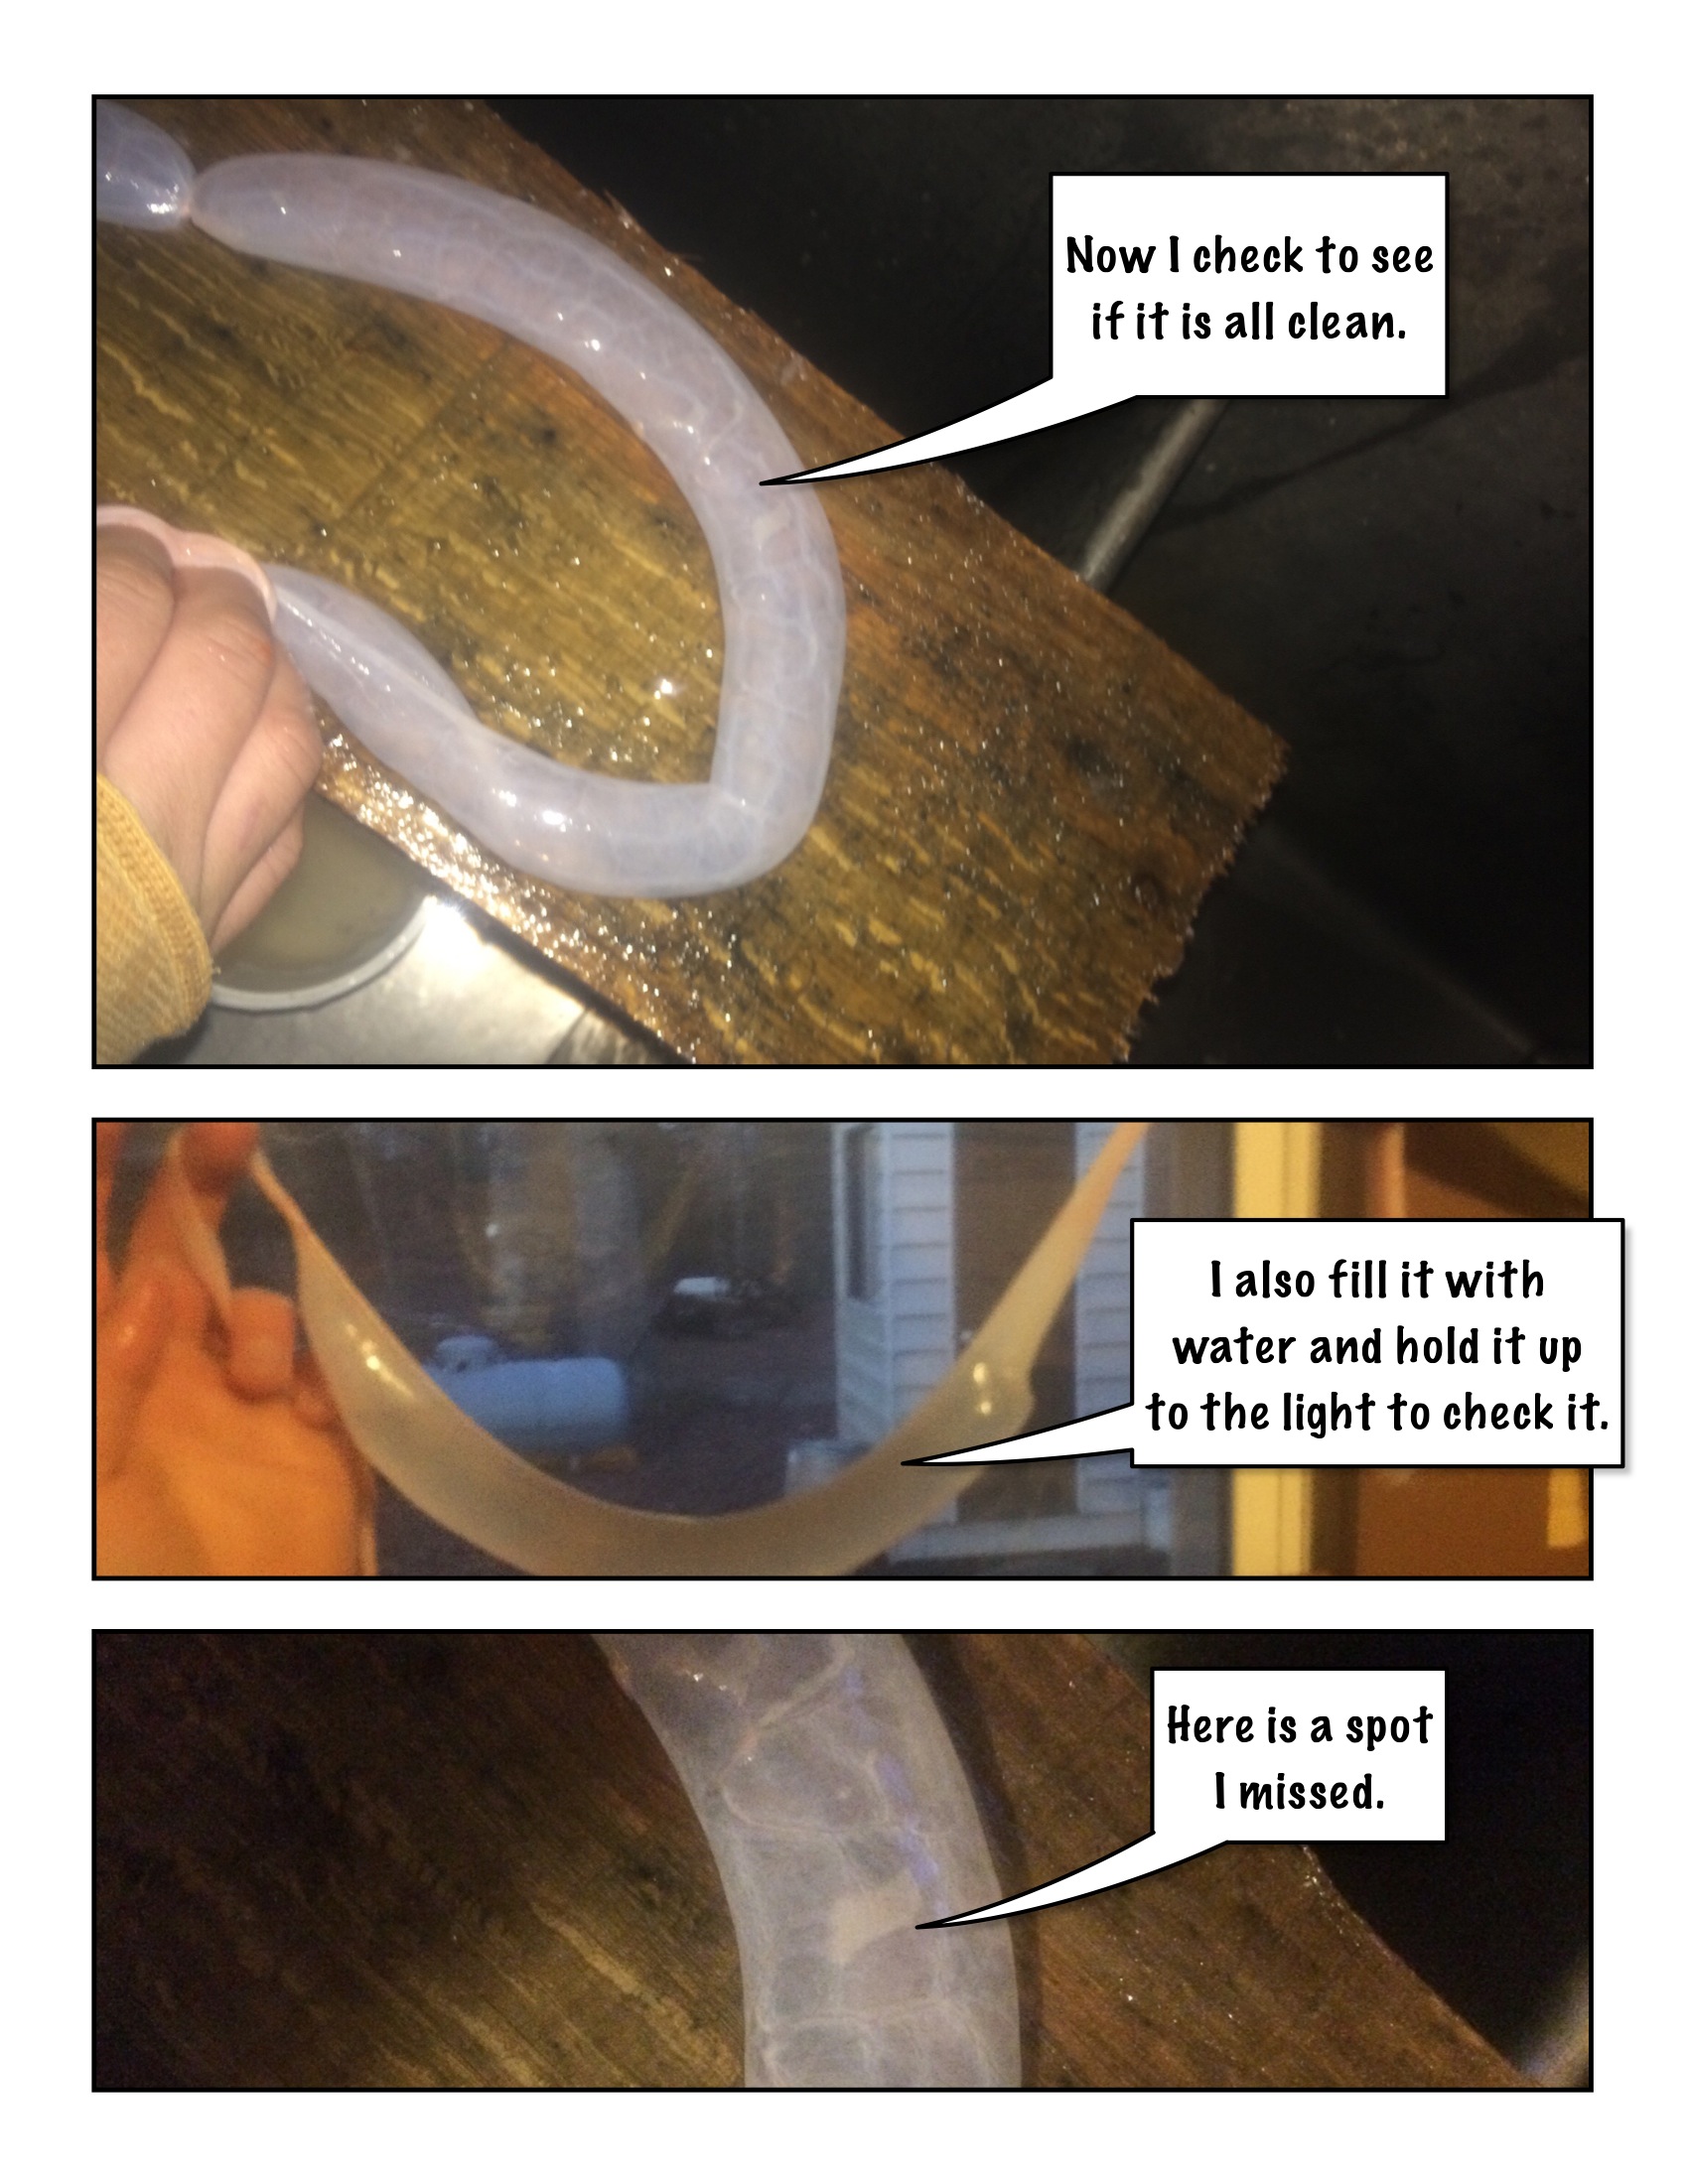
After a section has been scraped, it must be double-checked for small bits or remenant lining. Fortunately, there is an easy method of doing so. Fill one end of the casing with twelve inches of water, until a piece of the casing looks like a brautwurst of water. Starting at one end, roll the water brautwurst down the casing until you get to the other end. It will be very easy to spot missed mucous membranes and messentary. This is also a good way to find tears in the casing. If there is a tear, break the casing. If there is a pinprick hole, you can use a judgement call on breaking the casing.Casings shorter than 2-5 feet are an aggrivation at stuffing time, so it is often a choice between permiting a pinprick hole and having a short sausage.
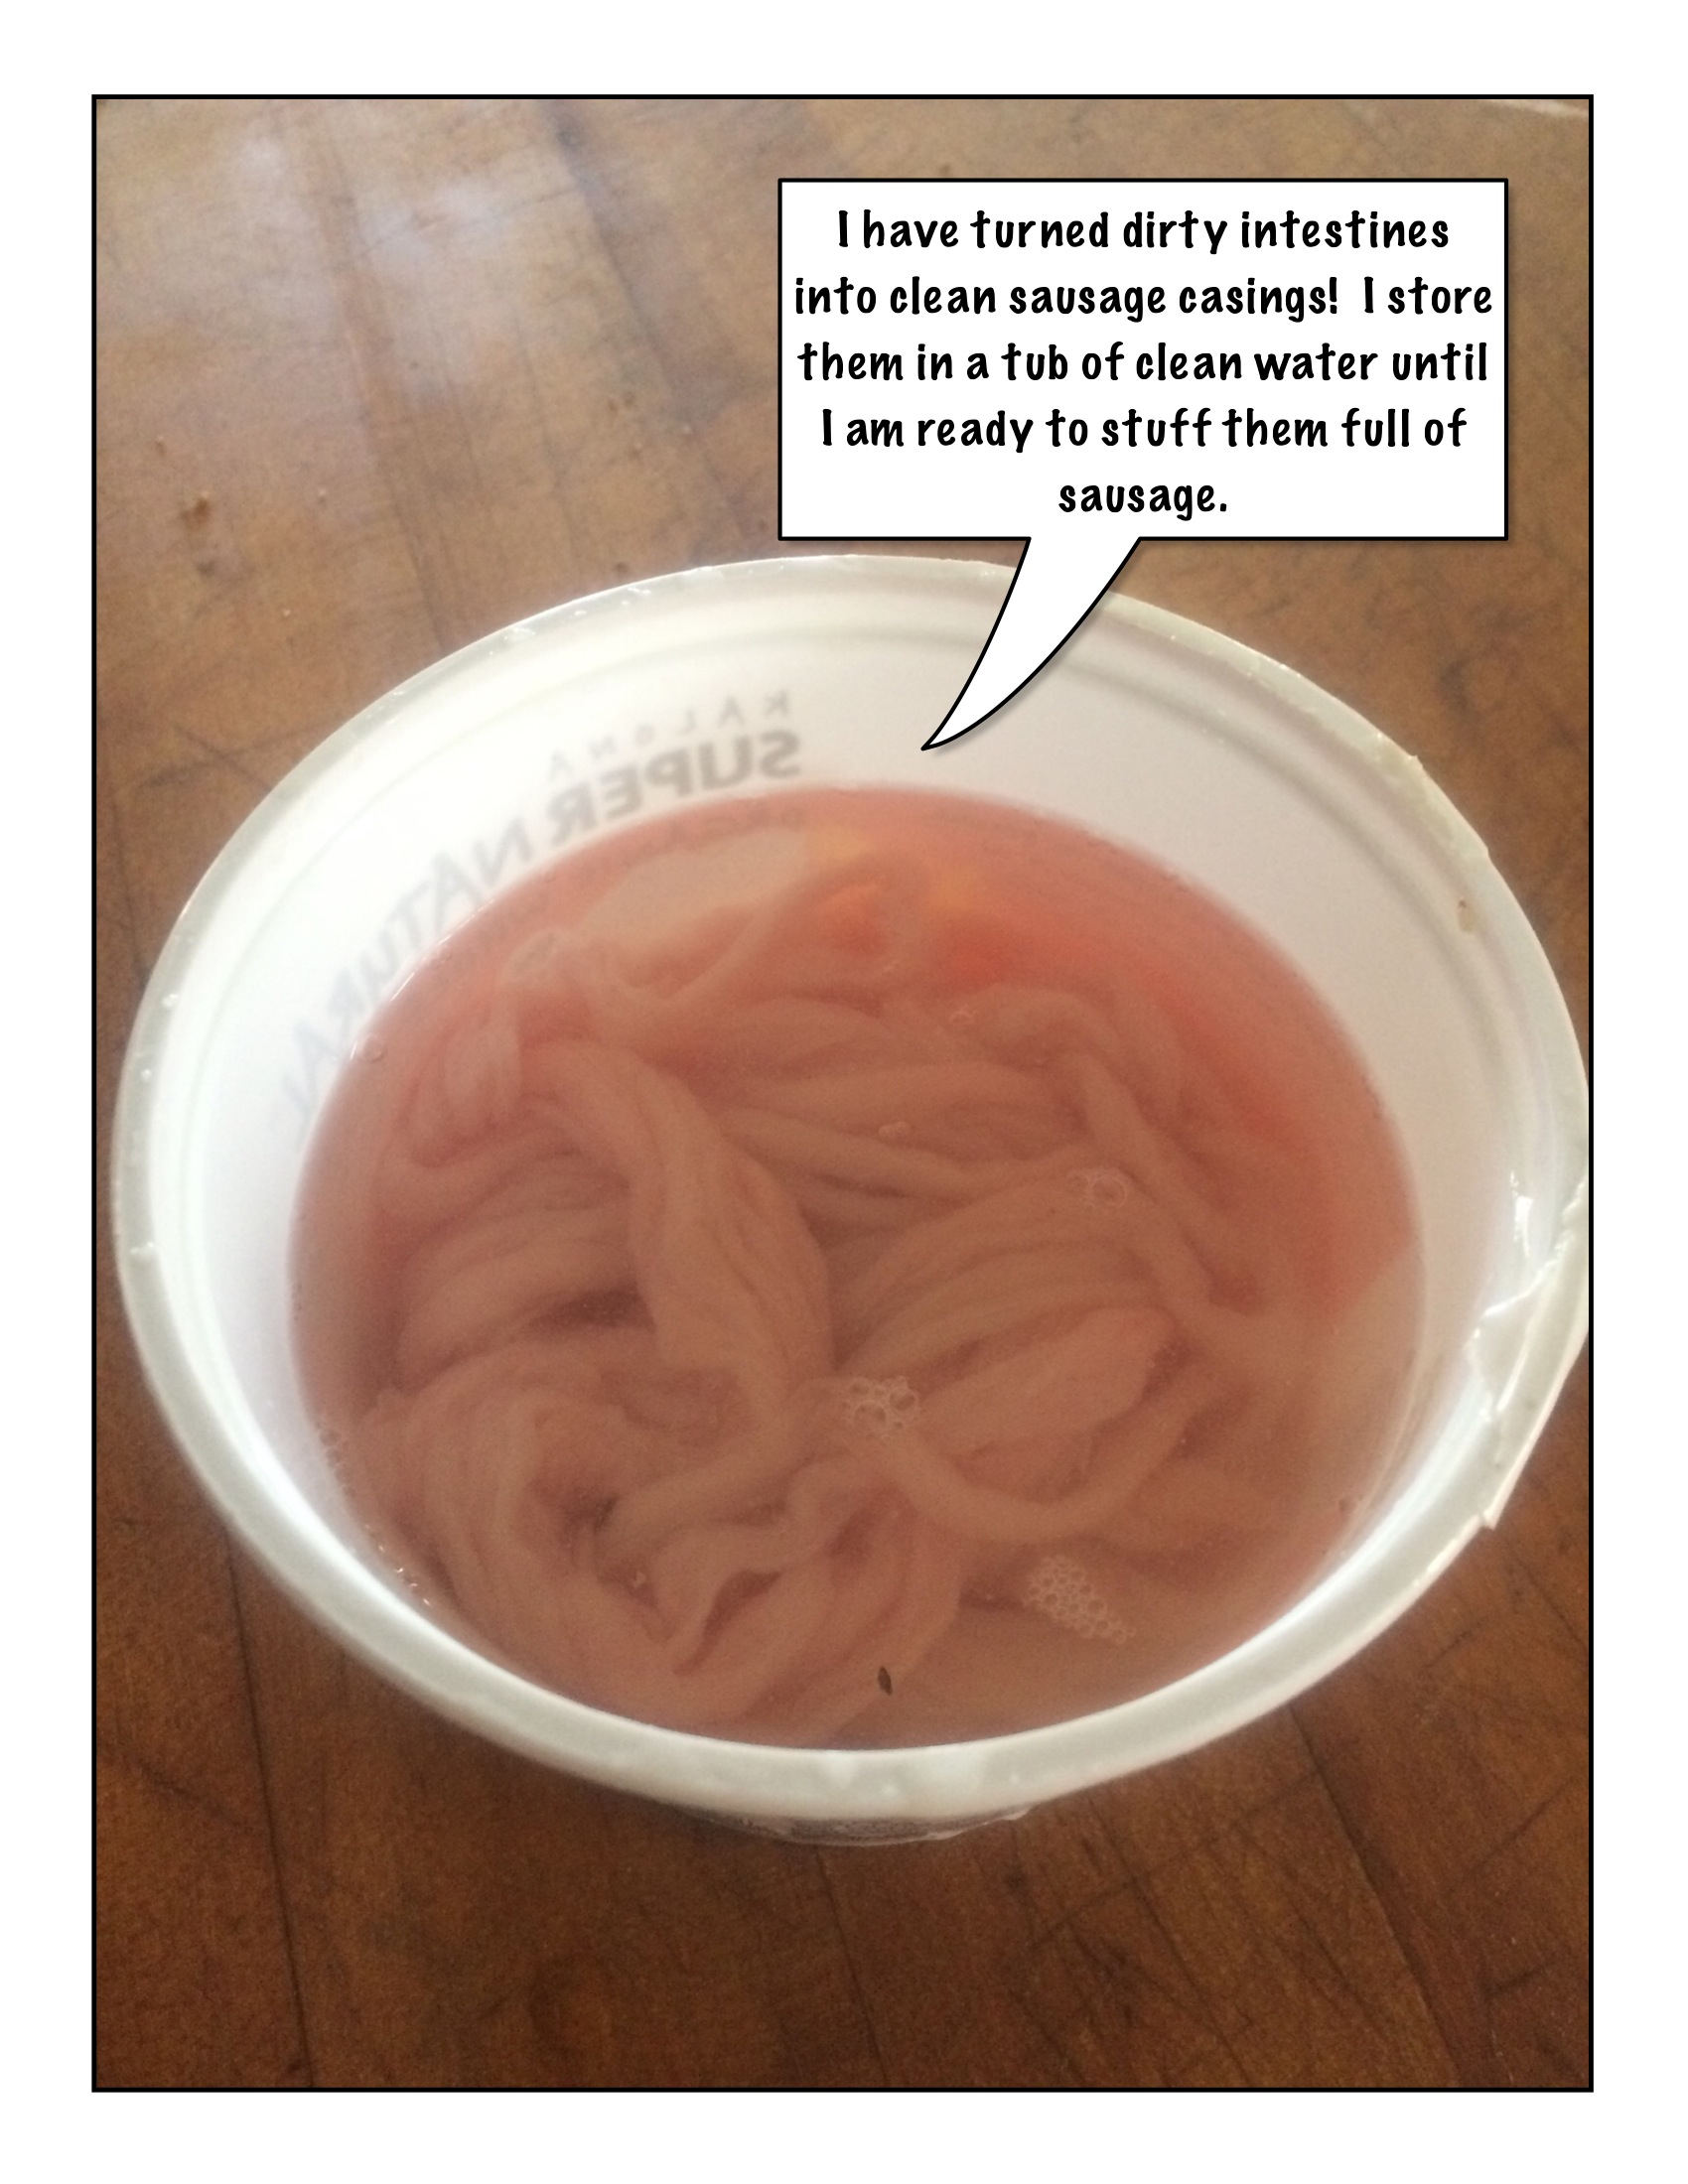
Casings should be refrigerated in water, which should be changed every day for a few days. For longer storage drain and pack with salt in a cloth. Soak and clush salted casings before use.
The stomach and blind bung are both cleared on a different principle. Their internal membranes are strong enough to be manually stripped or pulled away.
For the stomach, start on the greater curvature, looking where the intestinal sphincter used to be the difference betwen lining and smooth muscle should be clear.
Grab and pull the lining away from the stomach, working all the way around.
There are detailed instructions with the process of making headcheese in the second part.
Then blind bung is similar, but its membrane is much thunner and has the appearance of lacy fat. (it sits under a foul smelling mucosal lining) Again the trick is to sepearate gently and completely the innner lining and the outer smooth muscle tissue. I strongly recommend letting this casing sit in water in a cooler 1 - 2 days before cleaning, as this seems to loosen certain attachments between the layers. It seems if I clean the bling bung the first day I nearly always tear it right down at the bottom, but the problem is much reduced after 24-48 hours.
1.6 Cleaning the head
With the body and casings out of the way, it is time to return to the head. Start with a thorough washing. If the ears are clean and hairless enough to eat, scrub them. If not, cut them off and scrub out the ear canal. Try to wash out all blood. There will be lots of clotted blood where the bullet went through the skull, so it is worth it to stuck a hose through the hole and wash it as clean as possible. Try to wash food out of it's mouth- this may be difficult because rigor mortise has set in, but can be done by sticking a pipe up the trachea and washing food particles out through the mouth. Once you have scrubbed it as clean as possible, shave extra hairs. It is not necessary to remove the eyes because they are edible. It is very difficult to remove the eye because of the optical nerves.
[Need pictures of cut]
Take the well-cleaned head to a cutting board. Start by removing the jowel. The jowl is the huge layer of fat and blubber that hangs down under the face.
[Need better description of Jowel pg 7]
To remove the jowl, cut under the ear, across and above the right cheek, running up to a point under the chin. Do the same on the other side. Set the jowl aside for heavy or light curing.
With the jowel removed the tongue is accessible. Cut along the inside of the jaw bone on both sides until you reach the mouth cavity. The tongue is also anchored at the very front of the jaw. All that remains now is the root: cut it out liberally- working around the tongue bone. This allows you to thoroughly wash out the mouth cavity, since pigs are often fed right before death.
The final step is optional: split the head in half. Place the whole thing so the nose is pointed up. With a sharp knife cut down to the bone from nose to forhead right in the middle. Now take the cleaver and place the first inch of the cleaver on top of the forhead cut. Take a mallet and strike the cleaver smartly. This process requires cutting a lot of bone: unlike humans, pigs have pretty thick skulls and far smaller brains. Try to work with the tip of the cleaver, splitting the forehead first, then working down the nose and finally the pig's pallete. The last bone to break is the jaw, which is easy when the animal is young, and difficult when mature.
Splitting the head allows access to the brain, for eating or for tanning hides. Either way I recommend not putting the brains in stock. When you are done, wash the head again. Lightly salt the head and tongue and put overnight in a cooler.
1.7 Wrapping a finished set of smoke + cure pork products
If pigs are being done in tight succession, wrap the last of the previeous animal's bacons, ribs, etch the morking the crew is killing the next one, while it is still being scalded.
Bring each piece in and pat it dry. Some items, like hocks, can be wrapped whole. Other items, such as bacons and ribs, must be cut down to reasonable size. Cut ribs abarp in groups of 2-3, then use the cleaver to chop in half lengthwise. Cut bacon into slabs that fit in the slicer.
There are specific wrapping suggestions at the tend of the document, but the most important part is to try and create an airtight seal. The salt will encourage bacon to go to rancid, even in the freezer, after an extended period. an airtight seal is the best defense.
Day 1 Summary
- Kill the pig
- Scald the pig
- Gut the pig
- Remove, lungs, trachea, pericardium, genitles for use in stock.
- Remove heart, kidneys, spleen for adding to sausage
- Remove liver, which is good for pate or liver sausage
- Remove esophagus, stomach, caul membrane, bladder, and small intestines for casing
- remove kidney fat, messentary and other clean fats for rendering
Split the pig in half. Cut off pig's head. Put the pig halves in refrigerator
-
Process the head
- wash head
- remove jowl
- remove tongue
- split head and remove brain
- wash head again
- lightly salt head and tongue
| Day / Main Objective | 3.stock | 7. Sausage | 1.casings | 8.Fat | 4.fresh roast | 2.Headcheese | 5.Light cure | 6. Heavy cure |
|---|---|---|---|---|---|---|---|---|
| Thursday Butcher | Start veggies. Head meat scrap | Select meats and fats | Change water and flush | Begin rendering soft fat once all collected | Cut roasts | cook head in stock. Remove when done. pick. | Cut meats rub in salt inject hams lay in cooler | Select meats. Apply salt weight calculate brines + time |
Day 2: Morning: Butchering the Pig
2.1 Stock
Stock is invaluable. As the animal comes apart there are pieces not directly edible- bones and tough sinews, bloody meat from the neck, glands, an skin. Most of these materials are rich in collagen- the protein that literally binds the body together. Through long cooking that collagen breaks down into gelatin. Cooking also leaches many nutrients, like calcium, from the bones. The result is an unctous, flavorful, nutritious reduction of Pork (or beef or chicken...)
Since stock is such a natural byproduct of breakdown, start it first. Then it is trivial to deal with all of your scrap.
Stock starts with vegetables. Carrots, onions, garlic and celery (or celery seed) are standard. Bay leaf and tomato product are good additions.
See "Process overview: Stock" for the recipe.
Later, as you will see in the head cheese section, you will put the pig head and tongue in the stock pot to cook.
2.2 Sausages
Sausages cannot be made until there is some sausage meat, and that won't happen until the animal is butchered.
2.3 Casings
Clean the stomach. [Explain how]
2.4 Fat
The basic process for grade A lard is to collect all the messentary, leaf lard, kidney fat, and chop it or run it through the grinder. Put the fat in a pot with enough water to float it. Let the fat gently boil. At the end of the day you will need to turn off the stove and let it rest.
2.5 Fresh Roast
Now it is time to butcher the animal.
Butchering a pig is fairly simple once you grasp the basic primals. Let us work from the front to the back.
Of course the first primal is the head. Here I give the instructions to turn it into a form of headcheese, but souse (headmeat and cormeal) and Bathchap (face bacon) are equally valid. [ no instructions given]
Next comes the shoulder. Italians cut between the six and seventh ribs. Americans between the third and forth. On small pigs, I don't separate it at all. Anyways, this part has a food - good eating on young pigs, and a good addition to soups, stews, or headcheese on old pigs. Front Hock (foreleg) is excellent lightly cured for pork and beans. On young pigs it make be baked like ham, but mature specimens require lengthy simmering. On the inside of this primal are ribs- cut meaty as spare ribs, or cut thinly and cured for flavor bombs or else ad to stock. Most of the meat (arm shoulder) I use for sausage. Some might find good chops or roasts here, but the shoulder is generally relatively tough. On large hogs save the heavy fatcap for stable heavy salt and smoke fatback. Some of the meat also suits for bacon and streak-o-meat. One more muscle from the shoulder deserves special mention. The coppa - neck muscle - is traditionally prized for dry curing. It likes above the shoulder, just on either side of the spine. Sometimes the shoulder is used whole or boned or partial, for a ham.
To butcher the shoulder, remove the front foot. Flex the foot as far back as possible- get it to really bend- then cut at the very front and middle of the flexed joint. The wrist joint is quite complicated, so sonce you find an opening work with it. From young pigs the foot is good simmered, chilled and dried then fried or broiled. From older pigs add them to the head cheese.
Remove the front hock by cutting in from the back through the tendon above the point of the elbow, then forcing it to flex forward. The joint is lower on the arm than many people first suspect, try cutting down to and inline with the crease of the elbow when fully contracted.
Remove the ribs by folling [what?] closely with a short or boning knife. Start on the top or bottom edge. The coppa is now essentially the muscle on top as the animal would have stood. With it seamed out the remaining meat can be separated into two more manageable cuts, shoulder arm meat and body-belly meat. There is a pretty significant natural seem to follow, but a few muscles must be seamed out or cut to get them apart.
Deconstruct the shoulder by muscle groups and remove all gross sinews for stock, reserving meat for sausage. Roast bones for stock. The much fatter body/belly meat, impressive pieces reserved for curing, or else use some skin off in liver preparations. To use for sausage cut into squared, remove the skin and roughly separate meat and fat. Precision is not required.
I leave skin on for heavy cured fatback, or perhaps a ham, but otherwise, throughout the carcass, cut extra fat from skin- collect the fat to use in sausage. Collect the skins for sausage too- if not using them for sausage throw them straight in stock where they contribute a great deal of body and gelatin.
2.5.2 comments, observations and tips on butchering
Others speak with more wisdom, authority, thoroughness and knowledge on the subject of cutting meat. Seek them out too.
The style I advocate does not use a saw: all butchering can be accomplished with a good sharp knife. This is because it seems all modern hand meat saws have disposable blades I am far too cheap for that. A sturdy cleaver may be had for $50-$70 on the used market. The black rubber dead blow mallet to go with it is $10. Money well spent unless you can afford an electric saw. A standard construction saw will do in a pinch but they are very difficult to clean and make a mess of adjacent meat.
Cutting with a knife means learning how to travel through the body, learning how to recognize muscle groups and seams. The further you take a study of anatomy, the better it serves you. This is doubly true for the skeletal system. This system requires accurately finding and dismembering joints. Practice on young animals first: they come apart with ease. Age turns cartilige into bone, and sinews and ligaments grow tough. Flex and feel any joint you work on. Put the knife down and bend the joint. Think about the human corollary: experience in one species applies to another. There are differences but we are all built the same. Feel, when possible, work with your hands. They can certainly tell more about what's going on under meat than untrained eyes.
When you cut into a joint it will open a little bit and some fluid (synovial fluid, clear and viscous) may release. The joints are held all around, however. Ligaments, sinews that connect bone to bone, are white, so at first they look like bone. Ligaments are also hard to cut. Get the tip of the knife under the ligaments and then use leverage to sever the ligaments. Free the front and side of a joint and depending on the location you may be able to break it using the body's leverage. Above all, go slowly and don't cut yourself.
Instructions on where and how to cut are useless without the "why." Conversely, once a butcher viscerally understands how meat fits together and which meats are best cooked one way or another- she can vary the cuts to accommodate different serving sizes, or different sizes and breeds of animal.
- Head High in collagen/gelatin- use in stocks/soups
- feet + tail- cure or headcheese
- shanks high in collagen/gelatin-tough if baked. Excellent for braising or stewing. May be cured or smoked
- Shoulder generally tough, some muscles are tender enough for roast or steaks, but too small for east wind. Shoulder gets ground, but some meat is good for curing.
- Loin: money meat. Oven roasts, steaks, even on old animals.
- ribs: cut thick for BBQ or thin and cured for stews.
- Belly: best cured for BACON! or pancetta
- Ham - Bone in or out, fresh or cured, or ground for sausages.
2.5.3 Belly and Ham
The remaining two Primals are the belly and the ham. Begin separating these by removing the tenderloin on the inside of the spine. This is the most tender cut on the animal and makes ideal roasts or steaks. To remove the ham, fell for the curvature of the sirloin tip: [ is the ham the tenderloin?] the front of the ham. Follow that natural seam between belly and leg up toward the spine. It is also necessary to separate the leg for the pelvis, following along the outside of the bottom of the pelvic girdle come to the ball and socket joint. There is a thick tendon in the middle of the joint as well as several surrounding sinews and ligaments. With the ball and socket separated all that is left is to take the ham as large as judgement dictates. The largest ham is made by simply boning out the pelvis and completing the cut between belly and ham at the end of the loin (front point of the hip.) A smaller ham can be made by cutting straight down, parallel to the spine and pelvis after separating the joint- beware of the outside head of the femur which supports all that thick ham meat. Of course, the side may be varied between these extremes, all the meat above the pelvis is "sirloin." and will be dealt with in the ham section. Putting that aside for now, return to the middle.
The basic subprimal cuts for middle are Bacon, Ribs, Loin, and fatback. These can be cut in a number of ways. Bacon can be skin on or skin off. Ribs can be cut thick for GGX or thin to make more bacon and flavor bomb ribs. Bone in the loin can make standing rib roast or pork chops- bone out roast, and steaks work equally well. On small pigs I remove the ribs and spine, but cure the rest up(belly, loin and fatback) all together for the most possible bacon. On moderate pigs I make bacon up to the loin, loin into a cured or fresh roast, and a skinned fatback reserved for sausage. On the largest hogs the fatback is left skin on and the thick fatback cured. All of the middle cuts are excellent fresh or cured. Trim from the end of the bacon especially looser fat from near the ham is good to render. Meaty trim is good for sausage. The thick fat on the inside of the ribs is leaf lard and very good for rendering.
To fully break down a middle, start by removing the leaf lard. Next, working from either the bottom of the ribs or the top of the spine, separate the bones. Watch out for and be sure to remove the cartilage at the bottom of the ribs. Stay close to the bones as you remove them. Cleave the ribs from the spine and set aside to cure. Roast the spine and add the stick. The loin should now easily separate from the belly and fatback. Cure it or freeze fresh. Watch for heavy sinews on top of the loin and remove them. Cut the fatback from the belly skin for sausage or cure as is. Light-cure the belly for bacon, skin on or off.
Finally, return to the ham. Assuming the whole sirloin was left on (largest possible ham) trim the top edge of the ham to a pleasant shape and useful size. This removed piece is sirloin: excellent meat to trim for sausage, though some may prefer a roast.
For a ham the foot and hock may be removed or left attached. To remove the foot cut through the achilles tendon, then force the foot to flex forward this it wll help you find the joint. The hind hock is somewhat difficult to judge at first, but the rear edge occurs just where the ham goes from concave to convex. The front edge is slightly higher and is built very similar to our knees.
The ham itself may be cured skin on or off, bone in or out, or even seasoned into roasts for curing or freezing fresh. For a mild-cured hame remove the femur and the skin. For heavy cured "ham in a while" leave the back leg relatively intact. Disturbing it will only encourage bacteria.
This is a good place to treat the tail too. Simmer it long until tender, let it chill and dry a day or two then roll in flour and fry. A better treat from young pigs. from large ones add it to head cheese.
[section needs copious pictures or references ]
2.6 Head Cheese
Take the pig head out of the refrigerator and put it in the stock pot to cook. At the end of the day you will need to take the head out of the stock pot and pick all of the meat off the bones.
2.7 Light Cure
Nothing can be done with the meats until the butchery is done. [make a list of pieces of meat for light cure]
2.8 Heavy Cure
Nothing can be done with the meats until the butchery is done. [Make a list of pieces of meat for heavy cure]
Day 2 afternoon Prepping Meats
2.1 Stock
At this point, after butchering, you will probably have a lot of meat scraps and tendons. Put them in the stock pot if you haven't already.
2.2 Sausage
Nothing needs to be done with the sausage meat and fat at this point.
2.3 Casings
Change the water in the casings bucket. Run water through the casings.
2.4 Fat
Keep boiling the lard on the stove. If you have other pieces of fat, stick them in the stock.
2.5 Fresh Roasts
You have already cut them.
2.6 Head Cheese
The pig head should still be roasting in the stock. Remember to take it out at the end of the day. When it is done cooking, you will need to pick all of the meat off the bones.
2.7 Light Cure
Using East Wind Basic cure, take the piece of meat and rub the cure mix on it. Use just enough to get some everywhere on the meat and fat. Don't bother with skin: the salt won't stick or penetrate. There is no need to coat or pack the salt. When the meat is salted lay it down in a cask. See Process Overview: Light Cure for East Wind Basic Cure mix.
If you are light curing a ham, you will need to use brine. See Process Overview, Light Cure for how to inject brine into a ham.
2.8 Heavy Cure
Select meats.
For Heavy cure fatback, take thick slabs of fat from a mature hog, skin on. Pack them in a cooler, bucket, or wooden box - non reactive - with a layer of salt all around them - and the pieces well rubbed in too.
For heavy cure ham, create a brine solution. See Process Overview: Heavy cure for brine solution numbers. The brine needs to cool overnight before it can be injected.
Day 2 summary
Start Stock with vegetables and stock organs- add head and tongue Pull out and butcher pig- one section at a time. Separate
Products Fat to render fat for sausage meat for sausage Skins for sausage items for light cure items for heavy cure items to freeze fresh
inedible (hairy skin, bones, sinews, glands) add to stock as work proceeds. At the end of the day remove head and tongue from stock for headcheese. Be sure to pull bones while head meat is still hot [still no headcheese recipe]
| Day / Main Objective | 3.stock | 7. Sausage | 1.casings | 8.Fat | 4.fresh roast | 2.Headcheese | 5.Light cure | 6. Heavy cure |
|---|---|---|---|---|---|---|---|---|
| Friday Trim | clean and filter add skins and feet | measure kits. Cook skin and rice. Chill. | Change water and flush | continue rendering | Trim the roasts wrap and freeze | Cook feet. Pick feet. | Apply cool brine to hams |
Day 3- Sausage kits
Day three begins by clearing dish racks, putting everything back in order, and general cleaning.
3.1 Stock
Strain the stock- remove the solids for dog food or chicken feed or compost. Rinse the kettle (no soap) and return the stock. In the process remove as much liquid fat as possible and set aside for grade 'B' lard. Add all collected skins, as well as scrubbed and if need be shaved feet and tail if adding to headcheese.
Fat floats in a layer about an inch thick on top of the stock. To skim fat off the stock, use a ladle and skim it like you would skim milk.
3.2 Sausage
While the skins are being cooked, it is a good time to trim the sausage meat.
Before meat can be portion into "sausage kits" it must all be trimmed of heavy sinews(thick, opaque pieces) and cut into cubes small enough to fit down the grinder without effort. Also remove glands, bloody or soiled meat and excess membranes. Once all meat is trimmed weigh it out for sausages. Add to each kit the appropriate amount of cubed fat, salt, and spices. Determine the necessary amount of grain and pull enough clean stock to cook it in. Suggested details are given on the sausage process page.
If the skins are not yet done, use the time to catch up on curing, overhauling or packaging meats, or pick the head meat, rejecting bloody shattered or hairy parts. The snout, palette, cheek meat, and meat behind the eye are all very good. The eyeball is fine, but cut it and remove the hard white part and black lining around it.
When the skins are done remove them and run cold water over the skins so they are not scalding hot. Reject bloody/bruised or very hairy skin. On a flat surface with a dull knife scrape remaining fat off the back of the skin. When all the skins have been processed run them through the fine die meat grinder while still moderately warm. Fat and rejected skin go back in the stock.
Portion the skins and rice, but hold them separate from the sausage kits. Depending on your process grinding may happen on day 3 or 4. Be sure to have several hours left before grinding and stuffing. Once a kit is ready spread the spiced, salted meat and fat out on trays so all is once layer thick and freeze for 1-2 hours, until the meat has firmed, but is not frozen hard. If this happens, let the meat thaw until it is just getting squishy. Freeze the washed and dried grinder at the same time. Acquire a stand mixer bowl and paddle attachment too.
When the meat is just right send it through the coarse grinding die. Clean the blade and switch for the fine die. Grind some or all of the meat with the skins and rice through the fine die. Leaving some meat coarse will give the sausage a rustic texture. Not freezing the skins and rice help them grind. Feeding meat and fat running through the coarse then fine dies helps keep the die from clogging with sinews.
Put the whole forcemeat in the mixer bowl and mix on speed 1 for a minute, then add any liquid and switch to speed '2' for another minute. This develops bonds in the protein of the meat so the sausage sticks together. Fry a test patty and adjust seasonings if necessary.
3.3 Casings
Change the water and flush the casings.
3.4 fat
Turn on the fat rendering pot and let it keep simmering.
3.5 Fresh Cuts
Trim the roasts, wrap, and freeze.
3.6 Head Cheese
Remove the feet from the stock and pick the meat off of them. Add the meat to the head cheese mix.
3.7 Light Cure
Nothing needs to be done on the light cure today.
3.8 Heavy Cure
The brine has been sitting out overnight. Now it is time to inject the brine into selected hams. See Process Overview: heavy cure for instructions on how to inject the ham.
| Day / Main Objective | 3.stock | 7. Sausage | 1.casings | 8.Fat | 4.fresh roast | 2.Headcheese | 5.Light cure | 6. Heavy cure |
|---|---|---|---|---|---|---|---|---|
| Saturday Grind | clean and filter add leftovers and leave lid up to reduce | Grind, mix, stuff | Flush and stuff with sausage | continue rendering | Grind + season meats. Sew stomach and stuff. poach in stock | Overhaul A.M. | Overhaul remove previous pig |
Day 4
4.1 Stock
Clean and filter the stock. Add any leftover meat scraps to the stock. We will not reduce the stock today, so leave the lid up.
4.2 Sausage
As soon as a sausage is mixed, it is ready to be stuffed. Chub bags are probably the fastest way to do this. Casings and chub bags basically require a stuffer of some sort.
Every time you make a new batch of sausage, clean the sausage grinder. Because sausage is ground, all of the surface area of the sausage has been exposed to air and has the potential for contamination. Washing the grinder between kits of sausage keeps the possibility of contamiation
If you lack access to a stuffer, not all is lost. Take extra care when harvesting the caul. It can be used like organic saran wrap to make creppinettes. Let the caul-wrapped sausages dry a bit, overlapping side up and the membrane will stick to itself. Extraordinarily fine and thin, the caul membrane needs only a single layer with an inch or so overlap. To make crepinettes, take a 3 or 4 oz pattie of meat and put it near the edge of the caul. Cut a square a few inches large- enough to wrap the pattie, which often ends up rather flat and round and triangluarish.
In stuffing sausage links, sausage sticks are a necessity. Andy strong, small diameter stick which fits on a rack of your choosing will work. The idea is to stuff and twist off links. Some stuff one, twist one, some stuff a whole casing then twist all the links in. I like to stuff 2-3 ft of casing fairly loosely, then twist. Every 4-6 inches I grab and twist, forming a link. I rotate the link 4-10 times, in alternating directions. Tie a knot in the end of the casing at the beginning and end. Loop the finished sausage chain onto the stick, four-six sausages per loop. Intestines coil in this way naturally, so it should come easily. The stick supports and holds tension in the sausage chain so that the links do not unwind.
By holding the sausages in line and apart, (not all bunched) the casings will dry. Where the links were twisted off, the casing dries out and sticks to itself, sealing itself. The next morning sausages can be cut from one another without losing structural integrity.
Sausage sticks also simplify moving and handling batches. Move the while stick into the smoker or cellar as a unit. Label sausages with a loop of string and a piece of masking tape. By sausages are white oak wood, unfinished, cut into equilateral triangular sticks about 3/4 of an inch tall and 24 inches long. They fid on the racks in the meat fridge and cheese safe, and can fit on the hooks in the smoker. About 10lb meat fits on one of these sticks.
4.3 Casings
Flush the casings one last time. Today we are going to stuff them with sausage.
4.4 Fat
Turn the fat rendering pot back on.
4.5 Fresh Roast
The fresh roast cycle is complete.
4.6 Head Cheese
Take the head cheese meat and run it through the buffalo chopper. This creates a nice, coarse texture in the head cheese. It can also be ground with the grinder, but the buffalo chopper makes a better product.
After it is ground, stuff the meat into the stomach and sew the stomach shut. [add bit about sewing corner of stomach]
Put the packet of head cheese in the stock to poach. At the end of the day, take out.
4.7 Light Cure
Overhaul the light cured meats. [what does this mean?]
4.8 Heavy Cure
- Overhaul the heavy cured meats. [Expain this]
| Day / Main Objective | 3.stock | 7. Sausage | 1.casings | 8.Fat | 4.fresh roast | 2.Headcheese | 5.Light cure | 6. Heavy cure |
|---|---|---|---|---|---|---|---|---|
| Sunday Misc | reduce | Smoke and pack | Pack in extra salt. | complete rendering between now and tuesday. Make cracklins. | odds and ends | smoke | Remove thing to dry last thing PM. | Smoke previous pig |
Day 5
5.1 Stock
At this point, it is time to reduce the stock. This involves letting water evaporate from the stock. [Explain this]
5.2 Sausage
Hang the sausages in the smoker and smoke them for a day. At the end of the day, pack them [pack them where?]
5.3 Casings
If there are any casings left, take them out of their water bath and pack them in salt. [explain about how it dries them out]
5.4 Fat
Complete the rendering between now and tuesday. Make cracklins
5.5 Fresh Roast
Take care of any odds and ends you have left. [is there more to it than that?]
5.6 Head Cheese
Put the head cheese in the smoker and smoke it.
5.7 Light Cure
At the very end of the day, remove the light cured meat from the curing coolers and hang them in the refrigerator to dry. [Explain about string]
5.8 Heavy Cure
The previous pig will have been curing for about two weeks. It is time to smoke the cured meat. Put them in the smoker.
| Day / Main Objective | 3.stock | 7. Sausage | 1.casings | 8.Fat | 4.fresh roast | 2.Headcheese | 5.Light cure | 6. Heavy cure |
|---|---|---|---|---|---|---|---|---|
| Monday Packaging | reduce | pack | Pack | package | Smoke | |||
| Tuesday Packaging | pack | clean cooler | package | Smoke |
Days 6 and 7
6.1 & 7.1 Stock
On day 6, reduce the stock even more. On day 7, pack the stock in the freezer
6.2 Sausage
Pack the completed sausages away. [explain how]
6.4 Fat
Pack the rendered tallow away. [explain how]
6.5 Fresh Roast
Clean the cooler [how]
6.6 Head Cheese
Package the head cheese. [explain what to write]
6.7 & 7.7 Light Cure
Spend Day 6 smoking the light cured meat. Also spend day 7 smoking the light cured meat.
This completes the main sequence of EW pig butchering, but there are other parts bes considered as processes and product which happen alongside the main sequence. Finishing all of these processes takes the rest of the week.
Part 2: Processes
Chapter 1: Process overview: stock
Everything that doesn't have any other place can go into the stock pot.
Organs, sinews, glands, fat which is neither pure for rendering or hard for sausage, and other small bits get dropped directly into the steam kettle. Bones may be added directly as well, but my favorite process is to rub bones with tomato paste and roast them at 250-350 degrees Fahrenheit for 1/2 - 3 hours. Sometimes I break bones like the femur and humorous by rotating and hitting them across their axis with the cleaver to release the marrow. Do this before roasting, which makes them brittle in addition to heightening the flavor and preparing them to release nutrients. The acid from the tomato paste will specifically help strip calcium.
Stock takes several days to prepare. Each morning after the first morning, strain all solids from the stock. I do this by scooping out as many solids with a strainer as I can. This will leave all of the liquid behind. Then I place a kettle underneath the draining valve of the steam kettle, putting a piece of cheesecloth over a strainer, but the strainer underneath the draining valve, and draining all of the liquid through the cheesecloth.
Let the drained liquid settle for a bit, then skim the fat off the top with a ladle as if you are skimming milk. Set the fat aside and put the liquid back in the steam kettle (make sure you close the valve before you do.) Keep the steam kettle at 180 degrees, although variations do happen. Try not to actually boil it for more than an hour a day.
Day 2:
- Run 10-15 gallons of H2O in the steam kettle
- - add 4-10 onions cut in half, skins on unless dirty.
- 6-12 garlic heads, skins on unless dirty
- 6-12 carrots, washed, topped, and split
- celery or celery seed to taste
- 1/2 - 1 c tomato paste (or reserve to rub on bones)
- Pig head and tongue, extra organs
- trim as it is generated keep stock simmering at around 160-180 degrees Day 3:
- turn the kettle off and drain stock into a bucket.
- dump bucket through double cheesecloth in a strainer into 15-gallon pot
- when lard starts draining out of the kettle, close the valve. Skim off any fat and add the last of the stock to holding pot.
- replace bucket and continue to let out lard.
- Remove solids out of the top of the kettle- reserve for dog food.
- Pour or ladle clean lard from bucket into a pot.
- Wash down the kettle with water only: scrubb or soak to remove particles. It does not have to be perfect.
- Return stock to kettle. Boil for 1/2 hour and resume simmer at 160-180 degrees. This is called straining and cleaning the stock.
- Add skins, feet, and tail to stock.
- Add trim as generated.
Day 4-5
1. Clean and strain stock.
2. Add trim as generated.
By day five the stock will be excellent. It can be used fresh, in one or two weeks. For longer storage stock freezes very well. However, 6 gallons is a lot of freezer room. For this reason I reduce stock very heavily. I aim for no more than twelve cups of finished product, and I aim for six to eight cups. At this level the stuff is black and shiny. It can be poured out and dried into a shelf stable form, but it loses some flavor. Frozen at this point, it can be thawed and diluted for soup, or to cook rice or beans, or it can be used full concentration in sauces of extraordinary unctuousness and depth.
To make a full reduction, pour as much as will fit in a deep hotel pan. This pan has a lot of surface area for reducing. Keep the pan at no more than a slow boil and refill it until all the stock fits in the pan, from now on keep the heat low enough to keep it from burning on the sides. After every inch of reduction or so switch to a clean pan, and when the level gets low enough switch to a smallish pot. If the accumulate on both sides gets burnt the whole stock may turn bitter.
When taken too far reduction may actually burn. If you stir the stock and can see the bottom of the pan for a second just behind the spoon, you are too close! Further reduction from here can be effected with a water bath, but flavor may get damaged.
I pack finished stock in N.B. jars, labled "Powerful Pork" or "Demiglaze" or "Soul of Pig" or some such thing.
Chapter 2 Process Overview: Head Cheese - preparation
Head cheese is a clever way of making something out of nothing. Cook and shred head/foot/tail, season it, stuff it back in the stomach, simmer in stock, press, and chill. Freeze until july, then bring it out labeled "Fully cooked lunch meat." What a trick.
First thing is to clean the stomach. Assume it was rinsed and it is now in the kitchen sink. The stomach lining does not scrape off like intestines- it is much thicker. Start with the stomach inside out. Cut off the "knot" from the junction with the small intestine until this is easy to turn inside out. Along that opening, and along the greater curvature the lining can be worked away from the smooth muscle layers most easily. From there work all the way around the stomach. There is a funny little blind sac at the opposite end of the stomach from the main opening. Now or later take a sturdy needle and cotton twine and sew back and forth to close off the funny sac - then cut it off. It makes for an ugly headcheese and people will realize it is a trick.
Prepare the head by removing the jowl and setting it aside. Except for washing, all the rest of the preparations (splitting, removing tongue, salting) are optional. Simmer the head 4-8 hours until the skull and jaw pull out easily.
It is easiest to pick the meat about 2 hours later, no longer burning hot, but not cold and set either. In picking head meat refuse hairy bits, bloody black bits, and any bits that might have bone. The best meat comes from the tongue then cheeks, then the large muscle behind the eye. Many things besides muscle are good, too. Snout and lower lip are good, but watch for stubborn hairs and cheek membrane. The eye is good, if the hard white part is removed from the middle. I find the black around it unappealing and rub that out too. There is good flesh around the base of the hear, but beware of small bones and cartilage from the ear structure.
If you add trotters the picking process is similar. There are lots of seismoids- small bones that let a tendon change direction. These can be only a few millimeters across so check carefully. Don't miss the yummy bit on the inside of the hooves and dewclaws.
Small pigs yield 2-3 lbs in headcheese. Large pigs yield 6-7 lbs.
For a 7lb head cheese:
60 g salt, 2-4 tbls vinegar 1/3 c PSG seasoning 1/4 - 1/2 c stock
Take all the picked meats and run them through the bowl cutter/buffalo chopper. Let some become a paste, and some remain distinct. Toss the meat with the spice mix and stuff in the stomach. It is possible to overfill a stomach: it will burst in cooking. If you are worried the stomach will end up overstuffed use a bladder or blind bung for the rest.
Once the meat is stuffed, sew the opening of the stomach up and drop the whole thing in a pot of simmering stock for a few hours. Best to keep the whole thing submerged with a colander or lit iff possible. Resimmering under stock the stomach contracts around the meat. The gelatin will bind and when cool the meat will slice cleanly and not break apart.
Chill the head cheese under oderate weight(5-10 lbs) overnight. The next day the headcheese may be cold-smoked (or not) for 1-2 days, then frozen.
Chapter 3 - light cure meats
Lightly cured meats are a delight in the modern kitchen. I use the following process on bellies, ribs, hocks, and loins - anything reletively small. I'm not big on skinning, so I normally don't, but it won't affect the outcome too much.
Making a batch of EW Basic Cure 3 1/2 lbs salt 1 lb sugar 1/2 c black pepper 1/4 c red pepper
Nitrates/nitrites are not required for these product. These substances prohibit botulism. Botulism grows in warm, moist, mildly acidic environments with no air (anaerobic). Since these products are all handled flat, and cold smoked cure # 1/2 is not necessary. Cure #1 - sodium nitrite - may be applied at the processor's discretion. It will cause a red color and change the taste.
Actually curing the meats couldn't be easier. Take the piece and rub the cure mix on it. Use just enough to get some everywhere on the meat and fat. Don't bother with skin: the salt won't stick or penetrate. There is no need to coat or pack the salt. When the meat is salted lay it down in a cask. I use plastic picnic coolers, but crocks or tight wooden boxs would undoubtedly be better. Soon liquid will leach from the meat and make a dark red brine.
After 36-48 hours "overhaul" in the cooler, take each piece out. Add more salt like before if it seems something isn't curing fast enough [how do you tell what is curing?] Repack the cooler- what was on bottom is now on top. Everything should get pressed in the cooler.
After 3-4 days, sometimes as long as 6-7 for tick bacons, pull the meat out. Rinse it and blot dry on a towel. Hang for 1-2 days in the cooler to let the meat dry. It will become tacky - called "forming a pecille" Once the meat feels a bit sticky, it's ready to smoke. Smoke doesn't stick well to wet meat.
Hang in a cold smoker and smoke 1-2 days below 70 degrees. When the meats have a light golden color, pul them down, blot then dry on towels, portion and cook or wrap and freeze.
If you are on top of the game, light curing, smoking, and packaging can be completed before the next week's animal comes in.
Light Curing a ham is slightly different. Small hams can be left whole but large hams it is better to skin and debone. Weigh the ham and prepare a 50 degree brine according to the chart.
| Ham Weight(lbs) | Cups Water | Oz Salt |
|---|---|---|
| 5.79 | 1 | 1.2 |
| 11.58 | 2 | 2.5 |
| 17.37 | 3 | 3.8 |
| 23.61 | 4 | 5.0 |
| 28.95 | 5 | 6.3 |
| 34.74 | 6 | 7.6 |
The goal is to inject 10% of the ham's weight in 50 degree brine back into the ham. Fo this scale production a simple 4oz brine injecting needle will work. If a ham still has it's bone, try to inject down along it. Concentrate on the thickest parts of a ham first. Inject into and in between muscles, coming back up from the hock end. Once all the brine is injected, rub the ham with basic cure and put it in a cooler. Wait 4-10 days for the ham to cure. Longer for larger, skin on or bone in hams, less for smaller, skinned, or bone out hams. When a ham is done curing wash it and let it dry. [where to dry? for how long?] If need be truss or net the ham (especially bone-out hams.) Smoke 2-4 days and bake [ for immediate eating] or freeze[ for long term storage]. [this part needs a little more clarity. ] In all curing, but especially light curing, cool temperatures are imperative. I kept the coolers up by the rooks of foopin's east porch- 10 degrees cooler in the afternoon than the west. Try to keep the meat between 30-40 degrees. Don't let it get warmer than 60 degrees for any length of time.
light cured ham
12 lb light cured ham
Trim up loose fat or glands.
Prepare a brine of 2c water and 25oz salt. Heat it to dissolve the salt, then let it chill overnight. Inject the ham and also rub some dry cure mix on the meat.
Hold the ham in a cooler 4-6 days. Overhaul twice. Smoke 2 days. Skin the ham if cooking immediately, leave the skin on if freezing.
25lb light cured ham.
Skin and debone the ham. Trim a bit, but not too much. Leave plenty of fat.
Prepare a brine: 5c water, 6.3 oz of salt. Heat it to dissolve the salt, then let it chill overnight.
Inject the ham and rub cure on every surface of the meat.
Hold in a cooler 6-8 days. overhaul at least twice.
Rinse and pat dry, then truss back into shape, hang and smoke for two days.
Bake and chill, then slice on a deli slicer for a real treat.
Chapter 4 Process Overview: Heavy Curing
Heavy cure fatback.
This was my first curing project and a real eye-opener. Take thick slabs of fat from a mature hog, skin on. Pack them in a cooler, bucket, or wooden box - non reactive - with a layer of salt all around them - and the pieces well rubbed in too. Literally bury the fat in salt.
Because fat has less moisture it never really absorbs too much salt. The only problem I've ever encountered is oxidation, which doesn't happen if you keep it packed tight.
After a few weeks, take the fatback out and smoke it if you like, then recheck it. Keep cool for the longest shelf life.
Heavy cure ham:
Meat treated like fat will keep forever - it can get too salty and become unpalatable. A more refined approach is needed. In salami Polcy and Ruhlman suggest a method much like light curing, but applying as much salt as the meat will hold, then holding the meat in the tanks for 1 day / 2 lb (1kg).
For hams I have had success injecting brine 70 degrees or stronger[hotter?]
| Ham Weight | cups | oz salt |
|---|---|---|
| 12.36 | 2 | [??] |
| 18.54 | 3 | 5.76 |
| 24.71 | 4 | 7.68 |
| 30.89 | 5 | 9.60 |
| 42.07 | 6 | 11.52 |
Also coat these hams in salt and hold them the prescribed time. [how long?] Once cured hang the hams in a shady cool shed to dry. Make these hams in the winter. They should hang at least a month. Some of this time can be in a cold smoker. I do not skin or debone heavy cured hams as the inside of the ham is naturally sterile and the skin acts as a tough casing.
In march when meat processing winds down I pack our heavy cured meats for summer storage. Take each piece out and remove any strings you don't need. Make a paste from lard, flour, black pepper, red pepper, and rosemary. Infuse the lard and spices if you think of it. Cut strips from cotton sheets and soak them in the paste. Rub the paste on the meat. Wrap, mummify each piece in the pasted rags, squeezing the excess off of the cloth before using it. Paste a label as well so you remember what this piece of meat is. Wrap again in clean clothes and secure the bundle with a bit of twine. Bury the treated meats in hardwood ashes from your smoker in wooden casks. A little mold may grow on the meat, but provided you complete the procedure before the flies wake up the meat will be safe through the summer. Fatback may be packed this way, too.
Finally, I give the aromatic cure component - rub this on your bellies and coppas, but do not smoke them.
2/3 c sugar, 1 1/4 c black pepper 2/3 c juniper berries 20 bay leaves 5 t. nutmeg 5 T. Thyme.
This will flavor several bellies. Cedar trees bear juniper berries.
20lb dry cured pancetta
20 lb belly for pancetta.
Trim up belly. Apply 4 tsp nitrate, as much standard cure mix as the belly will take, and hold in a cooler for 10 days. Overhaul twice in that time, reapplying cure if you like.
10 days later, remove belly, rinse, and pat dry. Apply aromatic cure component to taste.
Roll or fold belly. Tie into shape, optionally cover the edges with casing or compress with two sticks and two tourniquetts. [need imagery]Cure #2 is necessary to holl, tie, and press pancetta. If you prefer to omit it, hang the belly flat for not more than two months.
Hang in shady shed for 2-4 months.
35 lb ham in a while.
Trim glands, loose fat, flaps of meat.
Weigh the ham. Prepare a brine with 6 c water, 11.5 oz salt. Boil them to dissolve the salt, then let it chill overnight.
Inject as much of the brine as possible.
Coat the meat of the ham with dry cure mix as it will stick. [huh?]
Hold in the cooler 15-20 days. Overhaul about four times.
Rinse the ham and hang to smoke for 4 days, then in the salt shed until March 5 or so.
Take the ham down. Wrap it and lay in ash. Eat after all the fresh roasts are gone.
Chapter 5: EW Fresh Sausage
The basic methodology already given applies to these ratios. [Link back to the overview]
Standard Sausage Kit
12 lb meat (up to 25% organs) 4.5 lb fat 1.5 lb skin 3.5 lb brown rice
21.5 lb total
Grind the meat with the coarse die. Then grind meat with the fine die. Add 6 oz salt Add 1 spice mix ( see mix recipes for quanties) add 0 - 3 cups water or tomato wine
Beat meat with a butter paddle.
3.5 lb cooked brown rice
1.5 c rice 3 c stock bring stock to a bil, add rice, return to simmer and cook 30-45 minutes.
These spice mixes are nothing special- just what I use
Mild sausage mixes
3.5oz pepper 3.5 oz sage 3 oz garlic powder
use 2.2 oz per batch
Italian Sausage Mix
3.5 oz pepper 3 oz sage 3.7 oz oregano 3.7 oz fennel seeds 2.7 oz paprika 1.7 oz cayanne Use 3.6 oz per batch
Chapter 6: Rendering Fat
Fat renders fastest when it is in small particles. Render soft body cavity fats together without meat or blood for pure white leaf lard. Render fatty bloody hard fats in the stock pot, then skim the oil and refine it o the stove.
The basic process for grade A lard is to collect all the messentary, leaf lard, kidney fat, and chop it or run it through the grinder. Put the fat in a pot with enough water to float it. Let the fat gently boil, resting it overnight, until all the water boils away, all the fat melts and the remaining connective tissues fry up to a crispy golden brown crackin. It can take me 3-4 days because I hate to render when I'm not in the room. It's a fire hazard. Dry craklings on cardboard or newspaper and sprinkle on beets.
Grade B lard is even more straightforward. Collect strained grease off the top of the kettle. Heat it until it stops sputtering and a thermometer reads 250 degrees. Watch out if you miss this point: the fat can get very hot very quickly once the water is out.
Removing water like this helps keep fats from getting rancid. Do not pour into plastic buckets until it has chilled to below 180 degrees. Once the fat is cool, store in a refrigerator or freezer.
Grade A: Grade B: Baking Packing/confit Frying Frying Soap Soap
Chapter 7: Confit
I normally don't confit pork, but I do confit with pork fat, so I will briefly review the process.
This works best with mature, tough meats.
Lightly cure the meat overnight with nitrite/ate, salt, and spices
Cover the meat in rendered fat and bake at 250 degrees for 6-18 hours to desired tenderness. Let chill to handle.
Pour off fat. Pack meat in very clean pots or jars. Cover with fat- including a 1/2 inch cap. Put by in a cool place for 2-6 months. Lightly reheat in a hundred delicious, convenient ways.
Chapter 8: On Wrapping and Freezing
Ziptop bags are cheap and easy, but cannot accommodate different size cuts and leads to Freezer burn. Vacuum sealers are fantastic and not too expensive, but the bags cost too much for East Wind's budget. I use 18inch polycoated white freezer paper, $55/1000 feet, from Springfield paper co and 3M white freezer tape from Harps in Mt. Home.
For loose objects like ground meat and chicken halves, I fold up a bag, then stuff it. Otherwise the two main wrapping methods are like a present (meat square with paper) and like an envelope (meat not squared).
It takes 3 folds to turn a 3-dimensional corner, height, length, and width. Once something is wrapped, flip it over and, if practical, rotate the package 90 degrees, then wrap it again.
Label meat plainly: this is no time to get cute. Write the cut, animal species/name, date, and weight.
When you pack meat in the freezer, spread it out. If there is a large amount, like chickens, freeze in multiple freezers or in batches. A solid block of 100lbs of meat is hard to freeze.
Chapter 9: On Knives
Find knies you like and keep them. I have four I particularly use. Some may be able to do with less, and some will need more.
A short, dull knife.
Use this for scraping hairs when scalding and for cleaning casings. Mine is just homemade from an old lawnmower blade. No tempering necessary!A short, sharp knife- just as above, or a good pairing knife. A small knife is good for dexterity- following seams, removing the spine and ribs, and certain trimming tasks call for a short knife with good control.
A 5 - 6 inch boning knife - These come in many shapes: stiff, semiflex, and flex. This is the primary knife I use taking joints apart, trimming, and boning meat. Anywhere you still need accuracy and a longer blade.
A full-sized chef's knife: Use this for separating primals, cutting straight through large chunks of meat, and cubing meat for stew or grind.
Learn how to sharpen and hone these knives: it's not really difficult. Maintain an even angle somewhere between 10-22 inch and stroke the knife smoothly along a stone. When you can feel a light burr all along the edge, switch to the next finest stone.
Use a hone at least 2-3 times a day to extend time between sharpenings.